Suppose you are facing BSOD or blue screen of death, ndis.sys error is one of the errors that irritate you most. Whether you are also one of those experiencing this trouble, this article is for you.
What is NDIS?
NDIS is a legitimate component of our Windows OS. Network Driver Interface Specification is the standard form of NDIS. People use this application programming interface for network interface cards. In short, it allows drivers to work in the way that they are willing to do on a network computer. Besides, it is also useful for the device where it is installed. The reason is that it helps your machine to communicate with hardware and connected devices. However, people are still getting the error message DRIVER_IRQL_NOT_LESS_OR_EQUAL ndis.sys Failed.
What is ndis.sys?
Ndis.sys is one of a Windows system file related to Network Driver Interface Specification. Microsoft signed it digitally as it is a vital part of Windows OS. The location of the file is in the C:\Windows\System32\drivers folder. The file should not affect the performance of your computer or laptop. But various factors such as high latency can cause ndis.sys failed BSOD.
About Ndis.sys:
On 25th October 2001, the system file was released first for the Windows XP platform. The latest updated version [v10.0.16299.1004 (WinBuild.160101.0800)] was released on 4th July 2011. This file is available in Microsoft Office Access 2010 14, Trillian 6.1.0.17, and Windows 10.
As we have said before, the file doesn’t affect your PC or performance. But there are some reasons due to which users face issues like high latency, error message driver_irql_not_less_or_equal), etc.
Causes of ndis.sys Failed BSoD Error on Windows 10:
There are some conditions when you can face the error for different reasons. The causes of the error are:-
Outdated Windows:
Your Windows operating system may not be appropriately updated to its latest version. It can be a reason due to which you can experience the error. That’s why it is recommended to check if any update is available. Then, check whether the problem is resolved after doing this.
Recently Installed Software:
Sometimes, software installed recently can stop your system from running. Therefore, it is recommended to remove any recently installed software. After that, you should check if the error remains.
Check Software:
Your disk or system files in the operating system can be damaged, due to which your device will not run. We recommend users run a few scans on their machine in this case. Then, try to fix the problems.
Antivirus:
Sometimes, the antivirus installed on the PC can cause the ndis.sys Failed issue. Hence, it is recommended to disable it temporarily.
What are ndis.sys Error Messages?
There are plenty of reasons why users experience different problems with ndis.sys. The problems are related to SYS files that involve Blue Screen of Death (BSOD) errors in most cases. As we have said before, hardware problems, outdated firmware, corrupt drivers, or other software-related problems can be reasons for it. Microsoft Office Access 2010 update is an example of software-related issues.
These are a few messages that you can see on display—
- ndis.sys could not be found.
- ndis.sys failed to load.
- The file ndis.sys is missing or corrupt.
- Windows failed to start – ndis.sys.
ndis.sys Failed BSOD Error Message:
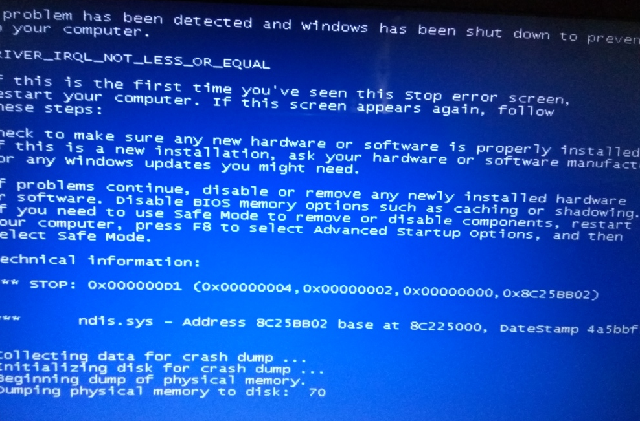
- “A problem has been detected, and Windows has been shut down to prevent damage to your computer. The problem seems to be caused by the following file: ndis.sys”.
- “:( Your PC ran into a problem that it couldn’t handle and now needs to restart. You can search for the error online: [BSOD] (ndis.sys).”
- STOP 0x0000000A: IRQL NOT LESS EQUAL (ndis.sys)
- STOP 0×0000007A: KERNEL DATA INPAGE (ndis.sys)
- STOP 0x00000050: PAGE FAULT IN A NONPAGED AREA (ndis.sys)
- STOP 0x0000003B: SYSTEM SERVICE EXCEPTION (ndis.sys)
- STOP 0x0000001E: KMODE EXCEPTION NOT HANDLED (ndis.sys)
- STOP 0x0000007E: SYSTEM THREAD EXCEPTION NOT HANDLED (ndis.sys)
How to Fix ndis.sys Failed BSoD Error on Windows?
We have given some ways to troubleshoot the error.
Solution 1) Update Device Drivers:
The most basic reason for this error is an outdated or corrupted device driver. Hence, we recommend updating the device drivers first in the Device Manager.
Keep your eyes on the driver and a yellow exclamation mark nearby. It means that the driver may be experiencing some troubles. If you haven’t seen any yellow exclamation marks, next focus on the network adapter.
Use device manager:
Use the default Device Manager tool as it helps to find the essential driver software online.
Windows 7:
- If you are using Windows 7, you should first tap on the Windows logo icon. After tapping on the icon, you can see the Start menu appearing.
- Next, your job is to tap on the computer. Then, you should choose the Manage option from the menu.
- Now, you can see the Computer Management screen.
- As soon as you enter the screen, you must choose the option Device Manager.
- Then, you should choose a device you use and tap on it.
- Finally, you should update the driver.
Windows 10:
- If you are a Windows 10 user, you should first tap on the Windows logo + X shortcut available on the keyboard. As soon as you tap on this, it will open the quick access menu.
- After that, your task is to choose the option Device Manager from the list of options.
- Tap on a device and then go for the up-gradation of your device’s driver.
- At last, choose the option that enables Device Manager to find the driver online. Always remember that you need to perform the above-mentioned steps for each hardware.
Update drivers manually:
Here, you have to do the step yourself. Therefore, it is essential to know the correct driver details required for your device to work correctly. Next, you should look for the software online. In this case, you should begin searching from the official webpage of the device’s manufacturer. While installing something, you should be careful as it can damage your system.
Solution 2) Roll Back Network Driver:
Some users reported that they had solved the issue by rolling back the recently-installed network drivers. Whether updating device drivers won’t help you, then it is an excellent choice to try.
The steps of restoring the earlier network driver are as follows:-
Step 1: First, your task is to head towards the Device Manager. After going there, you are required to tap on the network driver that you recently updated. Now, you need to select the option Properties.
Step 2: As soon as the new window appears on display, you must switch to the Driver tab. After that, your job is to tap on the Roll Back Driver button.
Step 3: A confirmation window appears on the screen. When it appears in front of you, select a reason why you are willing to roll back the driver. Next, you should hit the Yes button to continue.
After completing the process, you can restart your system to check if the issue is solved.
Solution 3) Scan Your Computer for Malware:
There are plenty of malware entities that can cause various problems. Therefore, it is essential to scan the PC for malware and potential viruses. If you are willing to know if the system file is a virus, check the file’s location. If the file location is not C:\Windows\System32\drivers, ensure that the file becomes a virus.
You can use the default Windows Defender along with the third-party antivirus program. This tool is also helpful as it can remove malware from the PC.
Windows 7:
- Hence, you should first find the Windows logo and S keys on the keyboard. When you locate them, you need to tap the buttons simultaneously. It helps to invoke Search.
- Then, you should write ‘Defender’ without quotes in the Search box.
- Now, you are required to move to the list of search results and choose Windows Defender from there.
- Tap on the Scan option after that available in the Windows Defender home window.
- Move to the arrow that is available next to Scan. Tap on the icon after that.
Finally, you should choose the Full Scan option.
Windows 10:
- Navigate to the taskbar first, and then your job is to tap on the Windows logo icon.
- Head towards the Start menu and then choose the Settings gear option.
- After that, your task is to tap on the option Update & Security. Next, you should choose the option Windows Defender.
- Tap on the Open Windows Defender link.
- Now, the Windows Defender Security Center window appears in front of you. Move to the left pane after that and then tap on the shield icon.
- Choose the Advanced Scan, and then you need to choose Full Scan.
- When the scanning is finished, you will get a result report. If you experience any threats, you have to follow the suggestions available on display to remove the threats. Then, restart the PC to check if it helps to resolve the error.
Solution 4: Temporarily Disable the Antivirus Program:
Antivirus programs usually help to protect our PCs. But sometimes, it can cause a few problems like ndis.sys latency. Whether you don’t install the antivirus long before you face the ndis.sys error, then it can be the reason.
In this case, you should disable the recently installed antivirus program temporarily. If you find the error solved after disabling this, you don’t need to use the program more. You can take help from the manufacturer. Uninstalling the program can help you also. In this case, you need to switch to another one. If you find other apps harmful, perform the same steps.
Solution 5) Run SFC Scan:
If you cannot solve the problem with the above steps, then it may happen that the critical system files are missing or corrupted. Hence, use the System File Checker tool for solving the issue.
Step 1: Your first task is to write cmd in the Run window. Then, you should hit Ctrl + Shift + Enter buttons together for opening the Command Prompt with administrative privilege.
Step 2: After that, you should type the command SFC /scannow and then tap on the Enter key to begin the scanning.
Step 3: Now, you must wait patiently until the system scanning is finished 100%.
When the verification method is ended, a scanning result appears in front of you. In case you detect any corrupted files, you should exit the tool. Then, you have to reboot the PC, and at this time, a cached copy will replace the problematic system files.
Solution 6) Employ DISM Tool:
If you are facing ndis.sys BSOD or latency issues, you must take the help of the Deployment Image Servicing and Manage (DISM) tool.
- It is effortless to use as here you only have to run the Command Prompt as Administrator. After running it as Administrator, type the commands given below. Make sure that you should hit Enter after each command.
DISM /online /Cleanup-Image / ScanHealth
DISM /Online /Cleanup-Image /RestoreHealth
- After typing the commands, you have to wait for a while. When the method is completed, you are required to restart the PC. The issue should not exist now.
Solution 7: Check the Hard Drive for Errors:
You might experience the issue after trying the fixes. There is no need to get worried. You should now check the hard drive for file system errors. You should know that drivers, system files, and corrupted hard drives are responsible for the issue.
Look at the three ways that we have given below to check the hard drive more effectively. Use File Explorer, Command Prompt, and a robust third-party program in this case.
Use File Explorer:
Mostly, Windows users should check their hard drive in File Explorer as it is the simplest way to do so.
Step 1: First, your task is to tap on the This PC icon two times in your monitor to open file Explorer.
Step 2: Move to the Devices and drives section and tap on one drive. After that, choose the Properties option.
Step 3: A new window appears on the display where you need to switch to the Tools tab. After that, you should tap on the Check button that is available in the Error-checking section.
Step 4: Now, you will see another window appearing. Then, you should tap on the Scan drive option to begin the process of checking the selected drive. Next, wait for a while for the scanning result.
Perform the steps for the left drives in the section to ensure that you have removed the potential file system fail error on your disk.
Use Command Prompt:
With the help of Command Prompt, you can also check the disk. But ensure that you should provide the administrative privilege to this tool.
Write the command chkdsk /f /r first in the prompt and then tap on the Enter button to begin the checking procedure of your disk. Now, you have to wait until the scanning is finished. Then, you need to reboot the PC. Thus, you can solve the error.
If you are willing, then you may check a certain drive on the disk for file system errors. Hence, you need to add your drive letter in the command like chkdsk c: /f/r. If the drive you are willing to check doesn’t have any drive letter, you should go through the guides and assign one.
Have you been waiting for a long time to execute the CHKDSK command? Then, these solutions are helpful hence.
Solution 8) Perform A System Restore:
If you won’t succeed in applying all the above steps, it is better to perform a system restore. Thus, you can bring the state of your Windows back to the previous date.
If you are willing to apply the process, you must enable the system restore feature. Make sure that you have generated at least one System restore point. However, you can try, although you have not generated one. Sometimes Windows can automatically make a restore point while anything important occurs to the PC.
The process is as follows:
Windows 7:
- First, your task is to move to the Start menu. After going to the menu, you should look for the Search box, and then you need to write System Restore.
- When you see the system Restore display, you must tap on the Restore system files and settings option.
- After that, your job is to hit the Next option.
- You need to choose the restore point that you want to restore to your operating system. Then, you should give the confirmation.
Windows 10:
- First, your task is to open the Start menu. Then, you are required to find the Control Panel tile. After locating, you should tap on this.
- You have to go to the System and Security portion to open it. Then, you should choose the option File History.
- Next, you are required to head towards the Recovery option. Then, you have to choose the Open System Restore.
- Tap on the Next option after that. Now, you have to select the restore point to return there.
I hope that you are capable of fixing the error successfully. However, sometimes it may happen that you have lost your essential information. But the interesting fact is that it is possible to restore the files with the help of Auslogics File Recovery.
Solution 9) Update your OS:
Is your OS out of date? Then, the ndis.sys blue screen and ndis.sys latency can be a reason that can evolve on the PC. As these are both undesirable outcomes, updating the system following the steps is recommended.
Windows 10:
If you are willing to update your windows 10, you should perform the steps below.
- Your first job should be invoking the start menu. It may happen that you have already done the step a few times.
- Then, you have to head towards the Settings menu. In this case, you need to tap on the gear icon that is available in the start menu.
- Now, you need to select the Update and Security option.
- Next, take a look at the updates to check if there are any available. If any update remains, wait for it to be installed. Confirm the installationafter that.
If you can’t see any suggested updates appearing, you must tap on the Check for updates.
Windows 7:
To update Windows 7, you should follow these steps.
- You should move to the Start menu at first and then open it. Next, you should choose the Control Panel.
- Now, your job is to tap on the System and Security option.
- Then, you should choose the Windows Update option.
- Go to the left pane and then choose the Check for updates option.
You should now download the suggested updates and install these then. Finally, check whether the error resolves or not.
Solution 10) Fix Your Registry:
When you cannot solve the error after applying all the processes, you can ensure that a corrupt or damaged system registry is causing the error. It is recommended not to try to edit this manually. The reason is that if you have made any mistake during the procedure, it can destroy your windows. Therefore, it is better to use a specific tool to complete this job.
Solution 11) Reinstall Installed Software Recently:
If you have installed software recently and the error starts appearing after this, you need to reinstall it. In this case, you should uninstall the software first. To do this, perform the steps given below and then reinstall it.
- Your first task is to repeatedly hit the “Window + S” keys on the computer. Move to the search bar and write “Apps & features” in the bar. Hit “Enter” after that on the keyboard.
- Now, you should find the app installed recently. After finding the application or software, you should tap on it. Next, hit the “Uninstall” button.
- Finally, you need to perform a Restart to the PC and check if the issue remains. If you find the error fixed, you can try to reinstall the app again.
Solution 12) Protect Online Privacy with a VPN Client:
If you talk about user privacy, then a VPN will be essential. As we know, social media platforms and other websites use cookies as online trackers. But apart from them, these are used by Internet Service Providers and the government also. It doesn’t matter whether you have applied the most secure settings through your web browser or not. The reason is that apps connected to the network can track your device even at that time also. However, Tor and other privacy-focused browsers are not optimal for diminished connection speeds. Therefore, Private Internet Access is the ultimate solution for your privacy. It helps to keep your identity secured online.
Solution 13) Use Data Recovery Tools:
During the procedure, your files can be lost. It is when Data recovery software comes to its use. This software helps you to recover the files. When you delete any file, it won’t vanish. The file remains on your system till you are not writing any new data on top of it. Using Data Recovery Pro software, you can get working copies of deleted files within the hard drive. The tool helps to prevent the loss of essential information, school work, private images, and other vital files.
Solution 14) Use MSConfig:
During Windows startup, if you want, you can take the help of the Microsoft System Configuration Utility. For instance, a user can disable Services and Startup Programs to eliminate these. Using a safe boot, you can boot up your device.
If you are willing to run MSConfig in Windows 10 or 8, apply the method.
- Hit Windows key + Q at first.
- Then, your task is to type cmd and hit Ctrl + Shift + Enter buttons together to run this as Administrator.
- Now, you should type the command ‘MSConfig’ and hit Enter.
Solution 15) Run Resmon Command:
Resource Monitor helps display the real-time load on Memory, processor, Disk, and Network.
Sorting and analyzing the results by the average or total utilization (last column) will reveal which processes are slowing and making your computer down.
If you want to run this in Windows 10 or 8, perform the steps.
- Perform the first two steps of the previous solution.
- Now, you should type the command resmon and tap Enter.
When nothing works, try to download and replace the correct ndis.sys file version. Try to keep a comprehensive database full of malware-free for each version of Microsoft Office Access 2010.
- To download and replace the file, you should first find the Windows operating system version. It is available in the “Download ndis.sys Files” list.
- Now, you should tap on the exact “Download Now” button. Then, you need to download the Windows file version.
- Next, your task is to copy the file to the correct Microsoft Office Access 2010 folder location.
For Windows 10: C:\Windows\WinSxS\amd64_microsoft-windows-ndis-minwin_31bf3856ad364e35_10.0.16299.98_none_7c2149939948bbf2\
1. Windows 10: C:\Windows\System32\drivers\
2. Windows 10: C:\Windows\System32\drivers\
3. Windows 10: C:\Windows\Temp\527D94AF-D053-4381-B105-0D815D53791E\amd64_microsoft-windows-ndis-minwin_31bf3856ad364e35_10.0.16299.1004_none_60ca5f3a59be315a\
4. Windows 10: C:\Windows\WinSxS\amd64_microsoft-windows-ndis-minwin_31bf3856ad364e35_10.0.16299.1004_none_60ca5f3a59be315a\
5. Windows 8.1: C:\Windows\System32\drivers\
6. Windows 8: C:\Windows\System32\drivers\
7. Windows 7: C:\Windows\System32\drivers\
8. Windows Vista: C:\Windows\System32\drivers\
9. Windows XP: C:\WINDOWS\system32\dllcache\
10. Windows XP: C:\Windows\System32\drivers\
Finally, it would help if you restarted the PC.
Conclusion:
We have given here; a lot of solutions to help you. If the fixes are also not useful, then the only thing you can try is to perform a clean installation of Windows 10.
Frequently Asked Questions:
- Can you disable ndis.sys?
No, you should not disable the file. This one is a system file; therefore, it is necessary for the normal functioning of the OS. Besides, if you turn off the file mistakenly, you need to start it again.
- Why do ndis.sys issues appear?
You should know that it is difficult to trace back the actual reasons causing the error. However, corrupted drivers, malicious software, corrupt or missing system files, registry problems are a few reasons. It is recommended to try each solution one by one to ensure that no one is left unturned.
- What are RAS Modem and NDIS?
Remote Access Service is the standard form of RAS that indicates a variety of PC networking tools. It relies on the context where you will use this.
On the other hand, Network Driver Interface Specification or NDIS refers to a particular type of networking software.