Have you faced the BSOD error while booting your windows? If yes, then you can see a blue display with a specific stop code. Multiple stop codes are there that you can encounter while experiencing the issue. The stop code KERNEL_SECURITY_CHECK_FAILURE is one of these you may experience. Want to fix the kernel security check failure and stop code? Then, check out our article.
It may be caused due to different problems like memory problems, virus infections, etc. But the common reason is the unsupported drivers that you have used on the previous version of the Operating System. In this case, you will get this Kernel Security Check Failure error message from the Operating System along with the 0x000000139 error code.
What is the “KERNEL_SECURITY_CHECK_FAILURE” stop code error?
Kernel Security Check Failure is an error message that you can see available on the display of your windows while any data file becomes corrupted. Reasons for the error can be malware and virus infections, incompatible settings, memory issues, incorrect Registry changes, etc.
The Kernel Security Check Failure message means that any file is unable to support or pass the integrity check, due to which you are required to update the file or replace it.
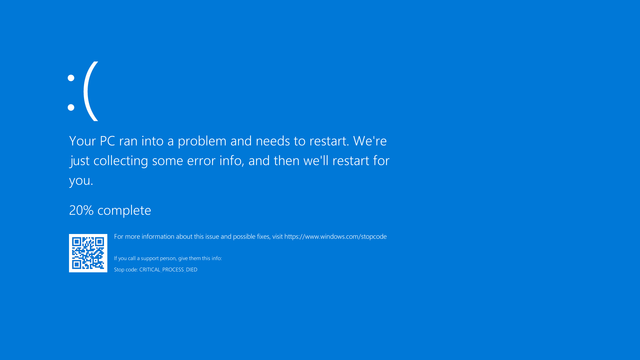
Blue Screen of Death is a usual problem that can stop the System and force your device to reboot. In most cases, the blue screen error is caused due to common PC errors and system-related issues. Your System may receive a “STOP” error for this, and the thing you should know is that it happens without warning. It indicates that you can lose your files, essential documents while working. Therefore, ensure that you save the files frequently.
If you are using an older Windows OS version, you can experience the blue screen of death rather unfriendly. It will appear on display with text and technical information. However, nowadays, the problem has become more accessible and easily detected.
The “KERNEL_SECURITY_CHECK_FAILURE” stop code usually happens when you upgrade your windows to the latest version. However, the problem can appear randomly when you use the PC.
Reasons for the Kernel Security Check Failure in Windows Error:
The error occurs for these reasons:
- Memory problems
- Outdated drivers
- Viruses
- Corrupted Windows system files
- Security programs
- A corrupted or damaged hard disk
Therefore, these are the possible reasons for whether you are dealing with the Kernel Security Check Failure stop code.
Your System is Outdated:
It may happen that the System you use is experiencing a Kernel Security Check failure as it is obsolete. Hence, you are required to update the recently updated version available. Updating windows is always beneficial as it keeps your device safe and resolves the existing bugs, errors, etc.
Malware on the System:
According to the users, they have solved the issue after completing scanning for malware and erasing the identified threats. It may happen that malware has infected your system, due to which you are facing the error.
A Driver is Outdated or not Compatible:
Like your System, drivers need to be kept updated to function correctly. If you have an old driver, it might run into compatibility troubles with other drivers.
Corrupted System Files:
You may have damaged or corrupted system files also. If it is the reason, then you can easily restore the files by the SFC scan and disk check commands.
Third-party Security or Antivirus:
It can interfere with your System if you have used a third-party antivirus.
Messages Appear:
These are situations where you can find disturbing Kernel Security Check Failure error messages.
Kernel Security Check Failure After Sleep:
You will face the message after waking your PC from sleep.
Kernel Security Check Failure after RAM Upgrade:
According to a few users, this message is seen sometimes when they are going to insert a new RAM card.
Kernel Security Check Failure When Playing Games:
People who prefer to play games must encounter the message on their devices several times.
Kernel Security Check Failure When Using Particular Apps and Programs:
This message indicates that your device has some specific apps and programs that trigger the error in the device.
How to fix Kernel Security Check errors in Windows 10?
-
Enable Legacy Advanced Boot Menu:
- First, your task is to reboot the PC for inserting a Windows 10 bootable media into the optical media drive. Hence, you need to know how you can make bootable media.
- Then, you should tap the Next option available on the Windows Setup box shown on the screen.
- After that, move to the next page and tap the option Repair your computer.
- When you see the Choose an option display, you need to tap the Troubleshoot option.
- Hit the Advanced options.
- Then, you should choose the Command Prompt.
- When the new cmd window opens, you need to write C: there. Next, you should tap the Enter button.
- Now, you have to write the command given and then hit the Enter button for enabling legacy advanced boot menu:
- BCDEDIT /SET {DEFAULT} BOOTMENUPOLICY LEGACY
- As soon as the command is executed completely, you need to write EXIT to turn off the Command Prompt window.
- Finally, you should return to the Choose an option display. Then, you need to tap the Continue option, and then you need to begin the PC normally.
-
Update and Fix Drivers:
- Hit the Start button at first, and then choose the Device Manager option from the list.
- Then, you have to tap on any component category for expanding it.
- Next, you are required to tap on the driver that you are willing to update. Then, you have to choose the Update driver from the list.
- When you go to the next window, your job is to tap the Search automatically for drivers.
- Once your System finds an updated driver, it will start installing. Then, you need to restart the System.
- Most Blue Screen of Death errors occurs due to missing or corrupted drivers. Therefore, if you update them, it will help you to solve the issue.
- The method can be done with the help of Device Manager, but you won’t get the best results hence.
- Whether you are unwilling to take the risk while installing the wrong drivers to your System, you need to use a versatile driver updater software such as DriverFix.
-
Use System File Checker and Memory Diagnostic:
Restart Computer from the Boot Menu:
- Hit the Troubleshoot option.
- Navigate to the Advanced Options after that.
- Then, you are required to tap on the Startup Settings.
- Now, you have to hit the Restart button that is available on the lower right side of the display.
- The OS you use should start with the system requirements required at least.
Run Command Prompt with Administrator Privileges:
- Hence, your job is to tap the Search feature that you can see placed on the taskbar, and then you need to write cmd.
- You should then open the command prompt with full privileges. But to do this, you need to tap on the Run option as administrator.
- Then, you need to write this Command, and then you should tap the Enter for running it.
sfc /scannow
- You have to wait for a while till the scanning method is not finished.
- Finally, you should write Exit and then tap the Enter.
Run the Windows Memory Diagnostic Tool:
- First, your task is to tap the Search button in your taskbar.
- After that, you need to write in memory. Then, you have to choose the Run as an administrator that is located below the Windows Memory Diagnostic option.
- After that, you are required to choose the Restart now option, and then you have to check for problems.
- When the reboot is completed, the Operating system will check the RAM. Then, it will show the possible reasons due to which the problem can occur.
- Now, you have to reboot the computer normally.
- Finally, you should check if the issue exists.
-
Update the Computer System:
- First, your job is to hit the Start button. After hitting the button, you should choose the Settings option.
- After that, your job is to tap on the Update & Security.
- Now, tap on the Check for updates button available from the top-right.
- If you find any new updates, install these. Then, you need to try to restart the computer so that the changes you have made can take effect.
- You need to ensure that you have the recent Windows OS updates on the device. Microsoft rolls out the updates of your windows for improving the System’s stability.
-
Scan Computer for Viruses:
- Head towards the Start menu and then write security. After that, you need to tap two times on Windows Security to launch the tool.
- Choose the shield icon available on the left side.
- Then, you have to tap on the Scan options.
- You need to then move to the Full scan option. After going to the option, you must tap the Scan now button.
- If the Windows Defender is unable to delete the malware, you can try out a third-party antivirus. It offers you a better detection rate.
You should perform a full system scan as it will help you detect and remove viruses or malware. If you have malware, it may cause problems on the PC like this Kernel Security Check Failure error.
-
Check Disk for Errors:
- Hit the Windows key + X together, and then you should choose the PowerShell (Admin) option. You can get this option available from the list of options.
- Then, you have to type the Command. After writing, tap Enter to run.
chkdsk C: /f
- Hence, you need to change the C with the drive letter you have.
chkdsk C: /f
- If you don’t use the /f parameter, chkdsk lets you know that you have to fix the file.
- If you are willing to repair the physical issues, you should run the /r parameter.
- Whether you are using your device at that moment, your device asks if you want to perform a restart. In this case, you need to tap the Y, and then you should hit the Enter button. After that, you should reboot the PC.
- The method can take time, but it relies on the hard drive’s memory. Sometimes, it can take half an hour whereas sometimes it can take two hours.
-
Run PC in Safe Mode:
- Hit the Start button at first on your Windows, and then you should choose the Settings app.
- Then, you should choose the Update & Security option from the menu.
- Now your task is to tap on the Recovery option, which is available in the left pane. You have to choose the Restart now, an option available on the right.
- Now, you can see a list of options appearing. Then, you should choose the Troubleshoot option.
- After that, you should choose the Advanced options.
- After that, a window appears where you need to tap on the Restart option.
- When you go to Safe Mode, you need to check if the issue is available.
If the error doesn’t happen in Safe Mode, an app or software is triggering the issue. Hence, you should enable the programs individually to detect the culprit. After identifying the culprit, try to uninstall the problematic software.
If you are not willing to reset the PC, you should boot the PC in Safe Mode. It helps you to detect software if there is any.
If you face a hardware failure of the HDD or the RAM, you need to replace this with a new one.
-
Perform a System Restore:
- First, you are required to tap the Win Key + X buttons at a time. Then, you need to select the Settings option from the menu.
- Next, you have to choose the Update & Security option.
- Then, you should tap on the Recovery option that is available below the left pane. Now, you should choose the Get started button that is available on the right side.
- When you open the next window, you have to select the option Keep my files.
- Use any of these two— Cloud download or Local reinstall options.
- It is recommended to use a cloud download to reinstall Windows. The process will take more than 4 GB of data. Therefore, you must have sufficient Internet data available.
- If you are willing to use the second one, then you need bootable media.
- Now, you should follow the instructions on display to complete the reset.
If the issue began after installing new software, then you should run System Restore. With the help of this system tool, you can delete recently added apps and programs.
In Windows 10, you will get multiple advanced recovery options. These enable you to clean the Operating System. If you want, then use the Reset This PC recovery option.
How to Fix the“KERNEL_SECURITY_CHECK_FAILURE” Error on Windows 11:
There are a few windows problems that are hard to handle when you are dealing with missing Windows files. Are you experiencing troubles while fixing an error? The System you use may be broken partially. It is recommended to install Restore. Using the tool, you can scan your computer and detect the fault.
-
Use a Built-In Recovery Tool to Diagnose Computer Automatically:
- First, your task is to move to the System recovery page and open it. To do this, you have to tap on the Start. When you keep holding the shift button, you need to select the Restart option.
- After that, your task is to tap on the Troubleshoot.
- Then, you should select Advanced Options.
- Next, you choose Startup Repair.
- Now, wait for a while until your windows 11 completes diagnosing the computer.
- Boot your windows normally, but it relies on the results of the method.
-
Enable Safe Mode Using Startup Settings:
- Hence, your first task is to tap on the Advanced options button that is available on display.
- Select the Troubleshoot option again.
- Next, your task is to select Advanced Options again.
- Tap on the Startup Settings after that.
- Then, you need to choose the Restart.
- Next, you are required to select the Safe Mode with Networking option. To do this, you have to tap the number 5 keypad.
- If you want, you can recover any files and then try another solution.
-
3. Uninstall Any Updates Done Recently:
- Tap the Start button at first, and then you have to hold the Shift button. Next, you are required to tap the Restart option.
- Now, you need to tap on the Troubleshoot.
- Choose the Advanced options.
- Next, you have to select Uninstall Updates.
- You can see there two updates— a minor update or the latest quality update, or a more extensive update or the latest feature update.
- You can tap on the uninstall quality update button or the Uninstall feature update button. But it relies on the choice that you have selected.
- Finally, you should follow the instructions available on display to finish the uninstallation method.
-
Restore System Using System Restore:
- When you are in the Advanced Options menu, you need to select the System Restore option.
- Then, you have to tap the Next option.
- After that, you need to choose the restore point that you have made most recently. Now, tap on the Next option.
- Then, you are required to tap the Finish option.
- You can see a pop-up there. Here, you have to confirm the action.
- Now, you have to wait for a few minutes until the System restores process starts.
- Tap on the Restart when the process is finished.
- After that, your Windows 11 needs to boot normally. Tap on the Close button, and then you need to begin using the PC.
- Whether the System Restore could not fix the issue, you should follow the following steps. It will make sure that the problem is resolved.
-
Run Command Prompt from the Advanced Options Menu:
- Select the Start option to open the Recovery menu again. Then, you have to hold down the shift button and then select the Restart option.
- Select the Troubleshoot option from the list.
- Then, you have to tap on the Advanced options.
- After that, choose the Command Prompt.
- When you are in the Command Prompt window, you have to write this Command. After typing the command, you have to tap Enter.
C:
- Now, type this Command and then Enter to run.
dir
- Next, a result can be seen on display.
- After that, you have to type this command and then hit Enter to run.
cd \windows\system32\config
- Now, type this and hit Enter:
MD backup
- Next, write this command and hit Enter to activate.
copy *.* backup
- Type cd regback Command now and press the Enter button to run.
- Write the ‘dir’ command and tap Enter.
- After that, you have to type the ‘copy *.* ..’ command and then hit the Enter button to run.
- Now, write A, and then you need to tap Enter for making changes.
- Finally, turn off the Command Prompt. To do this, you need to tap the X in the upper-right corner.
If the method is unable to help you fix the issue, you need to reset the PC entirely.
-
Reset Your Computer System:
- In this case, your task is to move towards the Recovery boot menu. You have to tap on the Start and hold the Shift button to do this. Then, tap on Restart.
- Tap the Troubleshoot.
- Now, select Reset this PC.
- You will see two options— Keep my files and Remove everything options. Select any of these two. It is recommended to select the first one because it will help you keep the settings.
- Finally, you need to follow the instructions given on display and then finish the reinstallation process of your operating system.
The Bottom Line:
We hope you get to know properly about the “KERNEL_SECURITY_CHECK_FAILURE” stop code error. Besides, we have given different methods to fix this problem for both Windows 10 and Windows 11.
Frequently Asked Questions:
- Is Kernel Security Check Failure a virus?
No, it is not a virus. It is an error message that can be seen on Windows 10, 11, etc. Malware and virus infections, incompatible settings, memory issues, incorrect Registry changes, etc., can be the reasons for the issue.
- How do you disable kernel security checks?
It is not possible to disable the kernel security check. The reason is that it is a crucial part of Windows OS.
- Is kernel security check failure serious?
It is serious because Blue Screen of Death error can be caused due to this. This one is actually a sudden system crash for which you may lose data. It can generate more damaging problems in the future.


