Have you got the DHCP Lookup Failed error on your laptop or computer? If you are suffering from this error, it indicates that your device can’t find an IP Address from the DHCP server. Do you use Smartphones, computers, Chromebooks, or anything else? If you attach your device to a network, it must also come with an IP address. It helps to communicate with both the router and the Network. Whether your device cannot get an IP Address, it cannot access the internet. Our article lets you know how to fix the error for your devices.
What is DHCP?
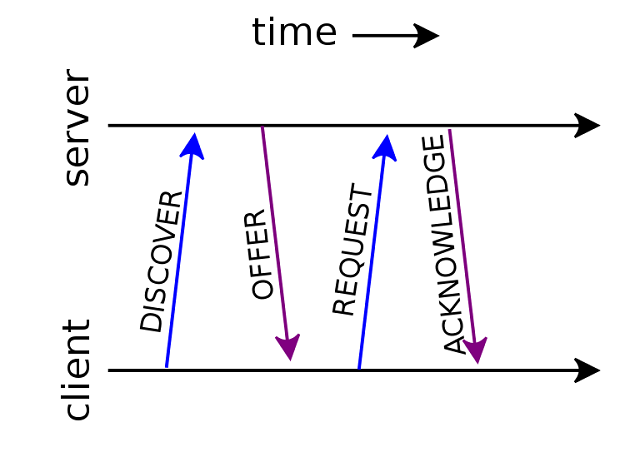
DHCP or Dynamic Host Configuration Protocol is an internet protocol that helps manage and automate the process of IP assignment. It helps to assess individually when you are using a network. Whenever any PC starts booting, it finds a DHCP device or server as well as an IP. If you cannot find the device or configure it properly, then DHCP Lookup will fail.
You need to keep the DHCP option enabled on your computer. The process of enabling this option is very simple. In this case, you only need to access the Properties menu of the Network Settings. Are you facing any DHCP issues? Then, the first troubleshooting step you need to take is to ensure that it is enabled. If you have not enabled this, then do it. After that, you have to restart the router. Now, you should reboot the device and try again. It can fix the issue sometimes. Otherwise, you have to follow other approaches to fix the DHCP error.
What is DHCP Lookup Failed?
This DHCP Lookup Failed error indicates that your computer or Chromebook cannot find the IP address from the DHCP server. While connecting your phone, computer, Chromebook to Network, there will be a requirement of an IP address to communicate with the router and internet.
What is a Chromebook?
Chromebook is one of the latest generations of PCs. It is designed in a way that helps to execute your work faster than the old PCs. You can run this on the Chrome Operating System. It comes with excellent features of cloud storage, Google, and enhanced data protection.
What Causes the DHCP Lookup Failed Error in Chromebook?
Generally, there don’t exist too many reasons for the error. However, a few of these are as follows:
DHCP Server Unavailability: The unavailability of the server is a major reason behind the error. You can experience the error because of misconfiguration, server downtime, or network problems, which could prevent communication between servers and clients.
IP Address Exhaustion: Suppose the server has exhausted the allocatable IP addresses. In that case, it would not be capable of responding to DHCP requests. As a result, you can experience the “DHCP Lookup Failed” error.
Network Connectivity Problems: Communication between DHCP servers and clients can be disrupted by hardware failure, network congestion, or misconfigured switches or routers. As a result, you can face the error.
DHCP Server Configuration Error: An improperly configured DHCP server can sometimes be the culprit. You can face the problem because of subnet masks, incorrect IP address ranges, or gateway configuration.
Client-side Issues: There can be issues with the client machine, such as outdated network drivers, misconfigured network configuration, or DHCP client service problems, due to which the error can occur.
VPN: It can mask the IP address due to which the error occurs.
Wi-Fi Extenders: These don’t gel appropriately with Chromebooks.
Modem/Router Settings: You can face network issues due to modem or router. As a result, it can meet the error.
Outdated Chrome OS: If you are using an outdated version of OS, it can generate issues on the associated device.
How to Fix DHCP Lookup Failed Error:
Here, we will tell you how to solve the error with the help of the following solutions. We have said before; the router assigns the IP Addresses. A few times, your router may not be capable of clearing the table with all the IP Addresses. As soon as the table becomes full, your router cannot assign another IP Address.
Solution 1) Restart the Networking Equipment and Chrome:
A temporary software or communication glitch can cause the issue. If you are willing to solve the problem, then it is better to restart the networking equipment and your machine.
- First, your job is to close the Chromebook completely. Make sure that you are not turning the PC into Sleep mode only.
- Then, you are required to switch off the modem/router, and then your task is to disconnect it from the power source.
- Now, you should wait for about 30 seconds before connecting everything to the Power source.
- Next, you have to wait till the modem/router’s lights are not stabilized.
- At last, you have to power on the Chromebook and then connect the operating system to the Wi-Fi network to know if the error is apparent.
Solution 2) Change the Chromebook Sleep Settings:
If Chromebook contains a known bug, then while waking up the system, your system cannot connect to the Network. As a result, you can see here the DHCP failed message. Hence, you should try to change the sleep settings of the Chromebook so the system won’t turn into sleep mode.
- Your first task is to head towards the Settings of the Chromebook and open it after that.
- Next, you have to tap on the Device option, and after that, tap on the Power option.
- Then, you have to move to the dropdown and open it when idle. Your task is to choose the Turn off Display but Stay Awake option.
- Now, your task is to open the ‘When Lid is Closed’ dropdown, and then you should choose the option Stay Awake.
- Save the changes you have made, and then get out of the Settings.
- Finally, your task is to restart the machine and then attach the Network.
You should know that it will not allow the Chromebook to sleep completely while closing the lid. The display will power off merely.
Solution 3) Reconnecting to the Wi-Fi Network:
A network glitch can be a reason why the connection between the router and device is not stable. Whether you are eager to know the issue, you can forget the Network first. Then, you can try to connect it again. Make sure that you are required to enter the password again.
- You can see a Wi-Fi icon in the bottom right corner of the display. Tap on the icon when you see this, and then you should tap the name of the Network.
- After that, your task is to tap the gear icon so that you can bring out the Network Settings window.
- You have to tap on the Wi-Fi option.
- Unplug it from the Network if you have plugged it in already. Next, you should tap on the right arrow of the Network that you are willing to forget.
- Then, your job is to tap on the Forget button.
- Finally, your job is to reboot the machine. Then, you have to attach it to the Network to see if it is working correctly.
Solution 4) Use Google Name Servers for the Network:
DNS servers have a significant role in the translation of the IP addresses into human-readable hostnames. If your machine cannot query the DNS server, then the error message can appear. Hence, if possible, then try to switch to the Google Name Servers.
- First, your task is to navigate to the Settings of the Chromebook and open it.
- You can see an option Wi-Fi that is available below Network.
- After that, your job is to tap the right-arrow of the problematic Network.
- Next, you have to scroll down the page and move to the dropdown menu of “Name Servers .”When you get this dropdown, open it.
- Finally, you are required to choose the “Google Name Servers” option.
Use Google Name Servers:
After connecting to the Network, you should check whether the error is fixed or not. If you are unable to resolve the operating system, you should perform the method again. Move to the network settings after that and then choose the “Automatic Name Servers” option. It will be the location where you have previously selected the Google Name Servers.
Use Automatic Name Servers:
- You should connect your device to the Network. Then, see if the Chromebook contains the error. If it doesn’t have any error, you have to open the Network Settings of the connection. Next, your task is to disable the “Configure IP Address Automatically” option.
- You have to set the IP address manually according to the IP scheme. Then, you have to reboot the Chromebook.
- Finally, you should restart the device and check if the device has the error.
Solution 5) Increase the DHCP Range of Internet Addresses:
Generally, the DHCP server allows you to connect a limited number of devices. When the server has reached the limit of the number of devices, it can experience the issue. For instance, if the server has a limit of 10 devices and you are connecting to the 11th device, then the error can appear.
Hence, you should try to remove devices from the Network. Besides, you can boost the number of the limit of devices connected to the Network. However, different routers come with different instructions depending on the model of the device.
- First, your task is to open the router’s network portal in a web browser. Then, your job is to log in with the help of the credentials.
- Next, your job is to move to the DHCP tab of the settings and open it.
- After that, your task is to boost the DHCP IP range. In case the upper range is 192.168.1.200, then boost this to 192.168.1.253. A few routers are there that specify the device number.
- Now, your task is to save the changes that you have made. Then, you should get out of the portal.
- Finally, your job is to attach to the Network to see if the error is still available.
Solution 6) Change the Frequency Band of Wi-Fi Network:
Nowadays, the routers can broadcast at a higher frequency or band channel. It is an excellent benefit of the routers of recent times. If you are willing to broadcast at a frequency that your device is not compatible with, then the error message can appear.
Hence, you should switch to a network frequency that your device recommends to you. The router’s instructions depend on the model and make of the router.
- First, your task is to move to the network portal of the router and open it. Then, you have to type the credentials to sign in.
- Next, you have to move to the Wireless settings tab.
- When you want, you can change the frequency. For instance, if you have chosen 2.4 GHz, move to 5 GHz. In case you have chosen 5 GHz, then move to 2.4 GHz.
- Save all the changes that you have made. Then, you should get out of the portal.
- Finally, you should perform the Restart to the operating system. Next, connect the device to the Network to see if it is working correctly.
Solution 7) Update Chrome OS of Chromebook:
Is the Chrome OS of the device outdated? If yes, then it may be the root cause of the error. Hence, try to update the device’s operating system to the recent version. Thus, you can fix the issue only.
- To do this, your first task is to use an Ethernet cable or Wi-Fi to connect the device to the Network.
- After that, your job is to head towards the Settings of your Chromebook and open it then.
- Tap on the About Chrome OS option that is available in the left pane of the window.
- Next, you are required to tap on the option Check for Updates.
- As soon as you update the operating system, your task is to reboot the device.
- Finally, your job is to connect your device to the problematic Network. Then, check if the problem remains.
Solution 8) Reset Router/Modem to Default Settings:
Sometimes, if you are dealing with corrupt firmware in your modem or router, it can cause the issue. Hence, try to reset the router/modem to the factory defaults to help you fix DHCP Lookup Failed error. This one is not so hard to do because it helps to fix multiple network-related issues. We have given here the general approach to resolve the issue because of the diversity of router models.
Two processes are there that help to reset the router/modem. You can use the button on the device or the web portal of it. There are a few models where people use the power button to reset the device.
- Navigate to the web browser first and open it then. Next, you have to move to the default gateway. Use the IPConfig command here if you are willing to find the default gateway in the Command Prompt. If necessary, then you need to check the back of the router.
- Next, you must type the credentials for accessing the web portal. For default sign-in, you have to use the ‘admin’ password.
- Find the reset option that is available in the General or System tab. Then, you have to look for the option Reset Settings or Restore Defaults and tap on it after that. Now, you need to confirm that you are resetting the router. Then, wait till the method is not finished.
- As soon as you reset the router/modem, your job is to reboot the system. At last, check if the error is available.
Solution 9) Powerwash Chromebook From the Login Screen:
Whether you have experienced the DHCP Lookup Failed issue on Chromebook recently or any other issues. In this case, you can use the Powerwash feature of Chromebook to bring the Chrome OS back to its original state.
The method of resetting the Chromebook from the login display is as follows:
- First, your task is to move to the login display of the Chrome OS and open it after that. Tap on these buttons Shift+Ctrl+Alt+R from your keyboard.
- As soon as you tap on this, it will help you to open the “Reset this Chrome device” window.
- Tap on the Restart button to begin.
- You can see the Chromebook now restarting. When you return to the login screen, you get to see a new window version appearing on display. You should tap on the Powerwash button. We recommend you choose the “Update firmware for added security” option before you are going to begin the Powerwash procedure. It helps to provide additional security to the device.
- After that, you should try to make confirmation about preceding this method. Next, you are required to hit the “powerwash” option.
- As soon as you finish the method, your job is to log in with your Google Account. You should follow the instructions given on display to set up the latest Chromebook version.
Solution 10) Update the router:
When you are going to reset your router, you should check if it has any firmware updates. You can fix bugs in your device and other security issues by updating firmware. Always try to keep the Network updated.
- To do this, your job is to sign in to the router first. Then, you should see whether any firmware update is available or not. The option is available below the management or system tab in most cases.
- You have to restart the router after installing the new firmware. Then, you are required to restart the device while the router is available online again. At last, check whether you have seen the error till now.
Solution 11) Fix Chromebook:
If you discuss getting an IP address from the DHCP server, Chromebooks will offer multiple problems. If the Chromebook can’t get a new IP Address, it will give an error message.
- In this case, you must power off the Chromebook first, and then you should restart the device. Usually, when you restart the device, it will help you fix most issues on each device.
- Now, your task is to tap on the clock or notification area.
- After that, your job is to close the Chromebook.
- Finally, you have to begin the Chromebook while it is powered off.
Solution 12) Switch To Guest Mode:
With the help of this Guest mode, you can run the Chrome browser, and you don’t need to install any app. Thus, the mode makes the process easier and helps detect any corrupted app that is screwing up the Chromebook.
- In this case, your job is to sign out first before you enter using the guest account.
- Navigate to the login display and then click browse as the guest option. You can get the option available at the bottom of the display.
- Now, you can see yourself logged in as a Guest. There are no chrome apps available that can bother you.
Are you still experiencing the issue? Then, it is better to try the recommended solution.
Solution 13) Check Your Internet Connection:
Generally, these problems have a relation with the Network. Therefore, it is better to check the network connection first to troubleshoot techniques on the Chromebook.
The router may be unable to communicate with your Internet Service Provider’s server. The error can occur due to this issue also.
- First, your job is to restart the network connection. To do this, you are required to unplug the power cable from the internet router. The location of the power cable is usually at the backside of the router.
- Then, your task is to wait for a minimum of 5 to 10 seconds before you plug in the power cable into the router.
- Next, you should try to connect to the router to check if you have resolved the issue. You can use other devices to connect to the Network if you want. Thus, you can check if the error is still available with the Chromebook.
If you can’t use any device to connect with your router, the error can be with your ISP. Hence, the best way to follow is to contact the customer service hotline to report the problem with the network service.
But if you are capable of connecting other devices to the network without causing any issues, then try the next solution.
Solution 14) Forget Wireless Connection:
Here, we have given you the procedure for fixing the DHCP Lookup Failed issue by forgetting the current network connection and reconnecting to it. The password you have entered may be wrong for your Wi-Fi. This can cause a connection issue on the Chromebook. Follow the steps if you want to forget the wireless connection.
- First, your task is to open the Chromebook. After you open this, you should tap on the Notifications menu that is available at the bottom right part of the display.
- Now, your task is to tap on the Gear icon for opening the Settings menu.
- After that, your task is to scroll down the page to the Network section. You need to tap on the arrow button that is available beside the current Network.
- Finally, you should hit the Forget button. Then you are required to reconnect the Chromebook to the internet router. Ensure that you have entered the correct password for the wireless connection. Check if the error is available till now.
Solution 15) Disable Your Wi-Fi Extender:
Chromebooks face difficulties connecting on networks that generally use Wi-Fi extenders to increase the wireless network signal. According to the users, the error is not seen while the Wi-Fi extender is powered off and connected to the router directly.
However, Google might introduce an update in the future to solve the problem with Wi-Fi extenders. But now, the way that you can follow only is to turn off the Wi-Fi extender. Then, you need to connect the network router or the Chromebook directly, taking the help of an Ethernet cable.
Solution 16) Run Google’s Network Diagnostic Tool:
When you cannot solve the DHCP Lookup Failed issue on the Chromebook, try to run Google’s network diagnostic tool. It scans your system and helps to resolve errors with the current wireless network.
- Your first job should be downloading this Connectivity Diagnostic Tool on the Chromebook.
- Then, your task is to follow the prompt on display to install the Diagnostic Tool.
- Next, your job is to launch the tool to scan automatically. Thus, it helps to resolve the network-related problems with the Chromebook.
- Finally, reboot the Chromebook, and then you need to attach your device to the wireless Network. Check if the problem remains.
Solution 17) Run Network Troubleshooter:
- You should know that a default network troubleshooter is available in Windows. Hence, the troubleshooter is available in Windows Settings (WIN +I). Then, you should navigate to the Update and Security section. Next, your job is to move to the Advanced Troubleshoot. Now, you need to find Internet Connections. Choose this first and then run as soon as you get this available.
- If necessary, then enter the network troubleshooter. After tapping on this, you can see the Internet Connections troubleshooter appearing. As soon as it appears, run this immediately.
Solution 18) Disable VPN:
Are you using a proxy or a VPN to connect your system to the Network? Sometimes, this can cause an error and maybe the reason for conflicting with the wireless Network. Proxy and VPN cause errors in Chromebooks in many situations. If necessary, then power it off to fix the issue temporarily.
- First, your task is to tap on the VPN client.
- Next, your job is to toggle it off as highlighted.
- If you don’t need it longer, then uninstall this.
Solution 19) Remove all Preferred Networks:
Chromebook OS is capable of retaining network credentials. Thus, it enables you to connect your system to a similar network, and you don’t need to enter the password always. When you connect to more Wi-Fi networks, it will store more passwords and details. Besides, Chromebook generates a list of preferred networks based on previous connections and data usage. As a result, users can experience network stuffing. In this case, we recommend you to remove the saved preferred networks. After removing them, check if any error exists.
You should perform these steps to remove the preferred networks.
- First, your task is to head towards the Status Area on display. Then, your job is to tap on the Network Icon and choose the Settings option.
- A Wi-Fi network is available in the Internet Connection option. You have to tap on it.
- After that, your job is to choose the option Preferred Networks. You can see here a list of all saved networks appearing.
- While you hover over the names of the Network, an X mark appears. In this case, you are required to tap on this to remove your preferred networks.
- Perform the process again to eliminate all preferred networks individually.
- As soon as you clear the list, your job is to connect to a Wi-Fi network that you prefer. Hence, you need to verify the password. It helps to fix the problem. If you cannot solve the issue, then go with the next solution.
Solution 20) Contact Chromebook Customer Support:
If you have applied all solutions but can’t fix the DHCP Lookup Failed issue, it is better to contact official customer support. If you are willing to get more details, contact the Chromebook Help center.
Solution 21) Update The Firmware:
When the Chromebook comes out of sleep mode, it can’t get a new IP address for a bug. But now the bug is fixed. Therefore, you should try to update the firmware. These are the steps you need to follow to update firmware:
- Your first job is to open Settings.
- Then, your task is to expand the Advanced option. Now, you need to select the option About Chrome OS.
- Now, you have to tap on Check of Updates.
- As soon as you install all the updates, your job is to restart your Chromebook.
Solution 22) Solve DHCP Lookup Failed On Windows:
One of the most basic methods to fix network connection issues is to restart the PC or computer. Then, you need to check if the problem is resolved. After restarting the device, if you see that the issue still exists, you need to check the network connection settings.
- Your first job is to hit the Windows key + X buttons.
- Then, you need to select Network Connections.
- Now, you have to choose Change Adapter Options.
- After that, you have to select the network adapter— ethernet or wifi — whatever you use.
- Next, your job is to tap on Properties. Then, you have to double-click on Internet Protocol version 4 (TCP/IPv4).
- Ensure that both settings are set to automatically obtain an IP Address.
- Finally, your job is to close the properties windows. Now, you need to check if the error is fixed or not.
Conclusion:
In this article, we have given multiple solutions to help you to resolve the DHCP lookup failed issue on Chromebook devices. If any other way is possible to fix the specific error on Chromebooks, you can feel free to let us know.
Frequently Asked Questions:
- How do you enable DHCP on Chromebook?
First, you should move to the Settings of your Chromebook and open it then. Scroll down the page, and next, you should open the dropdown of “Name Servers .”You should then connect to the Network to see if the problem exists.
- Why is the DHCP lookup failed?
When you get the error message, it means that your device cannot assign the IP address due to which you can’t access the Network. Besides, you should ensure that you have chosen both options to automatically assign IP addresses and DNS server addresses. As soon as you enable it, you should restart this and try again.
- Where are DHCP servers located?
These are available on the home router for home networks. In most cases, home routers come with an enabled DHCP server. However, if you want, use another PC as a server, although it is not done usually.


