Every device like a computer, laptop, or mobile has an IP address to connect the devices to the network. This address helps to identify a device on a network and communicate with other devices. If you are experiencing the ” Ethernet doesn’t have a valid IP configuration” error, the Ethernet connection cannot get a valid IP address from the DHCP. The network protocol allows servers to assign an IP address automatically to the PC for a specific network.
If your PC cannot assign a valid IP address, it means that the device can’t connect to a network and the Internet. This error is due to defective network adapter drivers and invalid IP configuration. Here, we have given the solutions to solve the “Ethernet does not have a valid IP configuration” error.
What is an Ethernet Cable?
A cable that we use to set up an Internet connection is known as an Ethernet cable. The Ethernet cable offers network communication and gives you access to the system.
Generally, if you are going to connect systems and set up a mode of communication, you can do this in two ways— Physical and Wireless methods. When you follow wireless methods, it includes local hotspot providers and other wireless devices. On the other hand, the Physical mode uses wires for providing connections.
What is “Ethernet Doesn’t Have A Valid IP Configuration” Error?
It is a configuration error, that indicates that your system cannot offer access to the Ethernet IP configuration. Your system may be unable to establish a connection for some reason. As a result, checking the internet protocol address at both connection ends is essential.
Types of Ethernet Doesn’t Have a Valid IP Configuration Error Windows 10:
Your system can experience many other Ethernet errors that are as follows:
- 1. Ethernet doesn’t work on a laptop
- 2. Ethernet doesn’t have a valid connection
- 3. Ethernet doesn’t have a valid config
- 4. Ethernet doesn’t have IP configuration
- 5. Ethernet doesn’t connect to the Internet
- 6. Ethernet doesn’t have a valid IP configuration router
- 7. Ethernet doesn’t have a valid IP query
- 8. Ethernet doesn’t have a valid IP configuration TP-Link, Netgear
- 9. Ethernet doesn’t have a valid IP configuration Powerline
- 10. Ethernet doesn’t work
- 11. Ethernet doesn’t have a valid IP configuration Unidentified Network
- 12. Ethernet doesn’t have a valid IP address
How to Fix the Ethernet Doesn’t Have a Valid IP Configuration Error on Windows:
Fix 1) Restart Modem, Router, and Computer:
Sometimes, you can fix the error by restarting the affected hardware. You should save all the files and works that you have done. Then, you need to close the PC.
- Your first task is to tap on the Windows icon in the taskbar to navigate to the Start menu and then open it.
- Hit the Power icon after that, and then you should tap on the Restart option. Thus, you can close the device and back it up without input manually.
- Now, you must sign in to the user account and then enable Windows 10 to load back up.
- After that, your job is to restart the router or modem.
- In this case, you should first disconnect your router. Then, you have to leave the device disconnected for a while. We recommend you wait for a minimum of 2-5 minutes to ensure that your device has a proper restart.
- You should connect it again and then wait for the startup. The LED lights help you to detect when the tool is turned on again and ready to use.
- Finally, you should check if the error is solved. Ensure that you have checked the Ethernet cable that you use. If necessary, then use other cables to test the connection.
Fix 2) Disable the Fast Startup Feature:
If you are willing, you can turn off the Fast Startup feature to solve the issue. In most windows, you can find this feature default. It enables your device to recover from hibernation or shut down quickly. It means that the PC will start faster. Whether you want to disable the feature, you must perform the steps.
- First, your task is to move to the search bar that is available at the bottom right. Then, you need to write “control panel .”If you are willing, then use the Windows + S keyboard shortcut to bring up the searching feature. You need to tap on the Control Panel application to launch it.
- You must adjust the view mode to small or big icons so that it can display all of the Control Panel items. After that, your task is to tap on the Power Options.
- Then, your task is to tap on the Choose what the power buttons do link that is available at the left side of the Window.
- After that, your job is to tap the ‘Change settings that are currently unavailable link. Hence, you may have to type an administrator password.
- Now, your job is to unmark the box Turn on the fast startup option that is below the Shutdown settings. It helps to power off the feature and tap on the Save changes. Thus, you can turn off the Fast Startup feature and fix problems potentially with the Ethernet connection.
- Finally, you have to click the Save changes button and reboot the PC after that. After completing the Restart process, check if the error remains.
Fix 3) Configure Network Adapter Settings:
You are capable of configuring the setting for assigning one static IP address. We recommend you to try this to check whether it works for you or not. Check the steps to configure the network adapter settings.
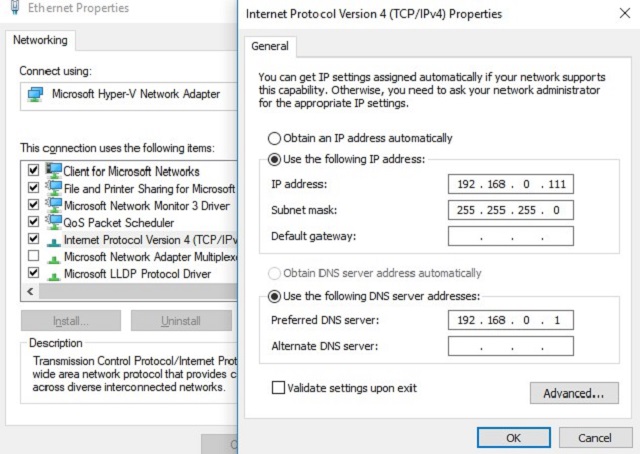
- First, your task is to tap on the Windows key + R buttons to get the Run feature. Then, you have to type ncpa.cpl and tap on the OK to open the Network Connections window.
- After that, your job is to tap on the Ethernet adapter settings and then select the Properties option.
- As soon as you go to the Ethernet Properties dialog box, you need to find the Internet Protocol Version 4 (TCP/IPv4). After finding the box, your task is to tat two times on it.
- You can see the Internet Protocol Version 4 (TCP/IPv4) Properties option appearing. In this case, you need to turn on these options:
Obtain an IP address automatically
Obtain DNS server address automatically
If you cannot fix this, then adjust the IP address and DNS manually.
Perform the steps to do this.
- You have to follow the earlier steps. Then, head towards the Internet Protocol Version 4 (TCP/IPv4) Properties and edit these options after selecting them. You can use the IP addresses that we have given below and use the numbers to fill in the details.
IP address: 192.168.1.15
Subnet mask: 255.255.255.0
Default gateway 192.168.1.1
- After that, you should use DNS server addresses to fill up the details.
Preferred DNS Server: 8.8.8.8
Alternate DNS Server: 8.8.4.4
- As soon as you have done the process, you must tap on the OK button to save the changes. You need to remember that these are Google’s DNS settings.
Fix 4) Reset TCP/IP:
To reset IP or TCP, you have to use Command Prompt and the netsh Command. Using this, you can display or modify the network configuration of the PC.
- First, your task is to write Command Prompt on the search area that is available at the bottom left of the display. If necessary, then hit the Windows key + S button to prompt the search bar.
- Now, you need to tap on the option Run as Administrator so that the Elevated Command Prompt appears. If you are willing, then tap on the Command Prompt icon. Next, you have to choose Run as Administrator. As soon as your device asks you for permission, you need to tap on the OK. It is essential to launch the software.
- As soon as you enter the Elevated Command Prompt, you must write the following commands. Make sure that you have hit the Enter key after each command to execute.
netsh Winsock
reset netsh int IP reset
- While you will run the first command, a message appears in front of the display asking to reboot the PC. However, you should now run the second command and ignore the first one.
- As soon as you have executed both commands successfully, you should reboot the PC. Then, check if you are getting the error message.
Fix 5) Clear the Network Cache:
- Here, you have to first write Command Prompt on the search bar that is available at the bottom left of the display. Then tap on the Windows key + S to prompt the search bar if you want. After that, your task is to tap on the Run as Administrator option to open up the Elevated Command Prompt. Tap on the Command Prompt icon and then choose Run as Administrator.
- As soon it asks for permission, tap on OK.
- When you are in the Elevated Command Prompt, you have to write the following commands:
1. ipconfig /release
2. ipconfig /flushdns
3. ipconfig /renew
- As soon as you have entered the commands, you need to reboot the PC to check if the error remains.
Fix 6) Reinstall or Update Network Adapter Driver:
Use the Device Manager to reinstall the network adapter driver or update it and fix the error. We have given here the steps:
- Your first task is to write the Device Manager on the search bar. You can get this available at the bottom left of your display. You can tap on the Windows key + S to promote the search bar if you want. Besides, if you are willing, then tap on the Windows key + R button. Next, you have to write hdwwiz.cpl in the input field and hit OK after that.
- As soon as you do this, the Device Manager appears in front of you. Then, you can see some devices attached to the PC. After that, you need to find the Network Adapters, expand this, and then tap on the device. Now, you should select the option Uninstall device.
- A confirmation dialog box will appear on display, and then you are required to tap on the Uninstall option. You should then check this box ‘Delete the driver software for this device.’
- Now, you need to reboot the PC to check if there is any problem. If your Window cannot automatically install the uninstalled drivers, you have to return to the Device Manager. Then, you need to tap on the PC’s name and choose Scan for hardware changes. It helps you to identify the missing drivers and install them.
- If you’re willing to update the drivers, you should follow the similar steps given above. But hence, you have to choose Update drivers rather than selecting Uninstall drivers (Step 2).
- A window appears before you and asks if you are willing to find updated driver software automatically. When you choose the first option, it helps you to find the PC and the network for the recent driver software. If you have chosen the second option, you need to find the drivers manually and install them. If you want to use the option, you need to download the driver previously. In case the first option is unable to solve the issue, you need to download the recent network adapter drivers from the manufacturer’s website.
Fix 7) Assign a MAC Address to the Network Card:
A MAC address is a device identifier that asks “I am this device” to the connected global and local network. This Mac address conflict can be a reason for the error.
- Hence, you should work as an administrator.
- Then, you are required to open the command prompt.
- Enter /IPconfig /all
- Now, your task is to find the network adapter and find the “Physical Address value.”
- When you get the Value, you need to note down the Value.
- Next, your task is to sign into the network card/router. After that, type the MAC address into the field.
- The error will be fixed entirely as soon as you change the MAC address.
Fix 8) Enable DHCP:
When you turn on the DHCP previously, you have to ensure that it is turned on. Now, your task is to head towards the router settings and look for the location of the IP addresses where it is assigned. Then, you are required to turn on the “DHCP” rather than Static IP. Whether you use a corporate network, then it can break stuff. That’s why you need to be very careful. We recommend this merely for home networks.
Ensure that you have turned on the “automatically retrieve IP address” option in network configuration on the computer. You should know that the wording can differ based on the device.
As soon as you restart the device, you should check whether the error message still appears or not. If you see the error message still, then your job is to reboot your computer.
Fix 9) Reinstall Drivers for the Network Cards in Compatibility Mode:
Whether you use an old network card, it may happen that the device does not support Windows 10. In this case, you need to look for the driver installer and then tap on this. After that, your job is to choose the Properties section and then head towards the compatibility. Choose the “Run in compatibility mode for Windows 8” option now. Finally, your job is to run this installer and reboot the PC.
Fix 10) Connect PC to the Modem Directly:
In most cases, the home networks are modem -> router -> computer. Check if the error solves when you connect to the source directly. In case it happens, then your router may be facing an issue.
Fix 11) Update All Your Firmware:
Is there a modem or router in the house? Then, you need to look for the firmware online. Hence, follow the instructions given on display from the OEM for each device? Then, you need to update the firmware to the latest version. A few users will offer beta firmware that is not function completely.
Fix 12) Disable Antivirus Software:
You can access the network by disabling the antivirus software. Sometimes, your antivirus may not allow your device to assign itself an IP address due to a bug. If you want to disable this, it relies on the antivirus software that you run. Therefore, you should use a search engine to find “Disable” + (name of antivirus) + (operating system).”
Fix 13) Disable QoS on the Router:
QoS, or “Quality of Service,” is a Setting of router device that is used to keep the network experience stable on a single network. Take the assistance of a search engine to find the QoS settings. As soon as you get this available, you need to turn off this feature if it is enabled.
Fix 14) Update your BIOS:
If you wish to update the BIOS, you need an installer on the PC. You can do this with a USB stick or CD while you have access to the network on another device. In this case, you need to launch an executable file without network access, and it helps to update the bios.
Fix 15) Run Network Adapter Troubleshooter:
You can locate and fix the error with the help of the feature getting from Windows on the system. It helps you to run the network troubleshooter and solve the issue.
- First, your task is to head towards the search bar and then look for the Network troubleshooter there. Next, you are required to tap on the “Identify and repair network problems” option.
- Now, your windows launch the Network troubleshooter that is used to find the error on your system. In this way, you can resolve the error quickly.
- Whether the troubleshooter can find the error, it offers the solution. If it won’t be found, it shows this “Troubleshooting couldn’t identify the problem” error message.
Performing the steps correctly, you can solve the error on the system.
Fix 16) Turn off Microsoft Kernel Debug Network Adapter:
You should turn off the Microsoft Kernel Debug Network Adapter, which is available in the Settings menu. The reason is that it doesn’t get involved with the network adapter along with the device. You must perform the steps to turn off the Kernel network adapter and solve the issue.
- Your first job is to hit the Windows button, and then you need to tap on the “Device Manager” option.
- After that, your task is to tap on the “View” option and then on the “Show hidden devices” option.
- Next, you are required to tap on the Network Adapters and the Microsoft Kernel Debug Network Adapter. At last, hit the “Disable device” option.
If you follow the steps correctly, then there is a probability that the error is fixed.
Fix 17) Disable IPv6:
You can disable the IPv6 also to fix the local area connection doesn’t have a valid ip configuration error in the settings.
- First, you are required to tap on the Wi-Fi option, and then you need to tap on the “Open Network and Sharing Center” option.
- Next, your task is to tap on the “Change adapter settings” option.
- You should then find the connection and tap on this after locating it. Now, tap the “Properties” option.
- Finally, you have to find the “Internet Protocol Version 6” option and then uncheck it. Hit the “OK” button at last.
Connect to the network again to check if the error is resolved. Performing the steps properly will help you to solve the Ethernet doesn’t have a valid IP configuration error.
Using Registry Editor:
Sometimes, you cannot disable the IPV6 setting from the settings menu. As a result, you have to disable this using the registry editor. If you are willing to do this, then you need to have an account with administrator access. You should know that a few Windows versions are there where the registry editor is not enabled. As a result, you have to access this on the PC.
- Your first job is to tap on the “Windows Key + R” and then write “regedit” in the search bar. Next, your task is to tap “Enter” for launching the registry editor.
- After opening the registry editor, you must head towards the given location.
HKEY_LOCAL_MACHINE\SYSTEM\CurrentControlSet\Services\TcpIP6\Parameters.
- When you move to the folder, your job is to tap on the space in the right pane. After that, your task is to select the “New > DWORD (32-bit) Value” option.
- Now, you are required to write “Disabled Components” as the new Value’s name. Then, you need to save this.
- After that, your job is to tap two times on DisabledComponents for opening its properties. Next, you need to adjust the data value to “ffffffff” and then tap on the “OK” to save the changes that you did.
- When you complete making the registry, you can disable the IPV6 setting on the PC entirely. Always remember that the feature can be enabled again.
- Reboot the PC, at last, to check if this is the reason getting the Ethernet doesn’t have a valid IP configuration windows ten error.
Fix 18) Change the Power Plan to Maximum Performance:
- First, hit the “Windows” + “R’ buttons to open the Run prompt.
- Then, you need to write the “control panel” and then tap on the “Enter” option for opening the classical control panel interface.
- When you enter into the control panel, your task is to tap on the “View By:” option. Then, your job is to choose the “Large Icons” option from the list.
- As soon as you choose big icons, you are required to tap on the “Power Options” button to open the power management display.
- Then, you are required to tap on the “Change Plan Settings” option that is available below the Power plan chosen recently.
- You need to choose the “Change advanced power settings” options to see the following display.
- After entering into the advanced power management window, your job is to tap two times on the “Wireless Adapter Settings” option to expand this. Next, tap two times on the “Power Saving Mode” dropdown.
- Choose the “Maximum Performance” option that is available in the list of options.
- Tap on the “Apply” to save the changes. After that, you should tap on “Ok” to get out of the Window.
- At last, check if the error remains.
Fix 19) Disable the Virtual Ethernet Devices:
- In this case, you need to hit the “Windows” + “R” buttons for opening the Run prompt.
- Next, your task is to write “ncpa.cpl” in the Run prompt. Then, hit “Enter” to open the network configuration panel.
- When you are in the network configuration, you need to tap on any entry that looks like from the software but does not have any physical connection.
- You have to choose the “Disable” option for disabling the virtual network connection.
- If you don’t have too much knowledge, you should Google each network device’s name.
- Lastly, check if it is resolved.
Fix 20) Reduce Network Power Usage:
By decreasing the network Power usage, you can eliminate the error.
- Hence, your job is to open the Run prompt by tapping on the “Windows” + “R” buttons.
- Then, your job is to write “Devmgmt.msc” in the Run prompt. Next, you need to hit “Enter” to launch the device manager.
- Now, you must write devmgmt.msc and then hit Enter to open Device Manager.
- Tap twice next on the “Network Adapters” panel to expand this. Then, your job is to tap on the network adapter that you use.
- Choose the “Properties” option for launching the network properties.
- Next, you need to head towards the “Advanced” tab.
- You can see here the Property option. You need to find the “Power Output property” option below it. Then, your task is to tap on this to choose.
- Your task is to open your dropdown menu available under Value. Then, you have to change this from 100% to 75%. Whether you will use an external monitor when the laptop is docked, you have to change the Value to 50% rather than 75%.
- Tap on the “OK” option, and then you are required to turn off the Device Manager. Next, you have to reboot the PC. Finally, check if the error is fixed.
The Bottom Line:
In this article, we have given a lot of fixes to solve the ‘Ethernet doesn’t have valid IP configuration error. If you cannot solve the problem with our tricks, you have to contact the ISP (Internet Service Provider).
Frequently Asked Questions
- Q) How do you set your Ethernet IP configuration?
Answer: You are capable of setting the Ethernet IP configuration easily. Just go through the steps properly.
- First, your task is to navigate to the Start option. Then, head towards Settings, then Control Panel, Network Connections, Local Area Connections, and Properties, respectively.
- Next, your task is to choose the Internet Protocol (TCP/IP).
- Then, tap on the Properties.
At last, you have to choose the “Obtain IP Address” option. Then, the DNS address will be obtained automatically.
- Q) How do you find your Ethernet IP address?
Answer: Use the Command Prompt to find the Ethernet IP address. Go through the steps correctly to find the Ethernet IP address.
- Your first job is to tap on the Start button.
- After that, you must choose the Programs and then Command Prompt option.
- When you are at the C:\> prompt, type this command “ipconfig /all” and hit Enter key after entering the command.
Here, you can see a Physical address available, and it is the Ethernet address.
- Q) How do you reset IP settings?
Answer: Perform the steps to reset the IP address.
- Your first job is to tap on the Windows key.
- Then, your task is to choose the Command Prompt.
- Next, you are required to type “ipconfig/release” in the Command Prompt. After that, hit the Enter button. It releases the recent IP address of your PC.
- If you are willing to renew the PC’s IP Address, type “ipconfig/renew” and then hit the Enter button.