Many people have encountered the ‘System Battery Voltage is Low’ Error. They generally face the error at the time of BIOS Booting. That’s why sometimes you are unable to load the OS completely. It is crucial to take extreme care when you apply the troubleshooting steps. Whether you have made any mistakes, then it may cause a few other errors like system damage.
The error message ‘Alert, System battery voltage is low’ can be seen on your PC’s display. It allows you to hit the F1 button to continue, F2 to run the setup utility, or F5 to run onboard diagnostics. We have given here about the error, causes of this error, and the process of fixing it.
What does “System battery Voltage is low” Error Message Indicate?
While the message “System battery voltage is low” appears, it indicates that your CMOS battery does not have sufficient power to run your CMOS data. The error is seen occasionally while the corresponding sensor is not working for some reason.
When the CMOS battery is not working more, you can encounter a similar issue. You can fix the Error easily, because you merely have to change the CMOS battery to get rid of the error.
Follow all the solutions to try once. If you find all of these hard to carry out, then it is better to take the PC to a technician.
This error message indicates that there is a problem with the Complementary Metal Oxide Semiconductor battery, which is not able to provide the required voltage. The battery plays an important role in the PC as it gives power to the BIOS firmware. You can mostly experience the error when the battery is worn out after a long use. However, there are several reasons because of which you can get the error message. For instance, it may happen that your device’s battery is defective. Or it could happen that the battery is not seated properly.
The “System battery voltage is low” is a very common message on Dell devices. We have given here the list of affected ones:
- System battery voltage is low – Dell OptiPlex: It is one of the common errors that a lot of people experience on their devices.
- Alert System battery voltage is low Dell OptiPlex 780: The system clock can fall behind in this case.
- System battery voltage is low – Dell OptiPlex 755: It is another Dell device throwing the error. You can try to update your BIOS and check if the error is fixed.
- System battery voltage is low Dell OptiPlex 380: Try the solutions mentioned in this article to resolve the issue on Dell OptiPlex 380.
- System battery voltage is low – Dell OptiPlex 760: Several users have experienced this error message on this device.
Update BIOS on Your Computer:
You can update the BIOS and check if the “System battery voltage is low” error is fixed. The steps you have to follow to update BIOS are:
- Your first task is to find system information by typing msinfo into the search bar. Then, your job is to open it.
- Now, you have to locate the BIOS Version/Date. Then, you need to copy this to a text file on the PC or computer you are using. Or you are capable of writing this down on a piece of paper.
- The process you need to perform depends on every manufacturer. So, you have to head toward your computer brand’s official website to find the next steps.
You need to find out whether your computer was bundled, assembled manually or inbuilt. Remember that it is very important as you definitely will not want to use BIOS that is only made for your PC’s one component and can’t be applied on your other devices, and you may overwrite the BIOS with the wrong one, resulting in system issues and significant problems.
You need to prepare your computer for the BIOS update. Whether you are planning to update your laptop, you have to ensure that the battery is fully charged. If you need to update your computer, you should use an Uninterruptible Power Supply (UPS) to ensure that your computer will not shut down due to a power outage.
Take Your PC To A Repair Shop:
When none of the above-mentioned methods works, and the problem is not resolved in Windows 10, it may happen that there is a significant issue with one of the components or the CMOS battery holder. In this case, you can take the PC to any repair shop to check what’s the issue. If any repairing is required, then the process should not take too much time and you can see your computer up and running in no time. For most people, replacing batteries has fixed the issue. However, you can use the best PC repair tools to automatically detect and fix the issue with the computer.
What Causes “System battery voltage is low” Error?
We have given here a few reasons due to which you can face the problem. There are two prime causes for the error on Windows 10.
-
CMOS battery must be reinserted or replaced:
The battery with lesser supplied voltage may be the reason. This issue appears when the problem falls out of the socket. These batteries are not long-lasting and cannot offer sufficient voltage to boot the BIOS after some years.
-
Issue with BIOS settings:
Sometimes, the issue can appear due to adding new devices to your system. It is one of the causes due to which you may face the problem.
There are a few other causes also for which you can encounter the error.
- If the arrangement of the CMOS Battery is not proper, you can face the problem.
Sometimes, the damaged socket where the CMOS Battery is placed is unable to detect; then, it won’t load the operating system.
You can face the error if there is any problem with the BIOS settings of the newly added peripherals.
- If the BIOS you have is outdated, then it can show the error message on display.
- Whether you have any damaged components in the Motherboard, then the error can appear.
System Battery Voltage is Low Error Related Problems:
Dell Optiplex 755: If you have faced an error while using your PC, check if your CMOS battery is working correctly. If it is not working, you should buy a new battery and replace it on their Dell Optiplex 755.
Floppy Diskette Seek Failure: Sometimes, there may not exist any floppy diskette in your system. But still, the error appears on the boot display. Hence, the best way you can follow is to replace the CMOS battery with a low voltage.
A problem with Windows 7: It doesn’t matter which windows you are using. Because the error can appear on a Windows 7, Windows 8.1, or Windows 10 PC, you can try all the solutions to these Windows versions.
After Replacing Battery: The main mistake we generally make while placing a CMOS battery is that sometimes we fix this in the socket improperly. It is the reason for which the Motherboard is unable to detect it. That is why you should remove the CMOS battery and then again insert it properly into the slot on the mother board.
Dell XPS: Professional or technical experts should disassemble the Dell XPS and check if the battery is in a working position. Whether you have found any problem with this, then you must replace that with the branded ones.
Dell Desktop: If you have a Dell Desktop, you should modify the BIOS settings. Whether you are unable to fix the problem, and then solve the error by updating the BIOS. However, if necessary, you should follow the below steps to solve the problem.
How to fix “System battery voltage is low” Issue:
-
Replace CMOS Battery:
There is a sensing circuit available on the Motherboard. It comes with a minimum voltage threshold of 2.7 V to 2.9 V. It varies depending on the age of the board. If the value comes down below the specified value, it will provide you with an alert. The “System battery voltage is low” message appears each time while you switch on the PC.
You can solve the error primarily by replacing the CMOS coin cell battery. Make sure that the battery you have exchanged is a 3-V CR2032 lithium model. Then, you should start the system. Besides, if you prefer the Motherboard to recognize it without any problem, your job is only to power cycle the PC three times. In addition, if you replace the battery and restart the system, it will help you to constitute the first cycle.
If you are still facing the problem, you should reboot the computer when the second cycle is running. After that, your job is to navigate to the BIOS setting. Next, your task is to navigate to the ‘Maintenance’ option, expand the menu after that and then choose the ‘Defaults’ option from the given list. Finally, you should save the settings and get out of the tab.
If you have encountered the message even after that, then there is nothing else you can do instead of replacing the battery. In this case, you should follow the instructions.
Steps:
- Your first task is to disassemble the computer. It is better to disconnect the computer’s power cord before you start to remove the screws.
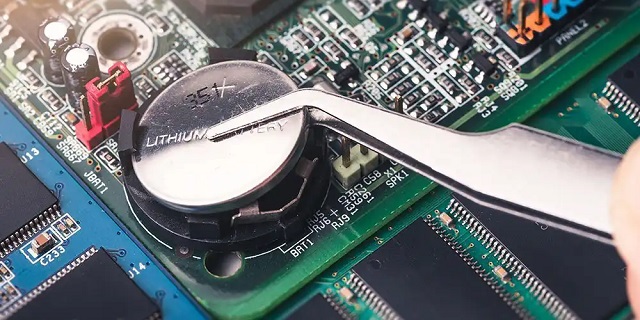
- Next, check the battery if it is there on the Motherboard of your device. You should verify whether you can access the component or not. In most cases, you will find recent devices using a small coin-like battery. You can get this available in the form of a key. Hence, you will find the battery in shape seen in wristwatches.
- After that, your task is to remove the CMOS battery. A few manufacturers are there who prefer to use a metal clip or bar for holding down the CMOS batteries in their devices in place.
In this case, you should slide the battery out through the barrier. You must not bend the clip.
Precautions to be taken:
Whether your PC uses a battery like a coin-shell, then you can remove the battery easily. In this case, you are only required to use your fingers to grab onto the edge of the battery. Then, you need to pull that upwards. Whether you find a clip holding down the battery, you should move it up using one hand. Then, try to use another hand to pull out the battery.
Whether you are facing trouble getting the CMOS battery, please take a look at your motherboard manual for its location. You can look for a video also through the internet or a tutorial letting you know how you should disassemble the device.
Sometimes, you may need to unplug wires, drives, but it relies upon the design of the computer. You are capable of removing other parts of the device for accessing your CMOS battery.
As soon as the battery is in your hand, you can test its voltage easily. Generally, if you find the voltage is less than 2.8V, it is essential to replace the battery. The computer is unable to function properly when the battery offers voltages lesser than the stated value. Usually, the output voltage of a good CMOS battery is from 3.2V TO 3.3V.
If required, you can have a replacement for it. Generally, these are cheap and simple to buy online. When you purchase a battery, it is vital to determine the right type or model required.
Generally, the manufacturers don’t indicate to us the correct type and model of the CMOS batteries. Therefore, it is essential to research yourself. It is its output voltage, and wiring which define a CMOS battery. You can note down the specifications you can access easily.
Replacing the Battery:
If necessary, you can insert a new model. Hence, you are required to put this gently to make sure that it is holding its place. According to a few reports, some batteries may explode (in case these are installed wrongly). You must take precautions hence.
It is important to know that all the CMOS batteries are not removable. Different manufacturers prefer to design their models in different ways. Thus, they want to ensure that these will be removed & replaced merely by certified or experienced technicians. You may require keeping the PC at a service center for solving the problem.
As soon as you place the new CMOS battery, you can power the computer and then reset the CMOS settings to the default values. You can access this through the BIOS. Thus, you can realize that your device is using a new adequately-powered battery. If the recommended method cannot offer you the required result, you need to switch off the PC through at least three cycles.
When you begin to use your system to the default CMOS values, then ensure that you are required to save the changes in your settings. After that, your job is to return to the BIOS menu.
Whether your system displays the error continuously after replacing the CMOS battery successfully, check and ensure that a hardware device or component is not damaged. If damaged, you must take the PC to a computer specialist or a certified professional for repairing purposes.
-
Set Up Time & Date in BIOS:
If you notice that the date and time are wrongly set, you can change the time zone. To do this, you should first tap on the date and time. You can get this available in the Windows Notification Area at the bottom right corner of the display. Then, you should choose the Adjust date/time. Hence, you should ensure that you have set the right Time Zone.
If you are willing to change the time in a manual process, you should automatically power off the Set time option. After that, your job is to hit the Change key. Now, you should adjust to the right time.
-
Reset/Update CMOS/BIOS:
The details you have stored in the BIOS as ESCD (Extended System Configuration Data) may be get corrupted for some reason. You may need to reset the BIOS or CMOS to “Factory Defaults” under certain conditions. You may require clearing the Non-Volatile Random Access Memory. The following one is the process of doing that.
- You should power off your PC and then unplug the power cord from its power outlet. Now, you are capable of removing the PC cover.
- After that, you should uncover this and find the 2-pin password connector (PSWD) on the system board.
- Your job then is to disassemble your 2-pin jumper plug.
- Next, your task is to look for the 2-pin CMOS jumper (RTCRST) available on the system board. Then, you need to remove the jumper plug from the password jumper from CMOS to pins.
- After completing the step, you are required to connect the AC power to the system. Then, wait for a while for CMOS to clear.
- Again, you should try to move the plug back to the password jumper. Then, you should replace the PC cover.
- At last, your task is to plug the PC and devices into power outlets and switch on them after that.
You should know that if you resort to the process wrongly, it may damage the PC permanently. If you cannot access the BIOS, we will recommend you take the PC to an expert.
-
Removing Surge Suppressors:
According to a few manufacturers, the error appears due to a few surge suppressors. You are capable of removing the error just by removing the surge suppressor and connecting your computer directly into the wall outlet.
-
Check the Integrity of the Motherboard:
Whether the wires or pins on the Motherboard are plugged loosely, then the problem may appear again and again.
Hence, your task is to disassemble the PC. After that, your job is to check the pins plugged between hardware peripherals and Motherboard. You should now verify that you have plugged the wires perfectly or not.
People who don’t know about assembling and disassembling their computers should get assistance from the technicians. If you have done something wrong during the procedure, it may damage your hardware components entirely.
-
Check the Regulators:
Sometimes, one or more than one regulator leaking the Motherboard might not work properly. Using the regulator, you are capable of memorizing voltage data. Therefore, if there exists a leak, it can cause an error. The problem can be seen while you are trying to boot or reboot the PC, notebook, or desktop.
-
Clear the System Event Log:
Clearing the system event log may be one of the solutions that you can try. Follow these steps here.
Step 1: First, your task is to enter the BIOS. If you have no idea about it, then go through a tutorial on the web.
Step 2: After that, your job is to move to the Advanced Tab and then find the System Event Log option. Then, you are required to clear the Event Log or the System Event Log at the initial display of BIOS settings.
Step 3: Your task now is to hit the Enter key for tapping the Clear System Event Log option. As soon as you confirm the choice and wait for the PC to boot, your task is to hit the button again.
Finally, you have to check whether the problem still exists or not.
-
Clear NVRAM (Non-Volatile Random-Access Memory):
The very first step you should try to attempt is to clean the NVRAM while the error message appears. You can get rid of the error by cleaning the Non-Volatile Random-Access Memory (NVRAM). Use the BIOS Setup Utility to do this.
- Open the computer first, and then your job is to hit the F2 key on the keyboard while the Manufacturer Logo appears.
- Then, it navigates to the Boot display. You can see the Main menu available on display.
- After that, your task is to navigate to the PCI menu using the Arrow buttons on the keyboard.
- After that, the PCI display appears in front of the display with different options.
- Then, you should turn on the option Clear NVRAM to Yes.
- At last, your task is to save the Modifications and then get out from the BIOS Setup Utility. Now, it begins booting and then clears the NVRAM. Check whether the system is capable of loading the OS without any problems or displays the message again.
-
Check the Controllers in Use:
Sometimes, there exists an issue with one of the controllers available on the Motherboard. In this case, a leak may exist. Hence, you can find multiple essential components are there that have stopped working. As a result, the system you are using may generate false error messages or false problem notifications.
Whether you see any issue with the controller, it is essential to solving the error to avoid seeing the message on display longer.
How to avoid System Battery Voltage is Low Error:
Here, we have given the best ways you can follow to avoid the error message.
- Keep the BIOS updated.
- Always try to use the PC daily.
Whether you don’t have any idea about the process of disassembling or assembling the PC, and then don’t do that yourself.
- These are the best ways following which you can safeguard the PCs from the troubles. You are required to replace the CMOS battery with a new one.
November 2021 Update:
You can eliminate the computer issues with the help of the tool available in the recent update, such as keeping yourself protected against file loss and malware. In addition, it is an effective way for optimizing the PC to deliver the best performance. Using the program, you are capable of solving common problems that occur on Windows systems with ease.
Step 1: First, your task is to download the PC Repair & Optimizer Tool. It is certified by Microsoft and can be used in Windows 10, 8, 7, XP, Vista.
Step 2: Tap on the “Start Scan” option to find the Windows registry problems. These can cause PC issues.
Step 3: Finally, your job is to tap on the “Repair All” option for solving all.
Power Cycle the Device:
- First, your task is to unplug the wires, power cord from your computer.
- Then, you are required to tap the Power key and hold it for about 10 seconds.
- After that, your job is to plug in the wires again and then check whether the error remains or not.
- In case you get the error till now, then you should go to a technician for repair. Else, your job is to open the computer and remove the battery from the PC. Next, you should hit the Power buttons for 10 seconds.
- Finally, your task is to replace your battery, and plug the wires again, then start the PC again.
What does the message indicate when you see the message “Battery Voltage Is Low” on a Dell Computer?
If you are a Dell user, then you must have seen a small, button-sized battery. Using the key, you can store the system hardware settings available within a CMOS chip when the PC is off. Whether there is a message asking that your system battery voltage is low while you power up the PC, it means that your PC is having an issue with the installation of the battery. The issue can be with the battery itself, and you must want to replace it.
Background:
CMOS stands for Complementary Metal Oxide Semiconductor. It is a type of chip that you can find in all modern computers. With the help of this chip, you are capable of storing a lot of hardware information-related Settings. There exists information about the system memory as well as the hard drive(s) connected to the PC. This chip also comes with security settings such as passwords. It is also capable of maintaining the system date and time.
Diagnosis:
According to the documentation of Dell, a “Battery Voltage Is Low” message appears while the system identifies insufficient voltage coming from the battery. The PC can lose the date, time, and hardware details when you switch off the computer as soon as it happens. You have to give the details via the system set up screens before the OS begins loading.
Troubleshooting:
As per information from the Dell Company, as a user, you should try to attempt to reset the battery. If you want, you can consult the system documentation for the particular Dell computer model to find the battery’s location. As soon as you reset, you have to open up the PC, remove the battery, and then install it in the slot again. Make sure that you are taking precautions for discharging static from your body. Thus, you are capable of avoiding damage as well as risk to the PC. You can take the help of a grounding strap. Make sure that you have touched the metal casing of the tool before you touch any other components.
Warning:
As per the statement of Dell, batteries may explode while you install them wrongly. It is also a reason why you should take assistance from a computer expert instead of undertaking the battery replacing process yourself.
Replacement:
If the problem is happening continuously after resetting the battery, you may also be required to replace the battery. Hence, it is vital to buy the right one for the PC. Before purchasing, you should check all the specifications. Then, you can contact Dell technical support whether you have any doubt left.
How do you know if the CMOS battery you have needs to be replaced?
We have given here a few signs that let you know about a CMOS battery failure.
- Incorrect computer date and time settings
- Your PC occasionally turns off or doesn’t start
- Drivers stop working
The errors can appear to you when you boot, such as “CMOS checksum error” or “CMOS read error.” You can encounter a few weird hardware issues also. For instance, the PC you are using may not be capable of finding the mouse, keyboard, or printer.
The Bottom Line:
While performing the methods yourself in your home, it is recommended to be very careful. In most cases, the issue occurs due to a faulty CMOS battery. You are capable of solving the problem by exchanging it with a new one. If you face troubles while applying any steps, you can comment about it and get assistance from us.
Frequently Asked Questions:
-
What Is A CMOS Battery Failure?
And:- CMOS is actually an acronym for “complementary metal-oxide-semiconductor.” It is a small, round battery using which you can store a day, an hour, and a month on the PC. In case the CMOS is depleted, the BIOS will lose all the information. As a result, the PC you are using may fail.
-
What do you mean by a Low Voltage Car Battery?
And:- Usually, the voltage of a battery is between 11.8 and 12 volts. If you have a low voltage battery, it indicates that you are required to charge it. If you want, you are capable of replacing this also. But it relies on the overall condition of the battery. You can use a low-voltage battery for starting the engine, but it may not be successful.
-
How do you fix the “Alert System battery voltage is low” error?
And:- If you are troubleshooting the error message while starting the PC, you are required to exchange the CMOS battery, set up a date and time in BIOS, etc. In addition, you should also try to update the BIOS to get rid of the issue. The error message is unusual, but still, you can see the message on an old computer at times.
-
How do you check your CMOS battery health?
And:- You may see a button-type CMOS battery available on the Motherboard. In this case, you can take the help of the flat-head type screwdriver. It will help you to lift the battery gradually from the Motherboard. You can take the help of a multi-meter to check the voltage of the battery. It is always better to use a digital multi-meter.
-
Can a computer run without the CMOS battery?
And:- You cannot use the CMOS battery to give power to the PC during operation. Except for this, you are required to reset the clock every time you power on your PC.