If you’re a PC user, you must have come across Blue Screen of Death at least once while using your computer. However, many people are there who don’t have any idea about the Orange screen of death. To let you know about it, we have given here the details of this issue. It is seen especially in windows ten and can appear at any time. If you compare this with design, it is similar to BSOD. The only difference between them is the color, but it doesn’t vary too much. However, we have given plenty of methods here. You can solve the problem following any of these processes.
What is the Orange Screen of Death?
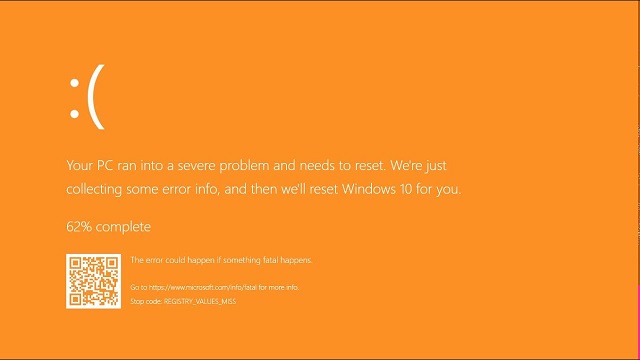
The Orange Screen of Death (OSOD) is an issue caused very rarely and seen on Windows 10 while the PC is stumbling upon a problem. While facing the issue, the PC closes itself to stop data loss and corruption. A hardware or software error, like an incompatible driver or a malfunctioning RAM card, is causing the error.
In other words, the OSoD is nothing but an error code embedded with an orange background that is displayed on the screen when your computer encounters a critical error that leads to the system crash.
What Does the Orange Screen on the Computer Indicate?
While you overclock the computer, you must change the hardware clock rate, multiplier, or voltage. As a result, it creates additional heat. Therefore, the CPU or GPU of your device can be unstable. This problem can appear due to the overloading of the GPU.
What Are The Reasons Causing The Orange Screen of Death Error On Windows?
The OSOD happens very rarely, and you won’t find many standardized solutions for the error. However, a few triggers are there you can blame for the problem. The causes of the error are as follows:
Faulty Drivers: The issue can appear due to defective driver files that are the main reason for orange screen of death error. Graphics drivers and network adapter drivers are these two usual graphics. Ensure that you have updated these to the recent version.
Hardware Acceleration In Chrome: A few people can resolve the error only by disabling hardware acceleration in Google Chrome. Users encounter the issue while streaming Netflix or anything else.
Installed Antivirus: The antivirus installed on the PC can interfere with your system files and create an error. Therefore, it is advised to select a better alternative.
Multimedia Devices Attached To PC: Many multimedia items like TVs or other displays may trigger the error. Therefore, we advise you to remove these in Devices and Printers.
How to Fix Orange Screen of Death Error:
Here follows some quick and easy fix to resolve your OSoD (Orange Screen of Death) issue:
- Reboot Your Personal Computer
- Unplug New Peripheral Devices and Hardware
- Disable Overclocking Software if any
- Reset BIOS Configuration to Factory Settings
- Update BIOS
- Uninstall Duet Display Software
- Uninstall softOSD
- Check Your Graphics Driver Update
- Reset Game Settings to Default
- Run A Clean Boot
- Uninstall Suspicious Software
- Uninstall Recent Windows Updates
- Use System Restore
- Check The Disk Space and Clean It Up
- Repair Hard Disk And Repair System File Corruption
- Use BlueScreenView
- Use Event Viewer
- Run A Malware Scan
It doesn’t matter whatever the cause of OSOD is as it can be fixed except by taking help from outside. Besides, it is not mandatory to have a unique PC experience when someone follows the instructions.
When you fix the issue, you are advised to generate a system restore point only while the OS enables you to access it.
-
Reboot the Computer System:
It is a simple process to fix the error. Whether you cannot navigate to the shutdown display or it won’t work, your job is to tap the Power button and hold it until the Windows 10 PC switches off.
After that, your job is to begin this once again and check whether the error remains. If you don’t face the issue continuously, you don’t need to take too much tension. Otherwise, there are many other solutions given in the article you can follow.
-
Unplug New Peripheral Devices and Hardware Added:
A few hardware components are there which are unable to support Windows 10 completely. It relies on the specifications of the PC. Whether you have bought or received new gear as a gift may be a reason for the error.
Whether you are willing to solve the error, unplug all new hardware components from the PC. Unplug those which need a USB Port with Wi-Fi adapters, headphones, and pen drives. After that, your task is to reboot the PC to check whether the problem still exists.
The USB ports you have may malfunction and cause the error. If you are willing to test this, your job is to attach the external tool into a different port to check what happens.
In case you find the USB ports damaged, it is advised to repair these. Until then, you should stay away from these. If necessary, you can take the help of a multi-USB adapter in the meantime. On the flip side, whether you find anything wrong with the new tool, contact the manufacturer.
-
Disable Overclocking Software:
Many PC users are there who use overclocking tools for amping up the GPU, CPU, or RAM. Gamers use these mainly to juice out most of the OS. However, overclocking indicates that the heat is turned up on the hardware.
In case your PC doesn’t contain a strong cooler, it may cause serious issues. Then, your windows will close themselves and show the orange display as a precautionary measure for stopping data loss and corruption.
If you want, you are capable of disabling third-party overclocking programs available on the PC. Whether you enabled overclocking mode in BIOS, disable that.
-
Reset BIOS Configuration to Factory Settings:
Whether you use BIOS mode to configure options, you may mess up with the vital system settings. As a result, it triggers the error.
For instance, it occurs while you try to overclock the computer. However, the error can be solved while you set the BIOS configuration again to default settings. It is the method you are required to follow.
The Process of Restoring BIOS to Default:
- First, your task is to restart the computer.
- Then, tap on the button seen on display for entering the PC’s BIOS mode before booting windows.
- When you are in the BIOS, your job is to get access to the advanced settings.
- After that, your task is to find the option to reset the configuration data. Enable it after that.
- Next, you need to save the recent BIOS layout and then exit from them.
- Finally, you are required to wait for a while till windows are not booting. Check if the error exists.
-
Update BIOS:
BIOS can be obsolete, due to which it can generate issues for the PC. You should not postpone this any longer if you don’t have updated BIOS earlier or multiple times have passed since then. It may be one of the reasons why you face the error.
The Procedure of Updating BIOS:
- First, your task is to tap the Win button and then write System Information. After typing this, you are required to launch the app.
- Next, you need to navigate to the System Summary area.
- Now, you should note the details displayed at BIOS Version/Date.
- Then, you should move to the website of the BIOS manufacturer.
- After that, find a newer BIOS version that supports the computer.
- After that, your job is to download the file to a USB flash drive and then unzip that.
- Then, you are required to start the windows again and then type the BIOS mode.
- Then, you should generate a backup of your recent BIOS version. Save the file to a similar flash drive after that.
- You should then deploy the update and then follow the on-screen steps.
- Next, wait for a while until you finish the update. You should not turn on the computer or reboot it during this time.
- Finally, you need to try to open the windows and see if the error exists.
-
Uninstall Duet Display:
Duet is a type of software app using which you are capable of turning iPads into Mac monitors. This one is specifically designed for those who are willing to have a multi-display setup. Duet Display software comes with a Windows edition.
- Because of the hardware acceleration, this type of software is causing the problem. There exists a Ddkmd.sys that may trigger Windows stability problems.
- Whether the tool is unavailable on the PC you are using, ensure that you have removed it.
- Now, your task is to open the PC again to check whether the error is solved or not.
-
Uninstall softOSD:
This software is a Windows application related to graphics. It offers you an OEM to adjust the display. This software also causes system errors like Duet Display which causes the error.
If you are willing to get rid of the error, then ensure to delete softOSD. On the flip side, whether you find the Windows 10 built-in uninstaller prompting you to erase the sds64a.sys file, you don’t need to do that step. Thus, you are capable of keeping the item on the hard disk.
-
Check Your Graphics Driver:
The graphics card driver can be a reason that is related to the error directly. It may happen that you have not connected the GPU card correctly to the PC unit. Otherwise, the graphics driver may be incompatible or obsolete.
It doesn’t matter whatever the case is, as you are required to check your graphics driver for compatibility issues. Follow the instructions here.
The Method of Reinstalling the Graphics Card Quickly:
- First, your task is to tap the Start key and then navigate to the option Device Manager.
- After that, your job is to move to the Display adapters category and open it.
- Then, tap on the graphics adapter and then choose the Uninstall device option.
- Hit the Uninstall key for confirmation.
- At last, you should restart the PC. You will find your windows 10 installing the GPU device automatically.
The Process of Updating Your Graphics Driver:
- Navigate to the Device Manager first.
- Then, tap on the graphics adapter, and then you should choose the option Update driver.
- Tap on the Search automatically option to use for the updated driver software.
- Whether it is unable to find a newer driver, tap on the option Search for updated drivers on Windows Update.
- Finally, after restarting the computer, check if the error exists.
When it comes to finding newer drivers through Windows Update, Microsoft is unable to do this. Hence, it is best to note the make and model of the graphics device. For this, you should navigate to the manufacturer’s official website and, after that, look for a newer driver to download.
As soon as you complete the step, retrace these to tap the Uninstall driver option. Now, you should choose the option Browse my computer for drivers rather than selecting the automatic Search. You are required to point to the downloaded driver file merely. Your windows will make all the rest jobs done.
Turn this into a driver update tool if you are unwilling to follow all the trouble and risk downloading an incompatible driver. You are capable of using this daily to update all your drivers. To do this, you have to look for the newer versions and install them automatically.
Whether you installed a driver that doesn’t support your GPU, your job is to roll back the changes. This is the method of letting you know how you should roll back the graphics driver.
The Procedure of Rolling Back Your Graphics Driver:
- Move to the Device Manager option at first.
- Then, you need to tap on the graphics adapter and, after that, choose the option Properties.
- Now, you have to switch to the Driver tab.
- Tap on the Roll Back Driver, and then your job is to go through the on-screen instructions.
- Whether the key is greyed out, you cannot find and install an older version of your GPU driver.
- Hit the OK key after that.
- At last, you should reboot the PC and then check if OSOD exists.
-
Reset Game Settings to Default:
According to multiple users, they have faced the error after tweaking the in-app settings of their games or the gaming platforms such as Steam. You must revisit the game properties to restore everything to the factory configuration, whether you are also one of them.
As soon as you do this, your job is to restart the PC. Then, open the game with default settings, and see if the error occurs. You may require to update the GPU card to fix the error permanently.
-
Run A Clean Boot:
The error can appear due to a malfunctioning process, service, or driver. Hence, your task is to perform a clean boot to the Windows 10 running the essential software components merely for making a safe environment.
The Procedure of Cleaning Boot Windows 10:
- First, hit the Start key, and then write System Configuration. Launch the application after that.
- Now, you should navigate to the Services tab.
- Next, you have to uncheck the option ‘Hide all Microsoft services.’
- Then, choose all services available there from the list and then tap on the option Disable all.
- After that, you should switch to the startup tab and tap on the Open Task Manager option.
- When you open the Startup tab, tap on the Status column for sorting all apps by status. However, you should know that it is essential to enable it first.
- Choose the first method and then tap on the Disable option.
- You should perform the step again for all methods with the Enabled status.
- Finally, you need to reboot the computer and then see if the OSOD error remains.
-
Uninstall Suspicious Software:
It is already said earlier about the method of how both the Duet Display and softOSD tools caused the error. However, these are not the ones only that can cause problems. Plenty of programs are there which are not compatible with Windows 10. As a result, it can cause OS compatibility problems such as free antivirus apps and VPN services for Windows.
Whether you see the display color turned orange after you install a new piece of software, then it may be the culprit. The error can be resolved by erasing new and suspicious programs from the Windows 10 PC.
The Process of Installing the Latest Programs Added:
- Hit the Start key at first and then choose the Apps and Features option.
- Then, you should set the recent programs in the first place by setting Sort by to Install date.
- After that, you need to choose the first program from the list given and then tap on the Uninstall option.
- Tap this option again for confirmation, and then you should go through the Wizard steps.
- Finally, restart the computer and see if it is there.
Unfortunately, a few software pieces can make permanent changes to the system registry while installing on the PC.
As you cannot detect and solve registry modifications with the help of the Windows 10 built-in uninstaller, it is better to use an app uninstaller. Using this, you can easily remove all leftover files and registry entries.
-
Uninstall Recent Windows Updates:
A few updates default to your PC won’t support Windows 10, due to which it may cause errors. After performing the latest OS update, if you see the display turning orange color, it is best to erase it to restore the stability of your PC.
The Method Of Removing Recent System Updates:
- First, your task is to hit both keys, Win key + R together. After that, you should write a control panel. As soon as you see the option, your job is to tap the Enter option.
- Now, your task is to navigate to the Programs and Features.
- Tap on the View installed updates then.
- Next, you should tap the Installed On column option for sorting updates and keeping the recent system updates first.
- Tap two times on the first update in the list.
- Then, you should choose the Yes option for confirmation and, after that, go through the uninstall instructions to proceed.
- At last, your task is to restart the PC and check if the error remains.
-
Use System Restore:
Have you generated any system restore points before facing the error? If yes, then you are capable of rolling back Windows 10 to solve all PC issues. Hence, you need to assume that this problem is a software error.
However, you should know that all software apps installed after the restore point won’t be available on the computer. Therefore, it is essential to install the apps again.
The Process Of Using System Restore:
- Tap the Win key + R keys first. Then, your task is to write the control panel and hit the Enter button.
- Navigate to the Recovery option after that.
- Then, you should tap on the Open System Restore option.
- Now, you should choose a restore point and then hit the Scan option for affected programs. Thus, you can find which are those apps affected by this modification.
- If you don’t find a recent checkpoint on the list, you should choose the option Show more restore points.
- Tap on the Next option after that and then go through the instructions.
- At last, you are required to reboot the computer and then see if the error remains.
-
Check The Disk Space:
Tools such as System Restore, Windows Update, web browsers, etc., need a few amounts of disk space to be available all the time. Otherwise, these are unable to perform accurately and may cause the orange screen of death error.
If you are willing to solve the error, it is essential to add additional disk space to the primary partition or erase existing files. Take the help of a partition manager to include extra disk space for shrinking the size of another drive. Then, you can allocate this to the Windows partition. There doesn’t meet a requirement to install any third-party tool as you can use Windows Disk Management.
The Process of Using Disk Management:
- First, your job is to hit Win key + R keys and then write diskmgmt.msc. Now, you have to hit the Enter key.
- Next, you should choose a big partition that is unable to host windows. Tap on the key and then hit the Shrink Volume.
- It would help if you then pointed to the latest volume size and then hit the Shrink option.
- As soon as you go back to the main window, you should tap the Windows drive. Then, you need to hit the Extend Volume key.
- Now, you have to type the new partition size.
- Finally, perform the last step: you need to reboot the PC and check if the error remains.
If necessary, you can choose an alternative way for deleting the existing files to clear the space for Windows. For example, it is possible to uninstall big apps and games you don’t want to play. If you wish, you can remove photos and videos that you don’t require. Now, your task is to send the rest work to an external hard disk.
Whether you don’t have enough disk space after performing this, then take the help of a system cleaner for removing junk files. Whether you are unable to install third-party utilities, you should resort to Windows Disk Cleanup.
The Method of Using Windows Disk Cleanup:
- First, use the admin account for logging in to Windows 10.
- Then, you have to check the Downloads folder and Recycle Bin for restoring any essential files as these places remain empty.
- Tap on the Start menu, and then write the control panel. Next, you are required to hit the Enter key.
- Navigate to the Administrative Tools now.
- Then, choose the Disk Cleanup and hit the Enter key to open.
- Select the OS drive after that and then tap on the OK key.
- You should now choose everything at Files for removing. After that, you should tap on the Clean-up system files.
- As soon as the Search ends, you are required to choose all again. Then, your job is to hit the OK key.
- Wait for a few moments until the cleanup method ends. After that, you should reboot the computer and check if the error remains.
-
Repair Hard Disk And System File Corruption:
If your computer has any Hard drive failure, it can cause significant PC errors, even OSOD. However, it is possible to find and repair HDD errors when selecting the CHKDSK (Check Disk).
Whether you find the OS files damaged or corrupted, then take the help of the SFC (System File Checker). If the error is more serious, use DISM (Deployment Image Servicing and Management) to resolve this. It will help to check the component store of the Windows image.
As Windows 10 has three different utilities, therefore it doesn’t require reading the trouble of installing anything else. You can operate them from the command-line environment if needed.
The Method of Solving HDD Problems with CHKDSK:
- Hit the Win key + R key and then write cmd. After that, you should tap the Ctrl + Shift + Enter buttons at a time for opening Command Prompt with elevation rights.
- You should then run chkdsk c: /f while windows are available on the C: drive. Otherwise, you are required to exchange c: with the correct partition letter.
- Now, you should write y for making the schedule the CHKDSK at the next system boot.
- Reboot the PC at last and then wait for a while until the CHKDSK completes its task.
The Method of Fixing Corrupt System Files with SFC:
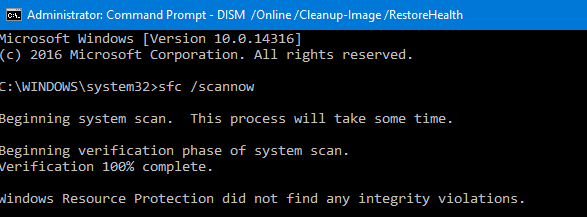
- First, your job is to open the Command Prompt app with admin rights.
- Then, you need to run the sfc /scannow option and wait for a while after that.
- You should then turn off the CMD tab.
- Try to reboot the PC finally to check if the issue is still available.
The Process of Handling Component Store Errors with DISM:
- Navigate to the console environment and open it after you apply admin rights.
- Then, you must run DISM /online /cleanup-image /scanhealth, and after that, wait for a while.
- If you face any error, run DISM /online /cleanup-image /restorehealth to solve the problem.
- You should then restart the PC and then your job is to open CMD as admin again.
- Next, your task is to run the SFC and then reboot your computer.
- At last, see if the issue still exists.
-
Run A Malware Scan:
Sometimes, Graphics issues can trigger Orange screen of death issue due to a malware attack. It can hijack the OS and then disable all vital methods. You should run regular scans on the PC and then check the file for malware. Therefore, whether you still won’t do this, perform a malware scan.
The Process of Scanning For Malware with the Help of Windows Defender:
- Tap on the Start key first and then write Windows Security here. Then, you should open the application.
- Now, your task is to navigate to the Virus & threat protection.
- Tap on the Scan options after that.
- Choose the option Quick Scan now and then tap on the Scan now option.
- Wait for a while until you complete the scanning method. If this doesn’t display any suspicious activity, use Windows Defender Offline scan mode to run another scan.
- Reboot the computer while you complete the second Scan. Then, check if the error remains.
-
Use BlueScreenView:
Wanna know more about OSOD? Then, use BlueScreenView for analyzing the minidumps left behind by the problem.
The Process Of Using BlueScreenview:
- First, your job is to download the BlueScreenView app from the official website.
- Then, you should navigate to the app and open it. Find the DMP file then made by the OSOD.
- You should then find the files which are involved in the crash.
- Finally, move to the Device Manager for reinstalling and updating those files.
-
Use Event Viewer:
Sometimes, people don’t prefer to install a third-party tool like the earlier one we have discussed. In this case, you can take help from Windows Event Viewer.
- To use this, you should restart the OS first after the display turns orange.
- Tap the Start key then and write Event Viewer. After that, you should open the application.
- Next, you are required to expand the Windows Logs folder available on the left side.
- Then, choose the System option.
- Tap on the first issue displayed in the list.
- Finally, your job is to look over the set in the General tab.
Conclusion:
We have given plenty of effective fixes to solve the orange screen of death OSoD error. Don’t hesitate to ask any queries as our techies are always ready to assist you in a quick time.
Orange Screen of Death Error – Frequently Asked Questions:
- What is the orange screen of the Nintendo Switch?
While the Nintendo Switch is booting up, it passes a system check process before powering the device. In case the system identifies anything vital failure, it will showcase a solid color only. Hence, the color is orange due to which we call OSOD.
- Why did your iPhone display turn orange?
When you turn on the Night Shift mode, it means that you have switched the display to warmer color temperatures automatically.
- Why is your display orange?
While you try to generate screenshots or use Snipping Tool or Snip & Sketch, you can see an unnatural orange tint on display. It is the Eye Care mode feature of Lenovo Vantage that causes the error.


