What is Miracast?
It is the latest wireless connection standard for sending and receiving data signals between devices. It is nothing but HDMI over Wi-Fi. Since it uses HDMI, it replaces the cable between the source device and display. Wi-Fi Alliance, the registered trademark Wi-Fi owner, first introduced it in 2012.
The major drawback of its Certification is; it does not mandate a maximum latency.
Wi-Fi alliance launched its certification program for Miracast. The certified devices can communicate between themselves regardless of the manufacturer. Now adapters are available to help the devices that do not have built-in Miracast support connect with the certified devices. The Adapter can directly plug into the HDMI or USB port to enable it.
It uses P2P architecture using a Wi-Fi standard called Wi-Fi Direct for peer-to-peer wireless connections. The connection usually establishes via Wi-Fi protected setup (WPS). Besides, it is more secured because it is using the WPA2 protocol. It transports packets using IPv4 as the internet protocol suite called the internet layer. It uses either TCP or UDP in the transport layer. The data transfer and streaming are control by RTSP and RTP on the application layer.
- Can send 1080P HD video in H 264 codec.
- 1 Surround Sound
- 2 Channels 16 bits 48 kHz
Devices Using Miracast App:
The sending and receiving gadgets must be certified to work with this casting technology. But non-certified devices must use Miracast adapters to stream movies and audio streams. The adapters can easily plug into the USB and HDMI ports. Google start supporting it from the Android 4.2+ version, and it was supported till Marshmallow (Android 6.0). Any way Google dropped supporting it.
Microsoft starts supporting it from Windows 8.1 and Windows 10.
The Amazon Fire TV Stick and the Roku Streaming Stick support it from 2014.
The Functionality of Miracast:
This technology works across the gadgets, irrespective of brands. Most importantly, it precludes the formats and codec. It uses an HDMI cable to transfer data from one screen to the other using the H.264 codec. It uses its own DRM layer emulated from the HDMI system. The Wi-Fi Alliance suggests that it could be used by a set-top box from which you are streaming the content to a TV or any other smart gadget.
- It can stream the DRM-protected media as well as premium-protected content streaming. The task is achieved using a Wi-Fi version of the same trusted content mechanisms used on DisplayPort and HDMI connections.
- The display resolution may be 27 Consumer Electronics Association formats from 640 into 480 up to 4096 into 2160 pixels, and 24 to 60 fps.
- It can display 34 VESA formats from 800×600 to 2560×1600 pixels and from 24 to 60 fps.
- Further, it can support 12 handled formats.
- Mandatory resolution of high definition video of 1280 x 720p with 30 fps.
- Optional resolution support is 3840 x 2160 with 60 fps for ultra high definition video of 4K.
- It follows the H.264 video coding format as mandatory, but it also supports several other transcoding and non- transcoding profiles, such as baseline profiles.
- It supports optionally H.265 High-Efficiency Video Coding and Main 444, SCC-8 bit 444, Main 444 10, at levels ranging from 3.1 to 5.1.
- The Mandatory audio codec it supports is LPCM 16 bits, 48 kHz sampling, two channels.
- It further optionally supports LPCM mode 16 bits, 44.1 kHz sampling, two channels.
- AAC modes
- Dolby Advanced Codec 3
- DTS-HD mode, Dolby TrueHD, and Dolby MAT modes
- MPEG-4 AAC and MPEG-H 3D Audio modes
- AAC-ELDv2
Miracast for Windows 10:
It is nothing but a screen mirroring protocol. We know it is a wireless technology used to mirror one device display to another device, with the help of HDMI. To employ it on your device, you need to use the in-build Wi-Fi capabilities of your System, or you need to use a Wi-Fi USB dongle. It does not have any intelligent hardware component. It helps you to share your video from any other device to your Windows 10 computer.
Check if your device is Miracast-compatible:
First, we need to check our computer system is compatible with it. The following test will help you to determine whether your System supports the protocol or not. It is nothing but HDMI over Wi-Fi. Instead of using an HDMI cable, you are employing Wi-Fi to do so. Therefore the video signals need not going through your home network. Instead, it directly fed into your computer screen with the help of Wi-Fi.
Consequently, you can cast your Windows 10 computer screen on your TV without any network cabling or any other devices in between, and vise versa. Windows 10 software supports casting. Therefore you need not add any external software for that. It needs some hardware component that supports the Miracast standard. That includes a Wi-Fi adapter, video card, and driver that to complete the setup. Firstly we need to check device is compatible to it or not in the following three ways.
- Trying to Cast directly.
- By checking the display setting of your computer
- By using Dxdiag
The first method is straightforward to check whether your System can support casting. The second method is a little tricky and cumbersome. The DxDiag is more accurate, even though it is a little complicated. And it shares your system capabilities for casting.
Trying to Cast Directly:
- Press Windows Key & P on your keyboard simultaneously.
It will lead to another screen with details.
- If your System is supporting it
It will flash the message screen share option is available, and a choice to project to will be displayed. With the available instruction, you may cast your Screen.
- If your System is not supporting it
It will ask you to reinstall the drivers or use a different video card.
By Checking the Display Setting of Your Computer:
Go to Start Menu -> Select System -> Select the Display option -> Go to Multiple Displays -> Select “Connect to a wireless display”
If it is available, you will have the option to connect to the wireless display.
If it is not available, you won’t see any options to connect under the multiple displays menu.
By using Dxdiag:
Right Click on the Start Menu -> Click on Run option -> In the Run window input ‘dxdiag’, and click OK -> It will go to DirectX Diagnostic Tool -> Save All Information option at the bottom -> Choose Desktop option -> Save the file name DXDiag.
Open the DxDiag text file on your System. Under System Information, Look for Miracast. If it is available, it will display the details, including the HDCP. If it is not available, it will state Miracast is not available.
Alternatively, on the DirectX Diagnostic Tool window, select Display Tab and click on it. Check your driver model. It will be at the end of the Drivers details. If the Driver model is WDDM 1.3 or above, your System will support Miracast. If it is less than 1.3, it will not support casting.
Then checking the graphics driver details to check whether they support casting or not. We need to check the compatibility of the network adapter. Here are the steps:
- Type Power Shell in Cortana
- Right-click on the PowerShell and run as an administrator
- In the window, copy-paste the following command
- Get-netadapter|select Name, ndisversion
- Click Enter
It will display the details.
The NdisVersion should be above 6.30 for your System to support Casting. If it is lesser than that, then you need to update the Wireless Network Adapter.
To update Wireless Network Adapter follow the steps:
Go to Start Menu and open Run dialog alternatively; you can click Windows Key + R simultaneously
Then input devmgmt.msc, find the network adapter details right-click on it, and select update the driver to update it.
If your System does not support cast, then you should buy an adapter to do the work.
How to turn your Windows 10 Computer into a Miracast-capable wireless display:
Most of the latest Hardware supports Miracasting. Anyway, ensure that your Hardware can support casting. Check whether your system video drivers, wireless card, and its drivers, Netsh WLAN Show Drivers are up to date to avoid errors. Go to the device manager and update the wireless drivers and graphic drivers. Do not forget to update the adapter firmware. To do this, go to the manufacture’s website, check for any latest updates. If it is available, update it accordingly.
Steps:
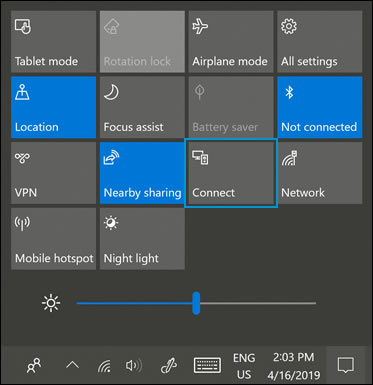
- Go to the Action Center; it is available in the notification area, the speech bubble icon at the extreme lower right corner of the screen.
- Then click the option Connect.
- A setting window will appear.
- Select “Projecting to this PC” and click
- A pull-down menu will appear to select any of the options Available “Everywhere’ else “Available everywhere on secure networks.”
Further
- Select the option “first time” or “every time a connection is requested” under the “Ask to project to this PC.”
- It is advisable to select Every time a connection has requested the option for the safety and security of your connection. Exclude “Require PIN for Pairing” for easy pairing.
- Select Yes when Windows 10 alerts you a device wants to project to your computer.
The rest will be taken care of with the Windows Connect app. You can drag, maximize or minimize the window according to your wish.
How to Miracast your Windows 10 screen to another Windows 10 device:
Here I am giving you tips to broadcast your windows 10 screen to another Windows 10 System display.
Go to Action Center
Click the Connect option
A list of receiving devices will appear. Your other System to which you are going to cast your Screen must be included in the list.
Select the receiving device
Wait for some time to pair the devices. If it fails, you need to try it again and again for few more times.
Toggle to “Allow Input” to “ON” if you wish to receive a device, to control your System with its keyboard and mouse, or with any other input devices.
Click “Change Projection Mode” and choose “Extent” from the menu that appears if you want to use the wireless display as a second desktop instead of mirroring your current desktop.
When you wish to terminate Casting, click “Disconnect,” and mirroring your device to another device will be terminated.
How to Solve the “Your PC or Mobile Device Doesn’t Support Miracast” Error:
Sometimes when you are trying to mirror your device, you may encounter with the following Error Message- “Your PC or Mobile Device Doesn’t Support Miracast, It Can’t Project Wirelessly.”
It may happen for various reasons. Here are the primary reasons for them:
- Both or any one of the devices involved do not support the Casting
- Wireless Adapter is forced to run on 5GHz
- Wi-Fi may be Turned off When connection through
- Graphic Hardware is disabled
- Using Integrated VPN feature of some third party software
Generally, the following are the easy fixes to resolve your above-said Error.
- Check whether your devices are compatible with it.
- Check whether Wi-Fi is enabled in both of the devices
- Set the Wireless Mode to ‘Auto’
- Enable the Integrated Graphic Card
- Uninstall and then Re-install the Wireless Network Adapter driver
- Disable Third-party software and VPN network solutions
We have already discussed various methods to check your device compatibility.
How to Enable Wi-Fi on Both of the Devices:
First, you need to check and confirm both of your devices support casting. Even if you still get the Error Message, then you need to check the Wi-Fi setting of both of your devices.
- To check and enable Wi-Fi in both of your Windows 10 devices, follow the steps below:
- To start the Run Dialog box, press Windows Key + R
- Enter “ms-settings:network-wifi” in the command box; hit Enter
It will lead to the Wi-Fi tab of the Network and Internet Setting menu. Hit toggle to activate or deactivate Wi-Fi
Check the other System also in the same way.
Check Wireless Mode Selection Is Set To Auto from Forced 5GHz:
Sometimes users may get the message, “Your PC or mobile device doesn’t support Miracast, so it can’t project wirelessly.”
It is because the wireless Adapter is force set to 5 GHz or 802.11blg instead of Auto Mode. So you need to set it into auto mode. Here follows the steps.
- Right-click on the Start button of Windows 10
- Select “Device Manager”
- Go to the “Network Adapter” drop-down menu and expand it
- Right-click on the wireless network adapter and select “Properties.”
- Click “Advanced Tab”
- Under Property list, select “Wireless Mode Selection.”
- Click the Value drop-down menu and select Auto
- Save the settings by clicking the OK button
- Now restart the System.
How to Enable Integrated Graphics:
You need to go to the BIOS setting and enable integrated graphics. The steps involved purely depend on your motherboard manufacturer. So you need to follow the steps in the computer manual to enable the integrated graphic card.
How to Re-Install the Wireless Network Adapter Driver:
Here are the easy steps to reinstall the Wireless Network Adapter Driver.
- Open Run Command by pressing the Windows Logo + R key on your computer
- Type devmgmt.msc and click OK to open Device Manager
- Expand Network Adapters
- Right-click on the Wireless Network Adapter
- Select Uninstall Device from the menu
- Click Uninstall
- Restart your computer system. Windows 10 will automatically reinstall the driver.
How to Disable Third-Party VPN Solution Software:
Most of the VPN software enables split-tunneling to increase speed and reduce bandwidth consumption. But it increases the vulnerabilities tremendously. The split tunneling allows users to direct one portion of traffic through the tunnel and another portion of traffic by network router and internet service provider.
Since the system firewall does not protect the data, the network connection is vulnerable to possible attacks. Therefore the System automatically disables the functionality. To enable it, you need to disable the VPN software and restart your system.
Modify Wireless Network Policy Permissions to Resolve:
 Still, you have issues and Error persists, then you need to do the following things:
Yes, it would be best if you altered GPO Settings. Suppose you experience an issue with adding Wireless Display missing, even after connecting to the domain. Then it may be an issue with a Group Policy Option issue. You need to modify the wireless network policy permission to resolve it. If you enabled auto-provision wireless through group policy within the Group Policy Object for wireless network policies, then you need to do the following.
Go to Network Permission Tab within the policy and find the Policy Setting “Do Not Allow Wi-Fi Direct Group,” and uncheck the tick mark from the box provided. And save the settings. After making the relevant changes, do not forget to run gpupdate to update and refresh the Group Policy settings. Now you will get the option to ADD a Wireless Display within the domain.
How to Wirelessly Project Windows 10 PC to an HDTV:
Nowadays, Miracast has become a popular way of projecting content from your Windows 10 computer to HDTV or any other larger display. Apart from mirroring your content on a bigger screen, it connects your devices more securely with WPA2 encryption. Therefore, your content is more securely protected.
Steps:
- Plug the Mira-cast Adapter into the HDMI port of your HDTV and select the correct HDMI channel
- Now open the start menu of your computer system.
- Click on the speech bubble at the bottom left corner of your Screen to reach settings.
- Select the Devices
- Go to connected devices and click on Add a device.
- A scan for all wireless display devices available will start.
- Your System will start searching for the new display hardware within the range.
- A list of devices will appear, and your HDTV will be one among them. Select it to your computer display will be projected on your HDTV.
Miracast on Android:
if you own a Samsung Smartphone, the in-built Smart things apps will serve the purpose. Before proceeding, you need to update your SmartThings App from the Google Play Store. For other Android phones, you need to use the cast screen feature. Before using, do not forget to do the system update for your mobile device. This feature will help you to use your monitor as an extended monitor to cast your mobile screen.
Launch the SmartThings App
Click the + symbol on the Main Screen
Tap “Devices” at the top of the list
Click “Scan Nearby “on the Screen
Select the device from the list that you want to mirror your mobile screen to.
Once completed the process, your mobile device screen will be cast to the display device which you choose.
To Miracast your android screen on your computer system.
Go to Settings-> Display->Cast
Tap it and activate the Enable Wireless Display check box.
You will see your computer on the list.
To cast on Android, move on to Settings > Display > Cast. Tap the Menu button and Click to activate the “Enable wireless display” checkbox. You should further check your PC appears in the list here if you have the Connect app is open. Tap the system name in the display, and it’ll instantly start projecting.
Pros and Cons of Miracast:
Pros:
- It helps you to connect more giant screens wirelessly
- It supports all types of file formats and applications within the content transmitted between the source and the sink – a display device.
- Do not need a Wi-Fi router for Screen mirroring
- It is easy to install and enable
- WPS automatically configure your devices to be paired
- WPA2 Security protocol for your content transmission
- It uses Wi-Fi Multi-Media Power Saver Mode. WMM-Power Save raises the efficiency and flexibility of data transmission of Casting.
- AP does not need to establish Wi-Fi direct between the source and display.
- No additional wireless technology is needed.
- Cost-effective
- Easy to use
- No complex procedures to setup
- Effectively handles traffic management by the optimum selection of channels using Wi-Fi-Direct and TDLS.
- Its QoS helps in organizing the traffic based on individual latency requirements.
Cons:
- Audio only gadgets are not part of the certification program
- Both of the devices must be certified gadgets to pair.
- Need to buy an Adapter to connect noncertified gadgets
- It is only doing Screen mirroring
- You may face stability issues
- Latency is not standardized
- It is not capable of doing multitasking
- Most android phones have the capability of Miracasting, but setup procedures vary for different manufacturers.
- It encapsulates UDP/IP protocol; therefore, Frame Loss may occur.