
Introduction:
In dynamic IT operations, where agility, efficiency, and scalability are paramount, Ansible emerges as a powerful force for automation. Ansible is an open-source configuration management and orchestration tool. In addition, it revolutionizes the way systems are managed. It makes complex tasks more straightforward, and mundane ones practically disappear. Besides, it helps system administrators, developers, and IT professionals in many ways. Further, it streamlines the workflows and organizes the application deployment. Besides, it helps automate infrastructure management. Ansible offers a flexible and elegant solution.
At its core, Ansible simplifies automation by utilizing a human-readable language and an agentless architecture. This feature distinguishes it from other configuration management tools. With Ansible, you can define and manage infrastructure as code. It enables the provisioning and configuration of systems with unparalleled ease. This introductory guide aims to demystify Ansible. It takes you through its fundamental concepts, installation, and usage. And, it provides a solid foundation for harnessing its potential in your IT environment. Let’s embark on a journey into the world of Ansible, where automation meets simplicity.
Ansible and Its Purpose:
Ansible is not just another tool in the vast landscape of IT automation. It is a paradigm shift. In addition, it is an open-source automation platform designed to simplify complex tasks. Further, it reduces manual intervention and accelerates the pace of IT operations. It is born out of the necessity to streamline configuration management, application deployment, and task orchestration. Ansible takes a radically different approach to automation.
Unlike many traditional automation tools, Ansible operates in an agentless manner. This means no agents or additional software need to be installed on target systems. Instead, Ansible connects to remote machines via SSH. It allows for a seamless and non-intrusive automation process. This simplicity, coupled with human-readable language, makes Ansible accessible to a broad audience. Its audience varies from seasoned sys admins to developers and IT managers.
Ansible’s purpose extends across the entire IT ecosystem. It empowers organizations to codify their infrastructure. People are defining it as code. They are also enabling version-controlled, repeatable, and auditable automation. It is provisioning servers, configuring network devices, managing cloud resources, and orchestrating complex workflows. Ansible provides a unified platform to handle these tasks efficiently.
In essence, it serves as a bridge between IT operations and development. It promotes collaboration and tearing down silos. Its goal is to free up valuable human resources from mundane and error-prone manual tasks. It allows them to focus on more strategic, creative, and value-added activities. We delve deeper into Ansible’s functionalities. So, you will discover its versatility and transformative power in automating the modern IT landscape.
What is Ansible?
Ansible is an open-source automation platform designed for configuration management, application deployment, task orchestration, and infrastructure as code. It was developed by Red Hat. Ansible provides a simple yet powerful solution for automating complex IT processes. It allows organizations to streamline and manage their systems efficiently.
Key characteristics of Ansible include its agentless architecture. This feature eliminates the need to install additional software on remote machines. Besides, it removes its use of a human-readable language for defining automation tasks. Ansible connects to target systems via SSH. And that is making it non-intrusive and enabling automation across a wide range of environments. It can automate on-premises servers to cloud instances.
With Ansible, users can define infrastructure & application configurations as code. They can facilitate version control and collaboration. Further, they can create reusable automation scripts. Its versatility makes it applicable to a variety of tasks like server provisioning, configuration management, application deployment, network automation, and more.
Ansible focuses on simplicity, flexibility, and scalability. It has contributed to its widespread adoption in the IT industry. These features are making it a go-to tool for organizations aiming to improve operational efficiency. It reduces manual errors. In addition, it accelerates their deployment and management processes.
Key Features That Make Ansible Stand Out:
-
Agentless Architecture:
Ansible’s standout feature is its agentless design. Unlike many automation tools that require agents to be installed on target systems, Ansible communicates with remote machines using standard SSH protocols. This approach simplifies deployment and reduces potential security concerns. It makes it simple to integrate Ansible into existing environments without the need for additional software installations on managed hosts.
-
Human-Readable YAML Language:
Ansible uses YAML (YAML Ain’t Markup Language) for its playbooks. These are the configuration files used to define automation tasks. YAML’s human-readable format makes it easy for both beginners and experienced users to understand and write automation scripts. This simplicity enhances collaboration among team members and facilitates the sharing of automation code.
-
Idempotence:
Ansible enforces idempotence, a critical concept in automation. This means that running the same Ansible playbook multiple times will yield the same result, regardless of the system’s current state. This ensures predictable and consistent outcomes. It reduces the risk of unintended changes. Besides, it makes Ansible a reliable choice for configuration management & system orchestration.
-
Broad Platform Support:
Ansible is platform-agnostic. It supports a wide range of operating systems, cloud providers, network devices, and applications. Whether managing Linux servers, configuring Windows machines, orchestrating cloud resources on AWS or Azure, or automating network devices, it doesn’t depend on it. The reason is that Ansible provides a unified platform for diverse IT environments.
-
Module Extensibility:
Ansible’s modular architecture allows the integration of various modules to extend its functionality. Modules are small, standalone scripts. These perform specific tasks. Ansible’s extensive collection of built-in modules covers a broad spectrum of use cases, and users can easily create custom modules to tailor automation to their specific needs.
-
Roles for Organized Code:
Ansible introduces the concept of roles, which enables users to organize and structure their automation code in a modular way. Roles promote code reusability. This makes it easier to manage and scale automation projects. This feature is particularly beneficial when dealing with complex infrastructures and large-scale deployments.
-
Parallel Execution:
Ansible performs tasks in parallel across multiple hosts by default. It optimizes performance and reduces execution time. This feature is crucial for large-scale deployments, where efficiency and speed are paramount. Ansible’s ability to parallelize tasks enhances its scalability and adaptability to the demands of dynamic IT environments.
-
Community and Ecosystem:
Ansible boasts a vibrant and active community. This ecosystem contributes to the wealth of available documentation, modules, and roles. The community-driven nature of Ansible ensures continuous improvement, updates, and the sharing of best practices. Thus, it can make this a valuable resource for both beginners and experienced users.
Ansible’s unique combination of agentless architecture, human-readable syntax, idempotence, broad platform support, modular design, role-based organization, parallel execution, and a thriving community make it a standout choice for automating diverse IT workflows. These features collectively contribute to Ansible’s effectiveness in simplifying and enhancing automation processes across the IT landscape.
Installation and Setup:
Before delving into the world of Ansible automation, a crucial first step is the seamless installation and setup of the Ansible platform. Fortunately, Ansible’s design prioritizes simplicity. It makes the process accessible to users across various operating systems. Let’s walk through the steps to get Ansible up and running on your system.
-
System Requirements:
- Before installing Ansible, ensure that your system meets the necessary requirements. Ansible has minimal prerequisites. It typically requires a Linux control machine (which could be your local development environment) and SSH connectivity to the managed hosts.
-
Installation on Linux:
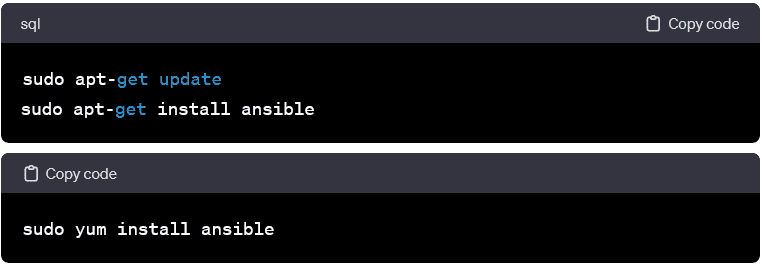
- Ansible can be installed using the system’s package manager for Linux-based systems. On Debian/Ubuntu, use apt, and on Red Hat-based systems, use yum:
-
Installation on macOS:

- On macOS, Ansible can be installed using the package manager Homebrew:
-
Installation on Windows:
- Ansible is natively a Linux tool but can be used on Windows through the Windows Subsystem for Linux (WSL). Alternatively, you can use the Ansible Windows Installer, which is available on the Ansible GitHub repository.
-
Verification:

- Once installed, verify the Ansible installation by checking the version:
-
Configuration:
- Ansible’s main configuration file is /etc/ansible/ansible.cfg. Most configurations can be left as default. However, it’s essential to familiarize yourself with this file for advanced settings and customization.
-
Inventory Setup:
- Ansible uses an inventory file to define the hosts it will manage. The default location for the inventory file is /etc/ansible/hosts. Customize this file to include your managed hosts’ IP addresses or domain names.
With Ansible successfully installed and configured, you’re now equipped to embark on your automation journey. In subsequent sections, we’ll explore the anatomy of Ansible playbooks, modules, and advanced features. It lets you harness the full potential of this powerful automation tool.
Installing Ansible on Different Operating Systems:
Ansible’s versatility extends to its installation process. It accommodates various operating systems seamlessly. Below are step-by-step instructions for installing Ansible on different platforms:
-
Linux (Debian/Ubuntu):

- Update the package list:
-
Linux (Red Hat/CentOS):
- Update the package list:
-
macOS (via Homebrew):


- Install Homebrew if not already installed:
- Install Ansible:

-
Windows (using Windows Subsystem for Linux – WSL):
- Enable WSL on Windows:
- Open PowerShell as Administrator and run:

- Open PowerShell as Administrator and run:
- Install a Linux distribution from the Microsoft Store (e.g., Ubuntu).
- Set up your Linux user account.
- Install Ansible within the Linux distribution using the Linux package manager.
-
Windows (using Ansible Windows Installer):
- Download the Ansible Windows Installer from the official GitHub repository.
- Run the installer and follow the on-screen instructions.
-
Verification:
- Once installed, verify the Ansible installation by checking the version:
-
Configuration (Optional):
- Explore the Ansible configuration file, /etc/ansible/ansible.cfg, for customization options. Common configurations include specifying inventory files and defining additional parameters.
These step-by-step instructions cater to a range of operating systems. It enables users to seamlessly integrate Ansible into their preferred environments. With Ansible successfully installed, you’re ready to proceed to the next stages of configuration, playbook creation, and unleashing the power of automation in your IT workflows.
Walk Through the Basic Configuration Settings:
After successfully installing Ansible, the next crucial step is to familiarize yourself with the basic configuration settings. Ansible generally works with sensible defaults. Besides, understanding & customizing the configuration can enhance your experience. In addition, both help to accommodate specific requirements. The primary configuration file for Ansible is ansible.cfg. Let’s walk through some fundamental settings:
-
Locate the Configuration File:
- The default location for the configuration file is /etc/ansible/ansible.cfg. You can also create a local configuration file named cfg in the current working directory or in your home directory.
-
Editorial Note:
- Open the configuration file in your preferred text editor. Suppose the file doesn’t exist. In that case, you can create it.
-
Inventory Configuration:


- The inventory setting in the configuration file points to the default inventory file. You can specify a custom inventory file or directory here.
-
Library Path:
- Ansible looks for modules in the default library path. Suppose you have custom modules. In that case, you can specify their location using the library
-
Roles Path:
- The roles_path setting defines the default location where Ansible searches for roles. Do you organize your roles in a specific directory? If so, then you can set it like this:
-
Remote User:
- Do you consistently use a specific user account for SSH connections? Then, you can set the default remote user in the configuration file.
-
Verbosity Level:
- Adjust the verbosity level using the verbosity This controls the amount of output Ansible produces. Values range from 0 (least verbose) to 4 (most verbose).
-
Timeouts:
- Customize timeouts for various Ansible operations, such as the SSH connection timeout (timeout setting) and the task execution timeout (execution_timeout setting).
-
Additional Configuration:
- Explore other settings in the configuration file, such as host_key_checking for controlling SSH host key checking. You can also explore forks for specifying the number of parallel processes to use when executing tasks.
-
Save Changes:
- After making any desired changes, save the configuration file.
You can walk through these basic configuration settings. Thus, you gain insight into how Ansible can be tailored to suit your specific needs. Now, you progress in your Ansible journey. So, you may explore more advanced configurations and optimizations based on the intricacies of your IT environment and automation workflows.
Inventory and Hosts in Ansible:
One of Ansible’s fundamental concepts is its ability to manage infrastructure through the definition of hosts in an inventory. The inventory file serves as a crucial bridge between Ansible and the systems it orchestrates. In this section, we’ll delve into the significance of inventories and explore how to structure them effectively.
-
Understanding the Inventory:
- Ansible’s inventory is a plain text file. It lists the hosts on which Ansible tasks will be executed. This file can be a single static file or dynamically generated. It allows for flexibility in managing hosts.
-
Default Inventory Location:
- The default location for the inventory file is /etc/ansible/hosts. However, you can specify a custom inventory file or directory in the Ansible configuration file (cfg).
-
Host Entries:
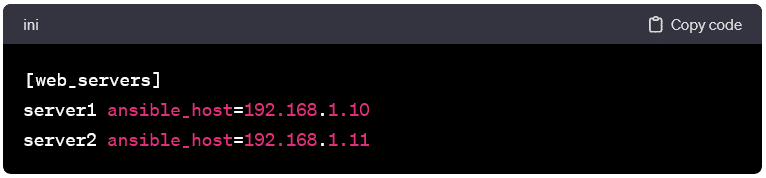

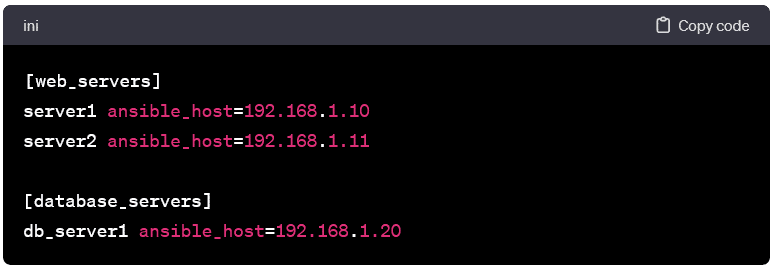
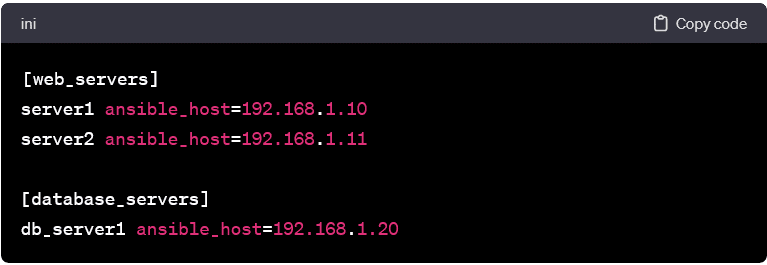
- Each entry in the inventory file represents a host and can include IP addresses, domain names, or aliases. Basic inventory entries look like this:
-
Grouping Hosts:
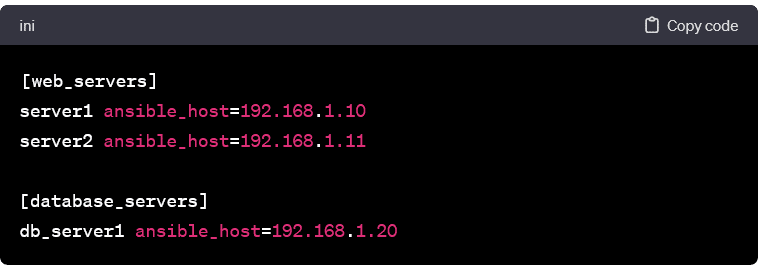

- Hosts can be grouped based on functionality, location, or any other relevant criterion. Grouping facilitates the execution of tasks on specific subsets of hosts. Example grouping:
-
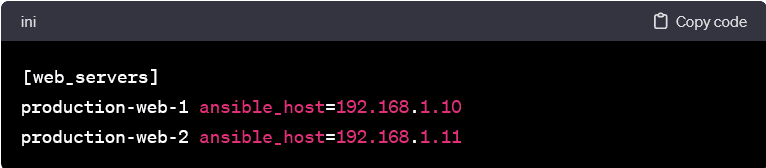
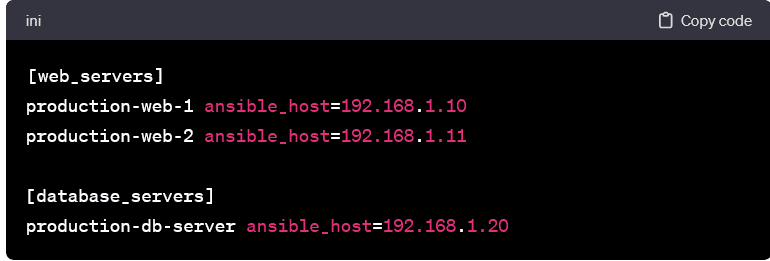
Host Aliases and Variables:

- You can assign aliases and variables to hosts to enhance readability and flexibility. Example with aliases:
-
Dynamic Inventories:
- Ansible supports dynamic inventories. It lets you generate inventory files dynamically based on external sources like cloud providers or databases. This enables automatic scaling and adaptability. Dynamic inventories can be scripts or plugins. These return JSON or INI-formatted output.
-
Patterns and Wildcards:
- You can use patterns and wildcards to select specific hosts or groups when running Ansible commands or playbooks. For example, to target all web servers:
-
Test Connection:
- Verify the connectivity to the hosts using the ping module:
-
Advanced Inventory Features:
- Explore advanced inventory features, such as variables, group variables, and meta-variables, to further customize your inventory & streamline configuration management.
Understanding inventories is a foundational step in mastering Ansible. As you progress, you’ll leverage the flexibility of inventories to organize hosts effectively. Besides, you can execute tasks seamlessly across your infrastructure.
How Ansible Uses an Inventory File to Define Managed Hosts:
In the realm of Ansible automation, the inventory file serves as the cornerstone. It offers a structured way to define and organize the hosts that Ansible will manage. Let’s explore how Ansible utilizes this inventory file to streamline communication & orchestration across your infrastructure.
-
Defining Hosts and Groups:

- At its core, the inventory file is a plain text document. It lists individual hosts & organizes them into groups. Each host entry specifies information such as the host’s IP address or domain name, along with optional aliases & variables. Groups can be created to categorize hosts based on their role, function, or any other classification.
-
Host Aliases and Variables:

- Aliases and variables enhance the readability and flexibility of the inventory file. Aliases provide a human-readable label for hosts. It makes it simpler to identify them in playbooks & commands. Variables allow you to associate additional information with hosts, such as connection parameters, user names, or custom attributes.
-
Grouping for Task Organization:
- Grouping hosts enables efficient task organization. Tasks can be executed on specific groups. It facilitates targeted management. For instance, a playbook could target the “web_servers” group for tasks related to web server configurations.
-
Dynamic Inventories:
- Ansible supports dynamic inventories. It enables you to generate inventory files on the fly based on external data sources. This is particularly useful in dynamic environments or when managing resources in the cloud. Dynamic inventories can be scripts or plugins. These fetch host information dynamically. It offers adaptability to changing infrastructures.
-
Patterns and Wildcards:
- Ansible uses patterns and wildcards when specifying hosts to execute tasks. These patterns allow for flexible and powerful host selection. For example, using ansible web_servers -m ping targets all hosts in the “web_servers” group.
-
Multiple Inventory Files:
- Ansible supports the use of multiple inventory files. This is beneficial in scenarios where different inventories cater to distinct environments or stages of deployment (e.g., development, staging, production).
-
Verification and Testing:
- Once the inventory is defined, verifying its correctness and testing the connectivity to the specified hosts is crucial. The ansible-inventory command is a handy tool for listing available hosts and groups.
-
Integrating Variables and Facts:
- Ansible also leverages variables and facts from the inventory. Variables can be associated with individual hosts or groups or applied globally. Facts are automatically gathered information about the hosts. These are accessible within playbooks for conditional tasks.
Understanding how Ansible utilizes the inventory file provides a solid foundation for effective infrastructure management. As you progress in your Ansible journey, you’ll appreciate the flexibility and organizational power. Its inventories bring to your automation workflows.
Showcasing Examples of Different Inventory Configurations:
In Ansible, the inventory file is a versatile tool. It allows you to define and organize hosts based on the needs of your infrastructure. Let’s explore various examples of inventory configurations. These highlight different scenarios & techniques for structuring your inventory.
-
Basic Host Definitions:

- In its simplest form, an inventory file consists of host entries with their IP addresses or domain names. Each entry can represent a standalone host.
-
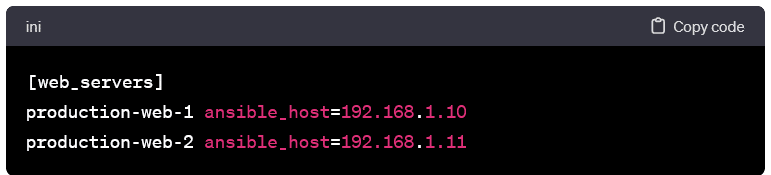
Aliases for Readability:

- Assigning aliases to hosts enhances readability, especially in larger inventories. This practice makes it easier to identify hosts in playbooks and commands.
-
Variable Assignments:
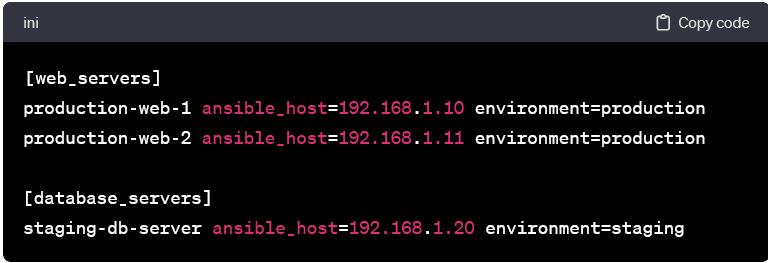
- Variables can be associated with hosts to provide additional information or configuration details. In this example, we assign a custom variable environment to each host.
-
Grouping for Organized Tasks:
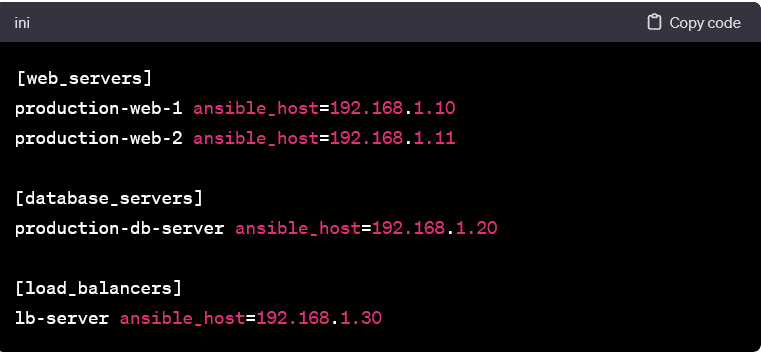

- Grouping hosts allows you to organize tasks efficiently. In this example, hosts are grouped based on their role. It enables targeted task execution.
-
Nested Groups and Subgroups:
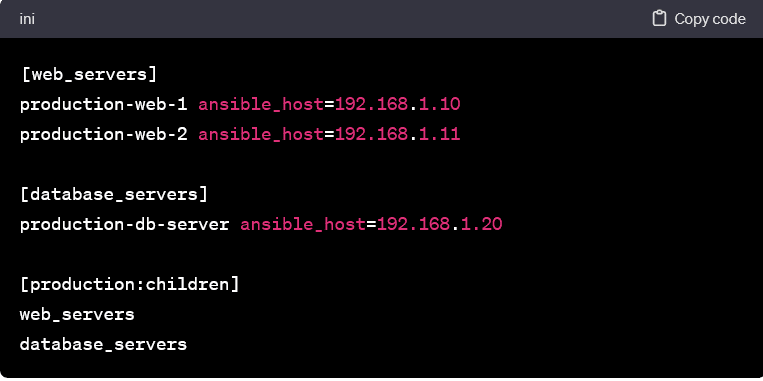

- Groups can be nested to create hierarchies. This is useful when dealing with complex infrastructures with multiple layers of categorization.
-
Dynamic Inventory for Cloud Environments:
- Ansible supports dynamic inventories. It allows you to generate inventory files dynamically based on external sources. Here’s an example of AWS using the py script.
-
Combining Static and Dynamic Inventories:
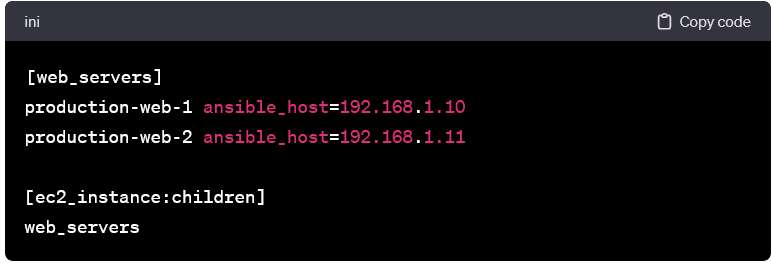

- You can combine static and dynamic inventories to manage a hybrid environment. Static entries coexist with dynamically generated entries.
These examples showcase the flexibility of Ansible inventories, demonstrating how you can tailor them to suit the structure of your infrastructure. Whether you’re managing a small set of servers or orchestrating a dynamic cloud environment, it doesn’t matter. Ansible’s inventory configurations empower you to organize & automate with precision.
Ansible Playbooks:
In the realm of Ansible, playbooks serve as the heart of automation. It can provide a powerful and declarative way to describe configurations and orchestrate complex tasks. A playbook is a YAML file that defines a set of plays. Each file specifies a series of tasks to be executed on hosts. Let’s delve into the key components and principles. These make Ansible playbooks the linchpin of efficient automation.
-
Structure of a Playbook:

- A typical Ansible playbook consists of a series of plays. Each play comprises a set of tasks. The structure is hierarchical, with plays at the top level and tasks nested within them. Here’s a minimal example:
-
Explanation of Components:
-
- name: A human-readable description of the play or task.
- hosts: The target hosts or groups on which the play will be executed.
- tasks: A list of tasks to be performed on the specified hosts.
-
Tasks and Modules:
- Tasks are the building blocks of playbooks. These represent actions to be taken by the hosts. Tasks use Ansible modules. These are discrete units of code that perform specific functions. In the example above, the task uses the apt module to ensure the Nginx package is installed.
-
Module Parameters:
- Modules accept parameters to customize their behavior. Name and state are parameters passed to the apt module in the example.
-
Idempotence:
- Ansible playbooks are designed to be idempotent, meaning they can be run multiple times without changing the outcome. This ensures a consistent and predictable state of the system.
-
Variables and Facts:
- Playbooks can leverage variables to make them more dynamic and reusable. Variables can be defined globally, within plays, or even dynamically fetched from hosts as facts during playbook execution.
-
Handlers:
- Handlers are tasks that respond to specific events triggered during playbook execution. For example, restarting a service when a configuration file changes. Handlers are defined separately and notified by tasks when needed.
-
Conditionals:
- Ansible allows the use of conditionals in playbooks. It enables tasks to be executed based on specified criteria. This enhances the flexibility and adaptability of playbooks.
-
Roles:
- Roles are a way to organize & package playbooks and related files. They promote code reuse and modularization. It makes it easier to manage complex automation projects.
-
Running Playbooks:
- Playbooks are executed using the ansible-playbook For example: bash ansible-playbook my_playbook.yaml
-
Error Handling:
- Ansible playbooks support error handling mechanisms. It allows you to define tasks or handlers. These respond to specific error conditions.
-
Tags:
- Tags allow you to run specific parts of a playbook selectively. It makes this useful for targeted execution and debugging.
-
Vaults:
- Ansible vaults enable the encryption of sensitive data within playbooks. It ensures secure storage of passwords and other confidential information.
-
Best Practices:
- Adhering to best practices, such as using meaningful names, organizing tasks logically, and documenting playbooks, contributes to maintainability and collaboration.
Ansible playbooks embody the philosophy of “infrastructure as code.” It provides a clear and concise way to express desired states and configurations. Whether managing servers, configuring software, or deploying applications, it doesn’t matter. Ansible playbooks are the go-to tool for automating the modern IT landscape.
Introducing the Concept of Playbooks and Their Role in Ansible Automation:
Playbooks take center stage in the orchestration symphony of Ansible, acting as the conductor guiding the automation process. A playbook is a human-readable and machine-parseable YAML file that defines a set of plays, each representing a sequence of tasks to be executed on specific hosts. Let’s explore the concept of playbooks and unravel their pivotal role in Ansible automation.
-
The Playbook Structure:

- At its core, a playbook is structured around plays, and each play encapsulates a specific set of tasks. A task, in turn, is a call to an Ansible module that performs a discrete action, such as installing a package, copying a file, or restarting a service.
-
Plays:
- A play is a set of tasks applied to a specific set of hosts. It defines the hosts on which the tasks will be executed (hosts), a name for the play, and the list of tasks to perform.
-
Tasks and Modules:
- Tasks represent the individual actions that Ansible will perform. These tasks utilize Ansible modules. These are pre-built units of code designed to carry out specific functions on the target hosts. Modules can manage packages, files, services, users, and much more.
-
Idempotence:
- One of the fundamental principles of playbooks is idempotence. This means that running a playbook multiple times will result in the same desired state, regardless of the system’s initial state. This ensures predictability and consistency.
-
Variables and Templating:
- Playbooks can use variables to make them dynamic and adaptable. Variables can be defined at various levels. It allows for customization based on the target hosts or other factors. Using the Jinja2 template engine, templating enhances the flexibility of variable usage.
-
Handlers:
- They are special tasks in playbooks that respond to specific events, such as task completion or configuration change. Handlers are only executed when notified by tasks. It ensures efficient and purposeful execution.
-
Roles:
- To further organize and modularize playbooks, Ansible introduces the concept of roles. Roles allow you to package and reuse sets of tasks. It makes managing complex automation projects and maintaining a clean and structured codebase easier.
-
Conditionals:
- Ansible playbooks support conditionals. It allows tasks to be executed based on specified criteria. This feature enhances the adaptability of playbooks to different scenarios and environments.
-
Execution:
- Playbooks are executed using the ansible-playbook This command reads the playbook, connects to the specified hosts, and orchestrates the defined tasks.
-
Error Handling and Logging:
- Ansible playbooks provide mechanisms for error handling. It lets you define tasks or handlers responding to specific error conditions. Additionally, Ansible provides robust logging capabilities to aid in troubleshooting and auditing.
-
Parallel Execution:
- By default, Ansible executes tasks in parallel across multiple hosts, optimizing performance and reducing execution time.
In summary, playbooks form the backbone of Ansible automation. It offers a structured and expressive way to define and execute tasks on hosts. Their modular and reusable nature, combined with features like idempotence and variables. This one makes Ansible playbooks a powerful tool for configuration management, application deployment, and infrastructure orchestration. As you embark on your Ansible journey, mastery of playbooks will unlock the full potential of automation in your IT workflows.
Examples of Simple Playbooks for Common Tasks:
To illustrate the practical application of Ansible playbooks, let’s explore a set of examples covering common tasks. These examples showcase the simplicity and versatility of Ansible in automating routine operations.
-
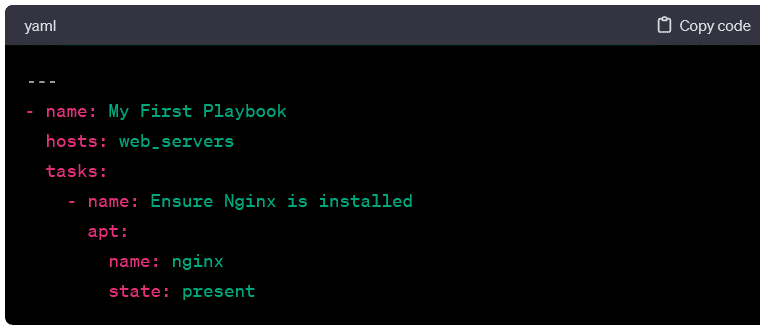
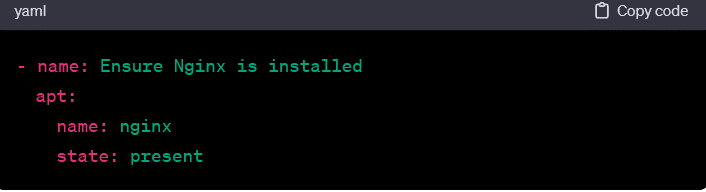
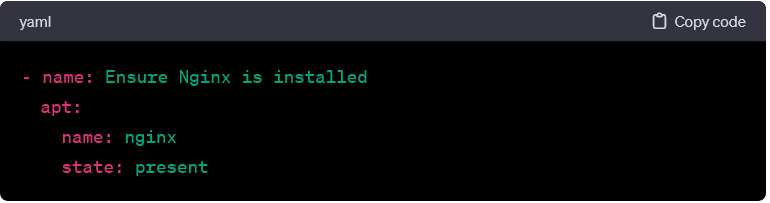
Installing Packages:
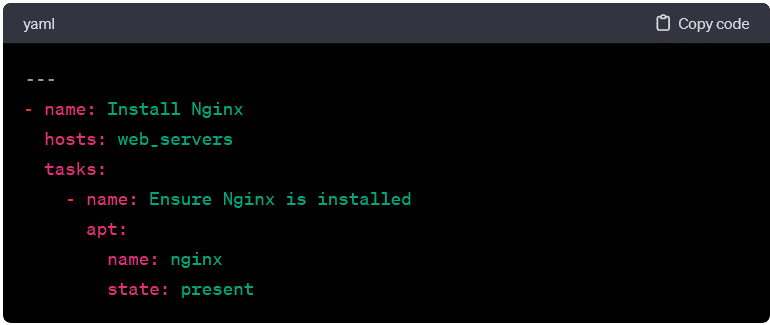

- This playbook ensures that a specific package is installed on targeted hosts.
-
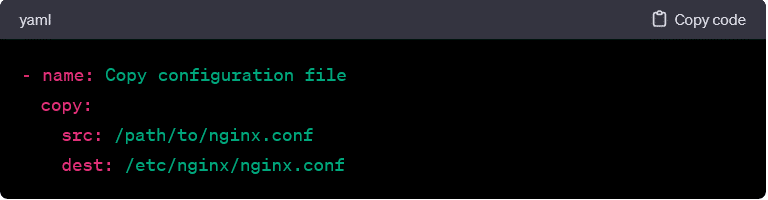
Copying Files:
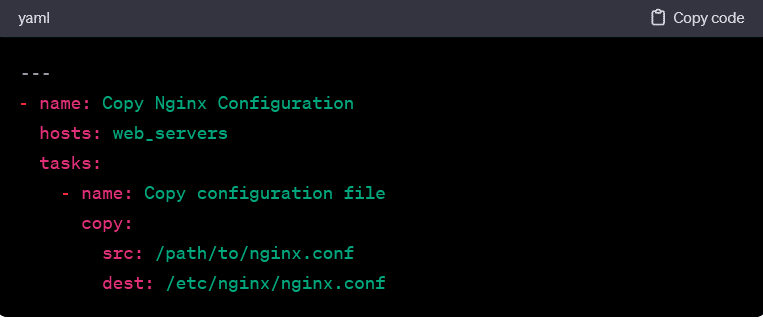

- This playbook copies a configuration file from the control machine to the specified location on the target hosts.
-
Managing Services:
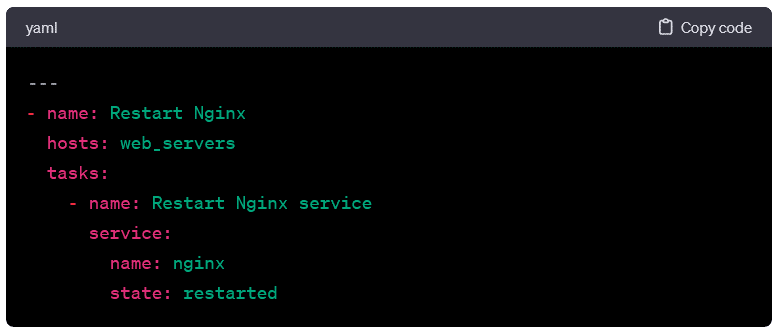

- Here, the playbook restarts the Nginx service on the target hosts.
-
User Management:
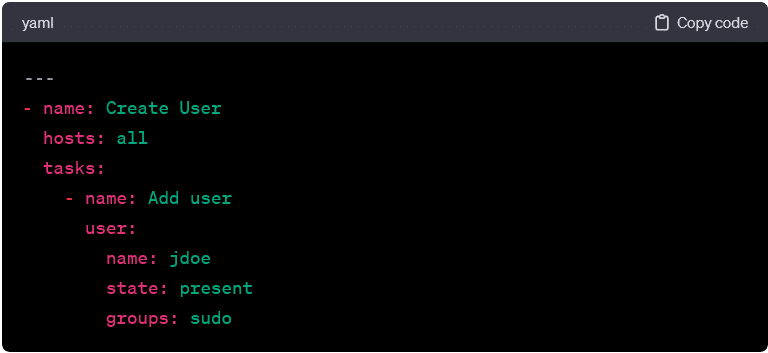

- This playbook adds a user with specified attributes to the target hosts.
-
Configuring Firewall Rules:
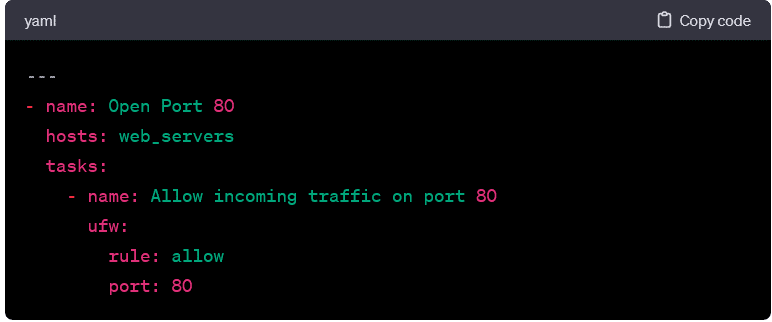

- The following playbook opens a specific port on the target hosts using the ufw
-
Managing System Packages:
- This playbook ensures that system packages are up-to-date on the target hosts.
-
Deploying from Git:
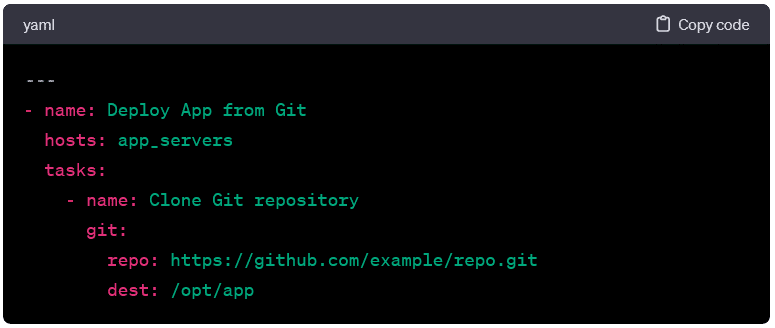

- Here, the playbook clones a Git repository to the target hosts.
-
Creating Directories:
- This playbook ensures that a specific directory exists on the target hosts.
-
Conditional Execution:
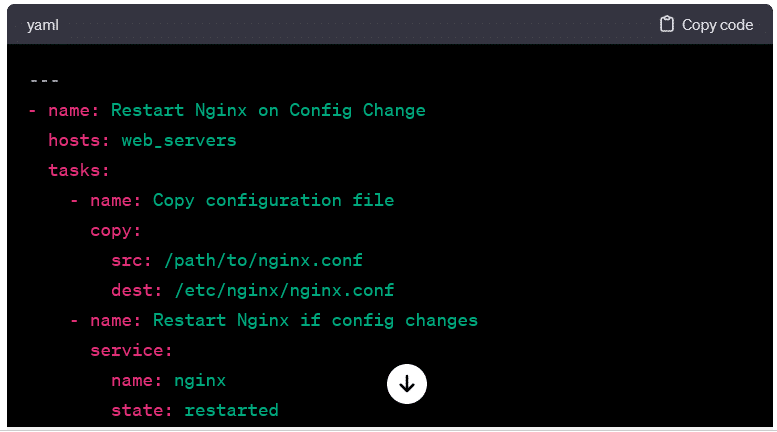

- Demonstrating conditional execution, this playbook only restarts the service if a configuration file changes.
These examples provide a glimpse into the versatility of Ansible playbooks. Whether managing packages, configuring services, or deploying applications, Ansible’s declarative syntax and modular approach make it an efficient and accessible tool for automating a wide range of tasks. As you explore and create your own playbooks, the flexibility and power of Ansible automation will become even more evident.
Ansible Modules:
In the Ansible ecosystem, modules play a pivotal role as the building blocks for task execution. Modules are standalone units of code responsible for carrying out specific actions on managed hosts. They encapsulate functions ranging from package installation to file manipulation, service management, and more. Understanding Ansible modules is crucial for effective playbook creation and automation. Let’s delve into the key aspects of Ansible modules and how they contribute to streamlined configuration management.
-
Diverse Functionality:
- Ansible modules cover a broad spectrum of functionalities, enabling users to interact with different aspects of the managed hosts. Common categories of modules include package management (apt, yum), file manipulation (copy, file), service control (service, systemd), user management (user, group), and more.
-
Declarative Syntax:
- Modules are designed with a declarative syntax. It allows users to specify the system’s desired state rather than detailing the step-by-step procedures. This aligns with the idempotent nature of Ansible. It enables the playbook to be rerun without adverse effects on the system.
-
Parameterized Execution:
- Modules accept parameters that tailor their behavior to specific requirements. These parameters are defined within the playbook. Besides, these allow users to customize how the module performs its designated action.
-
Examples of Common Modules:
-
- Package Management:
- Package Management:

• File Manipulation:
• Service Control:
• User Management:
-
Idempotence and Safety:
- Ansible modules contribute to the idempotence of playbooks. By checking the system’s current state before making changes, modules ensure that running the same playbook multiple times has no unintended consequences. This enhances the safety and predictability of automation workflows.
-
Module Documentation:
- Ansible provides comprehensive documentation for each module, detailing its parameters, usage, and supported platforms. This documentation serves as a valuable resource for users looking to leverage modules effectively.
-
Custom Modules:
- While Ansible has a vast collection of built-in modules, users can create custom modules to address specific needs. This extensibility allows for flexibility in handling unique scenarios or integrating with specialized tools.
-
Module Maintenance:
- As the Ansible ecosystem evolves, modules are updated to accommodate new features, enhancements, and compatibility with different operating systems. Regularly updating Ansible ensures access to the latest module functionalities and improvements.
-
Discovering Modules:
- The ansible-doc command can be used to explore module documentation directly from the command line, providing quick reference information on module parameters and usage.
-
Usage in Playbooks:
- Modules are integral to Ansible playbooks. In a playbook, a task references a specific module, and the desired action is described using the module’s parameters.
-
Version Compatibility:
- Ensuring compatibility between Ansible versions and module versions is essential for the smooth execution of playbooks. Module documentation specifies version requirements and supported Ansible versions.
Ansible modules empower users to automate a wide array of tasks with simplicity and efficiency. Their consistent and modular design facilitates the creation of playbooks that are powerful, maintainable, and adaptable to diverse IT environments. As you explore Ansible further, mastering the use of modules will significantly enhance your ability to automate complex configurations and operations.
Detailing Various Ansible Modules and Their Functions:
Ansible modules serve as the command-line tools for performing specific tasks on managed hosts. They encapsulate functionalities across different domains, providing a comprehensive toolkit for configuration management, system administration, and automation. Let’s delve into various Ansible modules, categorizing them based on common use cases and illustrating their functions.
Package Management Modules:
- apt:

- Manages packages on Debian/Ubuntu-based systems. Example:
- yum:
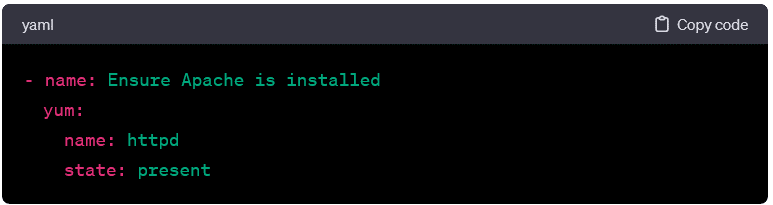

- Manages packages on Red Hat-based systems. Example:
- dnf:
- Similar to yum, it manages packages but is the package manager for newer versions of Fedora and Red Hat Enterprise Linux.
File and Directory Modules:
- copy:

- Copies files from the local machine to remote hosts.
- file:
- Manages files and directories on remote hosts.
- template:
- Manages files using templates, allowing dynamic content.
Service Management Modules:
- service:
- Controls services on remote hosts.
- systemd:
- Interacts with systemd services and timers.
User and Group Modules:
- user:
- Manages user accounts on remote hosts.
- group: – Manages user groups on remote hosts.
Network Modules:
- ios_command: – Executes IOS commands on Cisco devices.
- nmcli: – Manages NetworkManager connections on Linux systems.
Database Modules:
- mysql_db: – Manages MySQL databases.
- postgresql_db: – Manages PostgreSQL databases.
Cloud Modules:
- ec2: – Manages Amazon EC2 instances.
- azure_rm_virtualmachine: – Manages Azure Virtual Machines.
Security Modules:
- ufw: – Manages Uncomplicated Firewall (UFW) rules on Linux systems.
Using Modules within Playbooks:
Ansible playbooks harness the power of modules to perform specific tasks on managed hosts. Integrating modules within playbooks follows a declarative approach, where users describe the system’s desired state rather than specifying procedural steps. Let’s explore how modules are employed within playbooks and the key elements of their usage.
Playbook Structure:
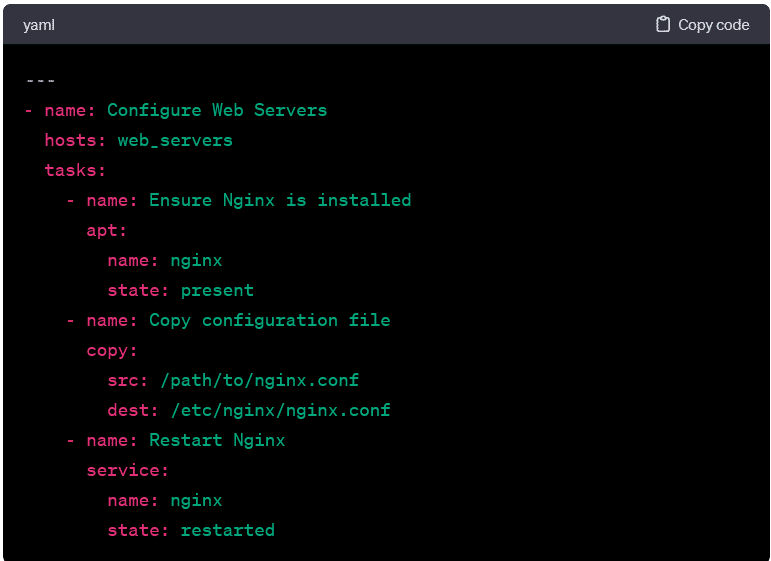
In a playbook, each task corresponds to the execution of a specific module on targeted hosts. The structure of a playbook consists of plays, which, in turn, contain tasks. Here’s a simplified example:
In this example:
- The first task uses the apt module to ensure that the Nginx package is installed (state: present).
- The second task utilizes the copy module to copy a configuration file from the local machine to the target hosts.
- The third task employs the service module to restart the Nginx service.
Module Parameters:
Each module accepts specific parameters that dictate its behavior. These parameters are defined within the playbook to customize the execution of the module. For instance, in the apt module task, the name parameter specifies the package to be installed (nginx), and the state parameter declares the desired state (present).
Task Execution and Idempotence:
Ansible modules are designed to be idempotent. It ensures that running the same playbook multiple times has a consistent outcome without unintended side effects. Idempotence is achieved by checking the system’s current state against the desired state specified in the playbook. If the system is already in the desired state, the module takes no action.
Variables and Templating:
Playbooks can use variables to make them more dynamic and reusable. Variables can be defined globally, within plays, or even dynamically fetched from hosts as facts during playbook execution. These variables can be interpolated into module parameters, allowing for flexibility and adaptability.
For example, using a variable for the package name:
Handlers:
They are special tasks in playbooks that respond to specific events, such as task completion or configuration change. Handlers are defined separately and are notified by tasks when needed. This helps in organizing tasks that should only be executed when necessary, promoting efficiency.
In this example, the Restart Nginx handler is notified by the first task. It ensures that the Nginx service is restarted only when necessary.
Conditionals:
Playbook conditionals in allow tasks to be executed based on specified criteria. This feature enhances the adaptability of playbooks to different scenarios and environments.
In this example, the task restarts the Nginx service only if the configuration file (nginx.conf) has changed.
Tags:
Playbooks tags allow you to selectively run specific parts of a playbook, making it useful for targeted execution and debugging. They are applied to tasks; you can specify which tags to include or exclude when running the playbook.
In this example, you can run only the tasks tagged with install or configure by specifying the corresponding tags when executing the playbook.
Understanding how to effectively use modules within playbooks empowers Ansible users to create robust and adaptable automation workflows. As you delve deeper into Ansible, mastering the interplay between modules, playbooks, and additional playbook features enhances your ability to automate complex configurations and operations across diverse IT environments.
Ansible Roles:
In Ansible, roles are a powerful organizational structure that facilitates the modularization and reuse of playbooks. Roles allow you to encapsulate related tasks, variables, and files into a well-defined directory structure, making managing and scaling your automation projects easier. Let’s explore the concept of Ansible roles, their structure, and how they contribute to efficient playbook management.
Role Structure:
A typical Ansible role has a predefined directory structure. Here’s an overview:
plaintext
my_role/
├── defaults/
│ └── main.yml
├── files/
├── handlers/
│ └── main.yml
├── meta/
│ └── main.yml
├── tasks/
│ └── main.yml
├── templates/
├── tests/
│ ├── inventory
│ └── test.yml
└── vars/
└── main.yml
- defaults/: Contains default variables for the role. These variables are used if no other values are provided.
- files/: Contains files that can be deployed to the managed hosts.
- handlers/: Contains handlers, which are tasks that respond to specific events triggered during playbook execution.
- meta/: Provides metadata about the role, such as dependencies.
- tasks/: Holds the main tasks for the role, often organized into separate files for clarity.
- templates/: Contains Jinja2 templates that can be used to generate configuration files.
- tests/: Includes files for testing the role, such as an inventory file and a test playbook.
- vars/: Holds variable files that can be used within the role.
Defining a Role:
Roles are defined in playbooks using the roles keyword. Here’s an example playbook that uses a role:
In this example, my_role is the name of the role. Ansible automatically looks for the role in the standard roles path, which typically includes a roles/ directory in the same location as your playbook.
Role Execution Flow:
When a playbook includes a role, Ansible follows a specific execution flow:
- meta/main.yml: If present, this file is processed first and may contain metadata about the role, such as dependencies.
- vars/main.yml and defaults/main.yml: Variables are loaded from these files, with defaults/main.yml providing default values.
- tasks/main.yml: The main tasks for the role are executed.
- handlers/main.yml: Handlers are executed based on events triggered during playbook execution.
Role Dependencies:
Roles can declare dependencies on other roles. This is specified in the meta/main.yml file. Dependencies are useful for organizing complex automation projects into manageable components.
Example meta/main.yml:
Reuse and Modularity:
Roles promote reuse and modularity by encapsulating functionality into self-contained units. They can be shared, versioned, and easily integrated into different playbooks and projects. This makes roles a fundamental building block for creating scalable and maintainable Ansible automation.
Role Variables:
Variables defined within roles have a specific scope. And it allows them to be used within the role but not globally in the playbook. This helps prevent variable naming conflicts and promotes encapsulation.
Dynamic Inclusion:
Roles support dynamic inclusion. It allows you to include a role conditionally or based on variables. This flexibility enhances the adaptability of roles to different scenarios.
Role Best Practices:
- Keep Roles Atomic: Roles should represent atomic units of functionality, focusing on specific tasks or responsibilities.
- Use Role Variables Wisely: Clearly document and organize role variables. Use defaults for non-sensitive values and allow users to override them as needed.
- Encourage Role Testing: Include test cases within the tests/ directory to ensure that roles work as expected in different scenarios.
- Consider Role Dependencies: Clearly document role dependencies and structure roles to be independent and reusable.
Role Galaxy:
Ansible Galaxy is a platform for sharing, discovering, and collaborating on roles. You can find pre-built roles on Galaxy or share your own roles with the community.
Ansible roles provide a structured and efficient way to organize and reuse automation code. By promoting modularity, encapsulation, and reusability, roles contribute to the scalability and maintainability of Ansible automation projects. Whether you’re building a simple playbook or a complex automation framework, incorporating roles enhances the flexibility and extensibility of your Ansible workflows.
Using Modules within Playbooks:
Ansible playbooks harness the power of modules to perform specific tasks on managed hosts. Integrating modules within playbooks follows a declarative approach, where users describe the system’s desired state rather than specifying procedural steps. Let’s explore how modules are employed within playbooks and the key elements of their usage.
Playbook Structure:
In a playbook, each task corresponds to the execution of a specific module on targeted hosts. The structure of a playbook consists of plays, which, in turn, contain tasks. Here’s a simplified example:
In this example:
- The first task uses the apt module to ensure that the Nginx package is installed (state: present).
- The second task utilizes the copy module to copy a configuration file from the local machine to the target hosts.
- The third task employs the service module to restart the Nginx service.
Module Parameters:
Each module accepts specific parameters that dictate its behavior. These parameters are defined within the playbook to customize the execution of the module. For instance, in the apt module task, the name parameter specifies the package to be installed (nginx), and the state parameter declares the desired state (present).
Task Execution and Idempotence:
Ansible modules are designed to be idempotent. It ensures that running the same playbook multiple times has a consistent outcome without unintended side effects. Idempotence is achieved by checking the system’s current state against the desired state specified in the playbook. If the system is already in the desired state, the module takes no action.
Variables and Templating:
Playbooks can use variables to make them more dynamic and reusable. Variables can be defined globally, within plays, or even dynamically fetched from hosts as facts during playbook execution. These variables can be interpolated into module parameters, allowing for flexibility and adaptability.
For example, using a variable for the package name:
Handlers:
They are special tasks in playbooks that respond to specific events, such as task completion or configuration change. And they are defined separately and are notified by tasks when needed. This helps in organizing tasks that should only be executed when necessary, promoting efficiency.
In this example, the Restart Nginx handler is notified by the first task. It ensures that the Nginx service is restarted only when necessary.
Conditionals:
ThePlaybooks Conditionals in allow tasks to be executed based on specified criteria. This feature enhances the adaptability of playbooks to different scenarios and environments.
In this example, the task restarts the Nginx service only if the configuration file (nginx.conf) has changed.
Tags:
Playbooks Tags allow you to selectively run specific parts of a playbook, making it useful for targeted execution and debugging. They are applied to tasks; you can specify which tags to include or exclude when running the playbook.
In this example, you can run only the tasks tagged with install or configure by specifying the corresponding tags when executing the playbook.
Understanding how to effectively use modules within playbooks empowers Ansible users to create robust and adaptable automation workflows. As you delve deeper into Ansible, mastering the interplay between modules, playbooks, and additional playbook features enhances your ability to automate complex configurations and operations across diverse IT environments.
Ansible Roles:
In Ansible, roles are a powerful organizational structure that facilitates the modularization and reuse of playbooks. Roles allow you to encapsulate related tasks, variables, and files into a well-defined directory structure, making managing and scaling your automation projects easier. Let’s explore the concept of Ansible roles, their structure, and how they contribute to efficient playbook management.
Role Structure:
A typical Ansible role has a predefined directory structure. Here’s an overview:
plaintext
my_role/
├── defaults/
│ └── main.yml
├── files/
├── handlers/
│ └── main.yml
├── meta/
│ └── main.yml
├── tasks/
│ └── main.yml
├── templates/
├── tests/
│ ├── inventory
│ └── test.yml
└── vars/
└── main.yml
- defaults/: Contains default variables for the role. These variables are used if no other values are provided.
- files/: Contains files that can be deployed to the managed hosts.
- handlers/: Contains handlers, which are tasks that respond to specific events triggered during playbook execution.
- meta/: Provides metadata about the role, such as dependencies.
- tasks/: Holds the main tasks for the role, often organized into separate files for clarity.
- templates/: Contains Jinja2 templates that can be used to generate configuration files.
- tests/: Includes files for testing the role, such as an inventory file and a test playbook.
- vars/: Holds variable files that can be used within the role.
Defining a Role:
Roles are defined in playbooks using the roles keyword. Here’s an example playbook that uses a role:
In this example, my_role is the name of the role. Ansible automatically looks for the role in the standard roles path, which typically includes a roles/ directory in the same location as your playbook.
Role Execution Flow:
When a playbook includes a role, Ansible follows a specific execution flow:
- meta/main.yml: If present, this file is processed first and may contain metadata about the role, such as dependencies.
- vars/main.yml and defaults/main.yml: Variables are loaded from these files, with defaults/main.yml providing default values.
- tasks/main.yml: The main tasks for the role are executed.
- handlers/main.yml: Handlers are executed based on events triggered during playbook execution.
Role Dependencies:
Roles can declare dependencies on other roles. This is specified in the meta/main.yml file. Dependencies are useful for organizing complex automation projects into manageable components.
Reuse and Modularity:
Roles promote reuse and modularity by encapsulating functionality into self-contained units. They can be shared, versioned, and easily integrated into different playbooks and projects. This makes roles a fundamental building block for creating scalable and maintainable Ansible automation.
Role Variables:
Variables defined within roles have a specific scope. And it allows them to be used within the role but not globally in the playbook. This helps prevent variable naming conflicts and promotes encapsulation.
Dynamic Inclusion:
Roles support dynamic inclusion. It allows you to include a role conditionally or based on variables. This flexibility enhances the adaptability of roles to different scenarios.
Role Best Practices:
- Keep Roles Atomic: Roles should represent atomic units of functionality, focusing on specific tasks or responsibilities.
- Use Role Variables Wisely: Clearly document and organize role variables. Use defaults for non-sensitive values and allow users to override them as needed.
- Encourage Role Testing: Include test cases within the tests/ directory to ensure that roles work as expected in different scenarios.
- Consider Role Dependencies: Clearly document role dependencies and structure roles to be independent and reusable.
Role Galaxy:
Ansible Galaxy is a platform for sharing, discovering, and collaborating on roles. You can find pre-built roles on Galaxy or share your own roles with the community.
Ansible roles provide a structured and efficient way to organize and reuse automation code. By promoting modularity, encapsulation, and reusability, roles contribute to the scalability and maintainability of Ansible automation projects. Whether you’re building a simple playbook or a complex automation framework, incorporating roles enhances the flexibility and extensibility of your Ansible workflows.
Exploring the Concept of Roles and How They Help Organize and Reuse Ansible Code:
Ansible roles are a cornerstone of effective automation, providing a structured and modular approach to organizing and reusing code. They play a pivotal role in simplifying playbook management, enhancing code readability, and fostering collaboration among teams. Let’s delve into the concept of roles and uncover how they contribute to efficient code organization and reuse within Ansible.
-
Modular Organization:
- At its core, a role is a collection of related tasks, variables, and files organized into a standardized directory structure. This modular organization allows you to compartmentalize and encapsulate functionality, making it easier to manage and comprehend.
-
Role Directory Structure:
- Ansible roles follow a prescribed directory structure, including tasks, defaults, files, templates, and more. This structure promotes consistency and ensures that roles are easily shareable and understandable.
-
Reusability Across Playbooks:
- One of the primary advantages of roles is their reusability. Once defined, a role can be seamlessly integrated into multiple playbooks. It allows you to leverage the same set of tasks and configurations across different projects. This not only saves time but also ensures consistency in configurations.
-
Role Inclusion in Playbooks:
- Including a role in a playbook is a straightforward process. In the playbook, you use the roles keyword and specify the name of the role:
- This inclusion syntax is concise and makes it clear which roles are associated with a particular playbook.
-
Variable Scoping:
- Roles have their own variable scope, preventing naming conflicts with variables from other roles or the global playbook scope. This encapsulation ensures that variables defined within a role are specific to that role, enhancing code robustness.
-
Default Values and Overrides:
- Roles can define default values for variables in the defaults/main.yml Users can override these defaults by defining variables in the playbook or by passing them as parameters during role inclusion.
-
Role Dependencies:
- Roles can declare dependencies on other roles, specifying required roles in the meta/main.yml This feature allows for the creation of modular and interconnected roles, facilitating the construction of complex automation solutions.
-
Dynamic Role Inclusion:
- Ansible supports dynamic role inclusion. It allows you to include a role conditionally or based on variables. This flexibility enhances the adaptability of roles to different scenarios and environments.
-
Role Testing:
- Roles often include a tests/ directory with test files to ensure their proper functioning in different scenarios. Testing roles is a best practice to maintain the reliability of automation code.
-
Ansible Galaxy:
- Ansible Galaxy serves as a hub for sharing and discovering roles. It is a community-driven platform where users can find pre-built roles, contribute their own, and collaborate with others. Ansible Galaxy promotes sharing best practices and accelerates the development of automation solutions.
-
Role Best Practices:
- Adhering to best practices when creating roles is essential. This includes keeping roles atomic, using variables wisely, encouraging testing, and considering role dependencies. Well-structured roles contribute to the maintainability and scalability of Ansible automation projects.
-
Role Versioning:
- It’s good practice to version your roles, especially when sharing them on Ansible Galaxy. Versioning ensures that users can explicitly specify the version of a role they want to use, helping to maintain consistency and avoid unexpected changes.
Ansible roles offer a systematic and scalable approach to organizing and reusing automation code. By encapsulating related tasks, variables, and files, roles enhance the clarity and maintainability of Ansible playbooks. Whether you are building simple configurations or complex automation frameworks, incorporating roles into your Ansible workflow is a key step toward efficient and collaborative infrastructure management.
Providing Examples of Creating and Using Ansible Roles:
Creating and using Ansible roles is a straightforward process that enhances code organization and promotes reusability. Let’s walk through examples of both creating and using roles to demonstrate their practical application.
Creating an Ansible Role:
Creating an Ansible role involves establishing a standardized directory structure and defining tasks, variables, and other necessary components. Let’s create a simple role for installing and configuring Nginx.
-
Create the Role Directory:
This command initializes a basic directory structure for the role named my_nginx_role.
• Define Tasks:
Edit the tasks/main.yml file within the role directory to include Nginx installation and configuration tasks.
• Define Default Variables:
Edit the defaults/main.yml file to set default variables for the role.
• Create a Template:
If you want to use a template for the Nginx configuration file, create a template file in the templates/ directory. For example, create templates/nginx.conf.j2.
Update the tasks/main.yml file to use the template.
• Define Handlers:
Edit the handlers/main.yml file to include a handler for restarting the Nginx service.
Using the Ansible Role:
Once the role is created, you can include it in a playbook for a specific set of hosts.
-
Create a Playbook:
Create a playbook that includes the role. For example, create a file named nginx_playbook.yml.
• Run the Playbook:
Execute the playbook using the following command.
- This command runs the playbook and deploys Nginx on the hosts specified in the inventory.
Role Dependencies:
Roles can have dependencies on other roles, allowing you to create modular and reusable automation. Let’s say your Nginx role depends on a common task role.
- Define Dependencies:
Edit the meta/main.yml file in the Nginx role to declare dependencies.
• Create the Common Tasks Role:
Create another role named common_tasks using a similar process as outlined above. This role can contain tasks that are common across multiple playbooks.
• Include Both Roles in a Playbook:
Create a playbook that includes both roles.
- Running this playbook will ensure that the common tasks role is executed before the Nginx role.
By creating and using roles in this manner, you can maintain a clean and organized codebase, foster code reuse, and simplify the management of complex Ansible playbooks. Roles can be shared, versioned, and integrated into various projects, providing a scalable solution for infrastructure automation.
Variables and Facts in Ansible:
In Ansible, variables and facts are fundamental components that provide flexibility and context-aware information during playbook execution. Understanding how to use and manipulate variables and facts is crucial for creating dynamic and adaptable automation workflows. Let’s explore the concepts of variables and facts in Ansible and how they contribute to the versatility of playbooks.
Variables:
- Definition:
- Variables in Ansible are placeholders that store information and can be referenced and manipulated throughout a playbook. They are used to make playbooks more flexible and adaptable to different scenarios.
- Variable Naming:
- Variable names in Ansible are case-sensitive and should consist of letters, numbers, and underscores. By convention, variables are written in lowercase with underscores to separate words (e.g., my_variable).
- Variable Assignment:
- Variables can be assigned values directly in playbooks or sourced from external files, group_vars, host_vars, or dynamically set during playbook execution.
- Variable Usage:
- Variables can be used throughout playbooks, including task parameters, conditions, templates, etc.
- Overriding Variables:
- Playbooks allow for variable overrides at different levels. Variables can be overridden in inventory files, at the command line, or by using precedence rules.
- Variable Default Values:
- Default values for variables can be set in roles or playbooks to ensure that they are defined even if not explicitly provided.
Facts:
- Definition:
- Facts in Ansible are pieces of information about remote systems gathered during playbook execution. They provide context-aware data that can be used to make decisions and dynamically adapt to the state of the managed hosts.
- Automatic Fact Gathering:
- Ansible automatically gathers facts from managed hosts when playbooks run. Facts include information about the operating system, network interfaces, hardware, and more.
- Accessing Facts:
- Facts are accessible in playbooks using the ansible_facts For example, ansible_facts[‘distribution’] provides the distribution name of the target system.
- Filtering Facts:
- Facts can be filtered to extract specific information. For instance, ansible_facts[‘network’][‘interfaces’][‘eth0’][‘ipv4’][‘address’] retrieves the IPv4 address of the eth0
- Custom Facts:
- Users can define custom facts by creating executable scripts that output key-value pairs. Custom facts are stored under ansible_facts[‘ansible_local’].
- Conditional Execution Based on Facts:
- Playbook tasks can be conditionally executed based on facts. This enables dynamic decision-making during playbook runs.
- Facts Caching:
- Ansible allows the caching of facts to speed up playbook runs, especially when dealing with a large number of hosts. The default caching method is JSON, but other options are available.
Variables and facts are essential components of Ansible that contribute to the dynamic and adaptable nature of automation workflows. By effectively using variables and leveraging facts about managed hosts, Ansible playbooks can be crafted to handle diverse scenarios, make informed decisions, and maintain a high degree of flexibility in managing infrastructure. As you delve into Ansible, mastering the manipulation of variables and facts enhances your ability to create sophisticated and responsive automation solutions.
Using Variables to Customize Ansible Playbooks:
Ansible leverages variables as a powerful mechanism to customize playbooks. It allows users to create dynamic and adaptable automation workflows. Variables can be employed to parameterize playbooks, make them reusable, and facilitate the management of configuration details across diverse environments. Let’s explore how Ansible uses variables and how they can be harnessed to customize playbooks effectively.
-
Variable Definition:
- Variables in Ansible can be defined at various levels, including in playbooks, inventory files, group_vars, host_vars, and external variable files. They serve as placeholders for values that can be referenced and manipulated throughout the playbook.
-
Variable Usage in Task Parameters:
- Variables can be used in task parameters to make playbooks adaptable to different scenarios. This is particularly useful for tasks where values may vary across hosts or environments.
-
Dynamic Variable Assignment:
- Variables can be dynamically assigned during playbook execution, allowing for real-time customization. This is achieved using the -e flag followed by key-value pairs.
-
Overriding Variables:
- Variable values can be overridden at different levels. It gives users flexibility in providing specific values for different scenarios. Overrides can be done in inventory files, on the command line, or by using precedence rules.
-
Variable Scope:
- Variables in Ansible have a specific scope. Their visibility is limited to the context in which they are defined. Understanding variable scope is crucial to preventing unintended conflicts and ensuring predictable behavior.
-
Default Variable Values:
- Playbooks often define default values for variables to ensure that they are always defined, even if not explicitly provided. This enhances playbook robustness and provides a fallback mechanism.
-
Conditionals Based on Variables:
- Playbook tasks can be conditionally executed based on variable values, enabling dynamic decision-making. This is achieved using the when keyword in tasks.
-
Variable Templates:
- Variables are often used in templates to create dynamic configuration files. This allows for the generation of configuration files with values that are determined at runtime.
-
Variable Files in Roles:
- Roles can define their own variables, providing a way to encapsulate configuration details within a role. Default values for these variables can be set in defaults/main.yml.
-
Encrypted Variables:
– Ansible supports encrypting sensitive variables using Ansible Vault. This ensures that sensitive information, such as passwords, is stored securely and can be decrypted during playbook execution.
ansible-vault encrypt_string ‘my_sensitive_password’ –name ‘db_password’
Playbook usage:
- Ansible’s use of variables provides a flexible and dynamic approach to customizing playbooks. Whether setting default values, dynamically assigning variables, or conditionally executing tasks based on variable values, mastering the use of variables enhances the adaptability and efficiency of Ansible automation workflows. As you work with Ansible, becoming proficient in manipulating variables allows you to create playbooks that are easily customizable and applicable to a variety of infrastructure scenarios.
Facts in Ansible: Gathering Information about Managed Hosts
Facts in Ansible are crucial pieces of information about managed hosts that provide context-aware data during playbook execution. Ansible automatically collects these facts as part of the initial setup, offering valuable insights into the characteristics and configuration of the target systems. Understanding how Ansible gathers facts and utilizes them in playbooks enhances the dynamic nature and adaptability of automation workflows.
-
Automatic Fact Gathering:
- When an Ansible playbook is executed, the first phase involves gathering facts from all managed hosts defined in the inventory. This process is automatic and collects a wide range of information about the host’s environment, such as operating system details, network configuration, hardware specifications, and more.
-
Accessing Facts:
- Facts are accessible within playbooks using the ansible_facts This variable contains a structured dictionary with various keys corresponding to different aspects of the managed host.
-
Common Facts:
- Ansible gathers a variety of common facts about managed hosts, including:
- Operating System Details: ansible_facts[‘distribution’], ansible_facts[‘distribution_version’]
- Network Interfaces: ansible_facts[‘network’][‘interfaces’]
- Memory Information: ansible_facts[‘ansible_memory_mb’]
- CPU Information: ansible_facts[‘ansible_processor_cores’]
- Disk Information: ansible_facts[‘ansible_devices’]
- Hostname: ansible_facts[‘ansible_hostname’]
-
Filtering Facts:
- Facts can be filtered to extract specific information, allowing playbook tasks to focus on relevant details. For example, retrieving the IPv4 address of the primary network interface:
-
Dynamic Variables Based on Facts:
- Facts serve as dynamic variables that can be used to conditionally execute tasks based on the characteristics of managed hosts. This enables playbooks to adapt to the specific attributes of each system.
-
Custom Facts:
- In addition to automatic facts, users can define custom facts by creating executable scripts that output key-value pairs. Custom facts are stored under ansible_facts[‘ansible_local’] and can be used like any other fact.
-
Facts Caching:
- Ansible allows the caching of facts to optimize playbook runs, especially in scenarios with a large number of managed hosts. By default, facts are cached in JSON format, but other caching options are available.
-
Fact Gathering Limitations:
- While facts provide valuable information, there are cases where the default facts might not be sufficient. In such situations, Ansible provides options to extend fact gathering using custom modules or by executing additional commands as tasks.
-
Facts and Playbook Efficiency:
- Efficient utilization of facts is crucial for playbook performance. Unnecessary fact gathering can be disabled for specific playbooks or tasks where detailed information about managed hosts is not required.
Facts in Ansible empower users with a wealth of information about managed hosts, laying the foundation for dynamic and adaptable playbook execution. By leveraging facts, Ansible playbooks become context-aware. It allows automation workflows to respond intelligently to the specific characteristics of each system. As you work with Ansible, mastering the use of facts enhances your ability to create efficient and responsive automation solutions tailored to diverse infrastructure environments.
Handlers in Ansible: Managing Service States and Events
Handlers in Ansible are specialized types of tasks that respond to specific events triggered during playbook execution. They are commonly used to manage services by restarting or stopping them when necessary. Understanding how handlers work and incorporating them into playbooks is essential. The reason is it needs to ensure that changes made during playbook runs take effect immediately. Let’s delve into the concept of handlers and explore how they contribute to the orchestration of Ansible playbooks.
-
Handler Definition:
- A handler in Ansible is a task associated with a particular name. Handlers are not executed immediately; instead, they are notified when specific events occur. These events are typically triggered by tasks that precede the handler in the playbook.
In this example, the notify keyword signals the associated handler, named Restart Apache, to run.
-
Declaring Handlers:
- Handlers are declared in the handlers section of a playbook. This section typically appears at the end of the playbook and is separate from regular tasks. Handlers are defined with a specific name and include the tasks to be executed when the handler is notified.
The handler named Restart Apache is defined to restart the Apache service.
-
Notifying Handlers:
- Handlers are notified by tasks that precede them in the playbook. The notify keyword is used to specify which handler should be triggered when a particular task makes changes that require the handler’s action.
In this example, the Restart Apache handler is notified when the task to restart the Apache service is executed.
-
Handling Multiple Notifications:
- Handlers can be notified by multiple tasks. These are executed only once, regardless of the number of notifications. This ensures that the associated action is performed consistently. It helps to avoid unnecessary service restarts or other actions.
Both tasks notify the Restart Apache handler. It is executed only once after both tasks have been completed.
-
Conditional Execution:
- Handlers can include conditions for execution, allowing for more fine-grained control over when they should run. This is useful when a handler’s action depends on specific circumstances.
This handler restarts Apache only if the service is present on the managed host.
-
Running Handlers Manually:
- Handlers can be executed manually using the –force-handlers option with the ansible-playbook This is helpful for testing or when you want to trigger handlers without making changes to the playbook.
-
Integration with Notify Module:
- The notify module can be used to trigger handlers explicitly. This is useful when you want to notify a handler based on a specific condition or event outside of regular task execution.
-
Ensuring Idempotence:
- Handlers contribute to the idempotence of Ansible playbooks. Even if multiple tasks notify the same handler, it is executed only once. It ensures that the associated action is performed in a consistent and controlled manner.
Handlers in Ansible play a crucial role in managing service states and responding to events triggered by playbook tasks. By notifying handlers based on specific conditions or changes in the playbook, users can orchestrate actions such as service restarts. It ensures that configurations are applied promptly. Incorporating handlers into playbooks enhances the reliability and responsiveness of Ansible automation workflows, particularly in scenarios where immediate actions are required to apply changes across managed hosts.
Introducing Handlers: How They Respond to Changes in a Playbook
Handlers in Ansible serve as responsive components that react to changes made during playbook execution. They are particularly useful for managing service states and executing specific actions when required. In this section, we’ll explore the introduction of handlers and how they dynamically respond to changes in an Ansible playbook.
-
Handler Introduction:
- Handlers are specialized tasks in Ansible playbooks that respond to specific events. These events are typically triggered by tasks that precede the handlers in the playbook. Handlers ensure that associated actions, such as service restarts or configuration updates, are performed only when necessary.
In this example, the task to restart the Apache service includes the notify keyword, indicating that the Restart Apache handler should be triggered.
-
Declaring Handlers:
- Handlers are declared in the handlers section of a playbook, which is distinct from the regular tasks. Each handler is assigned a unique name and includes the tasks to be executed when the handler is notified.
The handler named Restart Apache is defined to restart the Apache service.
-
Notifying Handlers:
- Tasks in the playbook can notify handlers by using the notify Suppose a task makes changes that require the associated handler’s action. Hence, the handler is notified and performs the specified tasks.
In this case, the Restart Apache handler is notified when the task to restart the Apache service is executed.
-
Handling Sequential Changes:
- Handlers can manage sequential changes made by different tasks. Suppose multiple tasks notify the same handler. In that case, it is executed only once. This one ensures that the associated action is performed consistently.
Both tasks notify the Restart Apache handler, which is executed only once after both tasks have been completed.
-
Conditional Execution:
- Handlers can include conditions for execution, providing fine-grained control over when they should run. This is beneficial when a handler’s action depends on specific circumstances.
In this example, the handler restarts Apache only if the service is present on the managed host.
-
Running Handlers Manually:
- Handlers can be executed manually using the –force-handlers option with the ansible-playbook This allows users to trigger handlers explicitly without making changes to the playbook.
-
Ensuring Idempotence:
- Handlers contribute to the idempotence of Ansible playbooks. Even if multiple tasks notify the same handler, it is executed only once. It ensures that the associated action is performed consistently.
Introducing handlers in Ansible playbooks adds a dynamic and responsive dimension to automation workflows. By responding to specific events triggered by tasks, handlers ensure that associated actions are executed when needed, such as restarting services or applying configuration changes. Incorporating handlers enhances the reliability and efficiency of Ansible playbooks, particularly in scenarios where immediate actions are required in response to changes across managed hosts.
Using Handlers Effectively: Practical Examples
Handlers in Ansible play a pivotal role in responding to changes made during playbook execution. Their effectiveness lies in managing tasks that require immediate actions, such as service restarts or configuration updates. Let’s explore practical examples of using handlers effectively to showcase how they enhance the orchestration and responsiveness of Ansible playbooks.
-
Restarting a Web Server:
- One common use case for handlers is restarting a web server after making configuration changes. In this example, the task updates the Apache configuration file, and the associated handler ensures that the Apache service is restarted only if changes are made.
The Update Apache Configuration task triggers the Restart Apache handler. It ensures that the Apache service is restarted if the configuration file is updated.
-
Delayed Service Restart:
- Handlers can be effectively used to delay the restart of service until a group of related tasks is completed. In the following example, the tasks update the configuration files for Apache, Nginx, and MySQL. The associated handler then restarts all three services only if changes are made.
The Restart Services handler restarts Apache, Nginx, and MySQL services if any of the configuration files are updated.
-
Conditional Restart Based on Changes:
- Handlers can incorporate conditions for execution, allowing for a more controlled response to changes. In this example, the handler restarts the PostgreSQL service only if the PostgreSQL configuration file is updated.
The Restart PostgreSQL handler checks if the PostgreSQL configuration file is among the changed files before restarting the service.
-
Handling Changes in Network Configuration:
- Handlers can be utilized to respond to changes in network configuration, such as updating firewall rules. In this example, the task updates the iptables configuration, and the associated handler reloads the iptables service.
The Reload iptables handler ensures that the iptables service is reloaded when the configuration file is updated.
-
Handling Changes in Custom Application:
- Handlers can be effectively employed in scenarios where changes to a custom application require specific actions. In this example, the task deploys a new version of a custom application, and the associated handler restarts the application server.
The Restart Application Server handler ensures that the custom application server is restarted when a new version is deployed.
The examples above illustrate how handlers in Ansible play a vital role in orchestrating actions in response to changes made during playbook execution. Whether restarting services, delaying restarts, conditionally executing actions, or responding to custom application updates, handlers enhance the effectiveness and responsiveness of Ansible playbooks. Incorporating handlers into your automation workflows allows you to manage and respond to changes efficiently across diverse infrastructure environments.
Best Practices for Ansible Playbooks:
While Ansible provides powerful capabilities for automating IT processes, adopting best practices ensures that your playbooks are efficient, maintainable, and scalable. Here are some recommended best practices to enhance your Ansible playbook development:
-
Organize Playbooks and Roles:
- Playbook Structure:
- Organize playbooks logically, separating different tasks into distinct playbooks.
- Use roles to encapsulate and reuse common functionality across playbooks.
plaintext
project/
├── playbooks/
│ ├── web_server.yml
│ ├── database_server.yml
├── roles/
│ ├── common/
│ ├── web_server/
│ ├── database_server/
-
Use Roles for Reusability:
- Role Structure:
- Define clear roles with a well-structured directory layout.
- Leverage role defaults for parameterization and flexibility.
plaintext
roles/
├── common/
│ ├── defaults/
│ ├── tasks/
│ ├── templates/
├── web_server/
│ ├── defaults/
│ ├── tasks/
│ ├── templates/
-
Variable Management:
- Variable Files:
- Use variable files for configuration management.
- Separate sensitive information, such as passwords, into encrypted files or use Ansible Vault.
plaintext
group_vars/
├── all.yml
├── development.yml
-
Conditional Execution:
- Use of when Statements:
- Employ when statements judiciously for conditional execution.
- Avoid unnecessary task runs by evaluating conditions efficiently.
-
Error Handling:
- Graceful Failure Handling:
- Implement graceful error handling by using failed_when and ignore_errors.
- Provide meaningful error messages for troubleshooting.
-
Documentation:
- Document Playbooks and Roles:
- Include clear and concise documentation within playbooks and roles.
- Describe the purpose, inputs, and expected outputs of tasks.
-
Testing and Validation:
- Use Ansible-Playbook Dry Run:
- Run playbooks in check mode (–check) to perform a dry run without making changes.
- Validate playbook syntax using ansible-playbook –syntax-check.
-
Version Control:
- Git Integration:
- Version control playbooks and roles using Git.
- Use branches for different environments or feature development.
-
Secrets Management:
- Ansible Vault:
- Store sensitive data securely using Ansible Vault.
- Encrypt variables or entire files with ansible-vault.
-
Parallel Execution:
- Use of -f Flag:
- Control parallelism with the -f flag to optimize playbook execution.
- Balance performance and resource utilization.
-
Regular Maintenance:
- Update Dependencies:
- Regularly update Ansible and related dependencies.
- Monitor for deprecated or changed functionality in new releases.
-
Monitoring and Logging:
- Integrate with Monitoring Tools:
- Integrate Ansible with monitoring tools for tracking changes.
- Capture playbook execution logs for auditing and troubleshooting.
-
Community Roles:
- Leverage Ansible Galaxy:
- Explore and use community-contributed roles available on Ansible Galaxy.
- Contribute back to the community by sharing roles.
Adopting these best practices will enhance the development, maintainability, and scalability of your Ansible playbooks. Consistent use of roles, effective variable management, and attention to error handling contribute to the reliability and efficiency of your automation workflows. As you refine your Ansible practices, consider the specific needs and characteristics of your infrastructure to optimize your automation processes effectively.
Best Practices for Writing Clean and Maintainable Ansible Code:
Maintaining clean and readable Ansible code is essential for collaboration, troubleshooting, and long-term manageability. Adhering to best practices ensures that your Ansible playbooks and roles are efficient, understandable, and easy to maintain. Here are some recommended practices for writing clean and maintainable Ansible code:
-
Consistent Indentation:
- Use Spaces for Indentation:
- Consistently use spaces for indentation, typically four spaces per level.
- Avoid using tabs, as they can lead to inconsistent formatting.
-
Descriptive Naming Conventions:
- Meaningful Task and Variable Names:
- Use descriptive and meaningful names for tasks, roles, and variables.
- Choose names that clearly convey the purpose of each element.
-
Modularization with Roles:
- Organize Code into Roles:
- Modularize playbooks using roles for better organization and reuse.
- Each role should encapsulate a specific functionality.
plaintext
roles/
├── common/
│ ├── tasks/
│ ├── templates/
├── web_server/
│ ├── tasks/
│ ├── templates/
-
Parameterization with Variables:
- Use Variables for Flexibility:
- Parameterize your playbooks and roles using variables for adaptability.
- Define default values in role defaults to enhance flexibility.
-
Logical Structure:
- Organize Playbooks Logically:
- Structure playbooks in a logical order, starting with the essential tasks.
- Group related tasks together to improve readability.
-
Comments for Clarity:
- Include Comments Sparingly:
- Use comments judiciously to explain complex tasks or provide context.
- Focus on writing self-explanatory code, reducing the need for excessive comments.
-
Encapsulation of Tasks:
- Group Related Tasks in Blocks:
- Use blocks to encapsulate related tasks.
- This enhances readability and allows for efficient error handling.
-
Error Handling:
- Graceful Error Handling:
- Implement graceful error handling using failed_when and ignore_errors.
- Provide meaningful error messages for troubleshooting.
-
Regular Refactoring:
- Refactor for Maintainability:
- Regularly review and refactor your code for improved maintainability.
- Remove deprecated or redundant tasks and variables.
-
Documentation:
- Include Documentation in Playbooks:
- Provide clear documentation within your playbooks and roles.
- Explain the purpose, inputs, and expected outputs of tasks.
-
Version Control and Git Commit Messages:
- Use Git for Version Control:
- Version control your playbooks using Git.
- Write clear and descriptive commit messages for changes.
-
Testing and Validation:
- Use Ansible-Playbook Dry Run:
- Run playbooks in check mode (–check) to perform a dry run without making changes.
- Validate playbook syntax using ansible-playbook –syntax-check.
-
Integrate with CI/CD:
- Continuous Integration and Deployment:
- Integrate Ansible playbooks with CI/CD pipelines for automated testing and deployment.
- Ensure that your playbooks can be seamlessly integrated into your deployment workflows.
Incorporating these best practices into your Ansible coding practices ensures that your automation workflows are not only effective but also maintainable in the long run. By writing clean, modular, and well-documented code, you contribute to the scalability and reliability of your Ansible playbooks, making them adaptable to the evolving needs of your infrastructure.
Handling Sensitive Information in Ansible: Strategies and Best Practices
Securing sensitive information, such as passwords and API keys, is crucial in Ansible playbooks to ensure the confidentiality of your infrastructure automation. Here are strategies and best practices for managing sensitive data in Ansible:
-
Use Ansible Vault:
- Encrypt Sensitive Data:
- Utilize Ansible Vault to encrypt sensitive information, such as passwords or API keys.
- Encrypt specific variables or entire files containing sensitive data.
- Decrypt and Edit:
- Use ansible-vault edit to decrypt and edit an encrypted file securely.
-
Vault Password File:
- Securely Store Vault Passwords:
- Store the Ansible Vault password securely in a file.
- Use the –vault-password-file option to specify the path to the password file.
-
Environment Variables:
- Use Environment Variables for Passwords:
- Avoid hardcoding passwords in playbooks.
- Use environment variables to pass sensitive information securely.
-
Prompt for Passwords:
- Interactive Password Prompts:
- Prompt users for sensitive information interactively during playbook execution.
- Use the –ask-vault-pass option to prompt for the Vault password.
-
Credential Plugins:
- Utilize Credential Plugins:
- Leverage credential plugins, such as ansible-vault or external tools.
- Customize the plugin configuration in the cfg file.
-
Store Secrets in Separate Files:
- Isolate Sensitive Data:
- Store sensitive data in separate files to easily manage and update secrets.
- Reference these files in your playbooks as needed.
-
Use Credential Management Tools:
- Leverage External Tools:
- Integrate with credential management tools, such as HashiCorp Vault or CyberArk.
- Fetch credentials dynamically during playbook execution.
-
Restrict Access to Sensitive Files:
- Set File Permissions:
- Restrict access to files containing sensitive information.
- Use appropriate file permissions to limit visibility.
-
HashiCorp Vault Integration:
- Integrate with HashiCorp Vault:
- Utilize HashiCorp Vault for centralized secret management.
- Configure Ansible to fetch secrets dynamically from Vault.
-
Review and Rotate Secrets:
- Regularly Review and Rotate:
- Regularly review and rotate sensitive information.
- Update passwords and API keys to enhance security.
-
Secure Storage Options:
- Explore Secure Storage Solutions:
- Investigate secure storage solutions for sensitive data.
- Solutions like AWS Secrets Manager or Azure Key Vault can enhance security.
-
Documentation and Training:
- Educate Teams on Best Practices:
- Provide documentation and training on handling sensitive information securely.
- Ensure that team members understand and follow best practices.
Implementing robust strategies for handling sensitive information is paramount in ensuring the security of your Ansible automation. Whether leveraging Ansible Vault, external tools, or secure storage solutions, it’s essential to adopt a proactive approach to safeguarding sensitive data. By following these best practices, you can fortify your Ansible playbooks against unauthorized access and potential security risks.
Real-World Examples:
Here are practical examples of how Ansible can be used in real-world scenarios across system administration, configuration management, and application deployment:
-
System Administration:
Automated System Updates:
- Objective: Automate the process of updating software packages on multiple servers.
- Explanation: This playbook ensures that all servers in the specified group (servers) have their software packages updated. The apt module is used for systems using Debian-based package management.
User Management:
- Objective: Manage user accounts and their permissions on a group of servers.
- Explanation: This playbook creates a user named “john” with a securely hashed password and adds the user to the “sudo” group, granting administrative privileges.
-
Configuration Management:
Web Server Configuration:
- Objective: Configure and deploy a web server on multiple nodes.
- Explanation: This playbook installs Apache on servers belonging to the “web_servers” group and starts the Apache service.
Firewall Configuration:
- Objective: Ensure that firewall rules are consistent across different servers.
- Explanation: This playbook uses the ufw module to allow SSH and HTTP traffic. It ensures consistent firewall rules on the specified servers.
-
Application Deployment:
Dockerized Application Deployment:
- Objective: Deploy a Dockerized application on multiple servers.
- Explanation: This playbook installs Docker on servers in the “app_servers” group, pulls the latest Nginx image, and runs a Docker container named “my_app.”
Database Deployment and Configuration:
- Objective: Deploy a database server and configure it for an application.
- Explanation: This playbook installs PostgreSQL on servers in the “db_servers” group, creates a database named “my_database,” and a user named “my_user” with a secure password.
These real-world examples showcase the versatility of Ansible in automating routine tasks across system administration, configuration management, and application deployment. By leveraging Ansible playbooks, organizations can streamline their operations, enhance consistency, and deploy applications efficiently across diverse infrastructure environments.
Troubleshooting Ansible: Addressing Common Issues and Seeking Assistance
Common Issues and Troubleshooting:
-
Authentication and Permissions:
- Issue: Playbooks fail due to authentication issues or insufficient permissions.
- Troubleshooting:
- Ensure that SSH keys are properly configured for passwordless authentication.
- Verify that the user running Ansible has the necessary permissions on target hosts.
- Check file permissions for sensitive files, such as Ansible Vault files.
-
Inventory Errors:
- Issue: Playbooks fail to run because of issues with the inventory file.
- Troubleshooting:
- Validate the inventory file syntax using the ansible-inventory
- Check hostnames and IP addresses for correctness.
- Ensure that the inventory file is accessible and correctly specified in the playbook.
-
Module Issues:
- Issue: Modules fail to execute tasks as expected.
- Troubleshooting:
- Review module documentation for correct parameters and usage.
- Check for typos or syntax errors in module arguments.
- Verify that the module is supported by the target system.
-
Network Connectivity:
- Issue: Playbooks fail due to network connectivity issues.
- Troubleshooting:
- Test network connectivity between the Ansible control node and target hosts.
- Check for firewalls or security groups blocking communication.
- Ensure that DNS resolution is working correctly for hostnames.
-
Ansible Version Compatibility:
- Issue: Playbooks created for a specific Ansible version fail on a different version.
- Troubleshooting:
- Check the Ansible release notes for any breaking changes between versions.
- Use version pinning or virtual environments to manage Ansible versions.
- Update playbooks to be compatible with the targeted Ansible version.
-
Variable and Facts Issues:
- Issue: Variables or facts are not being set correctly in playbooks.
- Troubleshooting:
- Print variables or facts using the debug module for debugging.
- Check the variable naming and scope in the playbooks.
- Verify that facts are available for the target hosts.
Seeking Further Assistance:
-
Ansible Documentation:
- Resource: Ansible Documentation
- Description: The official Ansible documentation is a comprehensive resource covering all aspects of Ansible, from basic concepts to advanced topics. Users can refer to the documentation for in-depth information and troubleshooting guidance.
-
Ansible Community and Forums:
- Resource: Ansible Community
- Description: The Ansible community is an active space where users can seek help, share experiences, and ask questions. Participating in discussions and forums can provide valuable insights and solutions to common issues.
-
GitHub Issues:
- Resource: Ansible GitHub Issues
- Description: The GitHub repository for Ansible is an excellent place to report bugs, find solutions to known issues, and stay informed about the latest developments. Users can search or open new issues for problem resolution.
-
Stack Overflow:
- Resource: Ansible Questions on Stack Overflow
- Description: Stack Overflow is a popular platform for asking and answering technical questions. The “ansible” tag on Stack Overflow is dedicated to Ansible-related queries, and users can find solutions to common issues posted by the community.
-
Ansible IRC Channel:
- Resource: Ansible IRC Channel
- Description: The Ansible community maintains an IRC channel on Freenode. Users can join the channel to engage in real-time discussions, ask for help, and connect with other Ansible enthusiasts.
-
Training and Courses:
- Resource: Ansible Training
- Description: Ansible offers official training courses and webinars that cover various aspects of using Ansible. These resources can provide users with structured learning opportunities to enhance their skills and troubleshoot effectively.
Conclusion: Unlocking the Power of Ansible
Troubleshooting Ansible-related issues is an integral part of the automation journey. Users need to address common issues and leverage community resources. In addition, users can enhance their proficiency in Ansible and overcome challenges effectively. The Ansible community, documentation, and forums serve as valuable assets for users seeking assistance and sharing their experiences.
In conclusion, Ansible stands as a powerful and versatile automation tool. It streamlines IT operations. Further, it transforms the way infrastructure is managed. Throughout this guide, we’ve explored the fundamental concepts of Ansible, from its installation and setup to the creation of playbooks, roles, and the orchestration of complex tasks. Let us recap the key points and encourage further exploration of advanced features and community engagement.
Key Takeaways:
-
Simplicity and Agentless Operation:
Ansible’s agentless architecture simplifies automation, eliminating the need for agents on managed hosts.
YAML-based playbooks provide a human-readable and easy-to-understand syntax, facilitating quick adoption.
-
Declarative Configuration Management:
Ansible employs a declarative approach, defining the desired state of systems rather than scripting procedures.
Playbooks describe tasks, and Ansible ensures the system converges to the specified state.
-
Modularity with Roles:
Roles enhance code organization and reuse, promoting modular and maintainable automation.
By encapsulating functionality into roles, users can share and apply standardized configurations across different projects.
-
Dynamic Inventories and Scalability:
Dynamic inventories enable the automatic discovery of hosts, accommodating dynamic infrastructure.
Ansible’s scalability makes it suitable for both small-scale operations and enterprise-level deployments.
-
Extensibility with Modules and Plugins:
A rich ecosystem of modules and plugins extends Ansible’s functionality.
Users can contribute custom modules and plugins to address specific use cases.
-
Security with Ansible Vault:
Ansible Vault ensures the secure handling of sensitive information, such as passwords and API keys.
Encrypted files and secure practices protect confidential data in automation workflows.
-
Community Support:
The Ansible community serves as a valuable resource for sharing knowledge and troubleshooting.
Documentation, forums, and social platforms offer avenues for learning and collaboration.
Encouragement for Further Exploration:
As you embark on your Ansible journey, consider exploring more advanced features to deepen your automation expertise:
-
Advanced Playbook Features:
Explore advanced playbook features like conditionals, loops, and error handling for intricate automation scenarios.
Dive into Ansible Galaxy to discover and leverage pre-built roles from the community.
-
Dynamic Inventories and Cloud Integrations:
Investigate dynamic inventories for dynamic infrastructure and explore Ansible’s cloud integrations for seamless management of cloud resources.
-
Container Orchestration with Ansible:
Extend your skills to container orchestration by integrating Ansible with tools like Docker, Kubernetes, and OpenShift.
-
Ansible Tower/AWX for Enterprise Automation:
Explore Ansible Tower or its open-source version, AWX, for centralized management, role-based access control, and job scheduling.
Contributing to the Ansible Community:
Finally, consider becoming an active member of the Ansible community. Contribute to the wealth of knowledge, share your experiences, and collaborate with fellow automation enthusiasts. Here are a few ways to engage:
-
Share Your Playbooks and Roles:
Contribute your playbooks and roles to Ansible Galaxy, making them available for others to use and learn from.
-
Participate in Discussions and Forums:
Join discussions on the Ansible Community Forum and other platforms to seek advice, share insights, and collaborate with peers.
-
Report Bugs and Contribute to Development:
Engage with the GitHub repository, report bugs, and consider contributing to Ansible’s development by submitting pull requests.
-
Attend Ansible Events and Webinars:
Attend Ansible webinars, conferences, and events to stay updated on the latest developments and connect with like-minded individuals.
Closing Thoughts:
Ansible empowers individuals and organizations to automate with simplicity and efficiency. As you continue your journey with Ansible, keep the community spirit alive, and remember that continuous exploration and collaboration pave the way for innovation and excellence in automation. Happy automating!


