Have you found the Microsoft Compatibility Telemetry issue on your windows 10? If you have experienced the problem, you should try to fix the issue to speed up the computer. Our article informs you of all the essential solutions to solve the problem. Let’s dive into the article to learn about Microsoft compatibility telemetry and what it is.
What is Microsoft Compatibility Telemetry?
Microsoft Compatibility Telemetry is a service of Windows Server 2019. It holds technical data that lets you know how the device and related software works. Generally, it sends the data to Microsoft to improve the system in the future and enhance the user experience.
Reasons to Turn Off Microsoft Compatibility Telemetry:
Usually, PC users complain about getting CompatTelRunner.exe high disk usage Windows 10 issues on different online forums. As a result, it causes performance issues like slowdowns and program crashes.
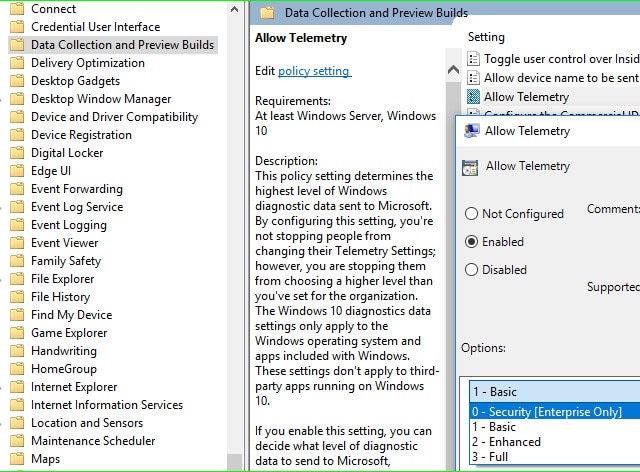
Besides, people are concerned about privacy. As per Microsoft, four stages of Windows diagnostic data collection exist Security, Basic, Enhanced, and Full. Each one is different in the size of data collected. However, a few users don’t want to be tracked at all. Therefore, you must also prefer to have Privacy. That’s why we recommend you disable the tracking services on your device.
You must not want to see your computer slowing down. Hence, it is better to have a bit more privacy. Go through our article to know how you should disable CompatTelRunner.exe on Windows.
Remember that the file belongs to Windows operating system and is digitally signed. Generally, we don’t recommend removing digitally signed OS files. Therefore, it can cause system stability-related issues. In simple words, it is better to disable the procedure. But if you are unwilling to remove or disable it, prevent the method from running via Windows Task Manager first. Hence, you should tap on CompatTelRunner.exe and End Task after that. It is recommended not to turn off the service. Whether you are willing to turn off it, try these general steps.
Steps:
- Tap on Start and then write Task Scheduler. Next, you should tap Enter.
- When you are on the TaskScheduler window, you should navigate to the following route: Task Scheduler Library\Microsoft\Windows\Application Experience.
- Move to the Application Experience folder, and find the Microsoft Compatibility Appraiser.
- After that, you should tap on it and choose Disable. Next, you should ensure that the method is finished.
- Run the following command in an elevated command prompt:
sc delete DiagTrack
sc delete dmwappushservice
echo “” >
C:\\ProgramData\\Microsoft\\Diagnosis\\ETLLogs\\AutoLogger\\AutoLogger-Diagtrack-Listener.etl
reg add HKLM\SOFTWARE\Policies\Microsoft\Windows\DataCollection /v AllowTelemetry /t REG_DWORD /d 0 /f
How Do to Fix The Microsoft Compatibility Telemetry Problem:
How do I turn off Microsoft compatibility telemetry in windows 10? It is how you can do so. Here follows a step by step guide.
Disable Microsoft Compatibility Telemetry:
Method 1) Disable via Local Group Policy Editor:
Turning it off through Group Policy Editor is easy to fix the Microsoft compatibility telemetry windows 10 problem.
Step 1: Tap on the Windows logo key and the R key simultaneously. After that, you can see the Run command window appearing.
Step 2: Write gpedit.msc and tap on OK to open the windows Group Policy Editor.
Step 3: Navigate to the Computer Configuration and then Administrative Templates. Afterward, move to Windows Components, Data Collection, and Preview Builds.
Step 4: Choose the option Allow Telemetry on the right panel and then tap two times on it.
Step 5: Now, you should choose Disabled. Then, tap on OK to save the setting.
After doing these, if Microsoft compatibility telemetry disable windows 10 issue does not exist, your PC won’t slow again. If you want, you can try other solutions to fix the problem. For instance, you can try using the Registry Editor or third-party software. However, using Group Policy Editor to turn off it is the simplest way.
Method 2) Disable via Registry Editor:
You can turn it off by editing registry entries. Thus, it becomes possible to prevent Microsoft from collecting your data. We recommend you make a backup for your registry before beginning the following steps while you are not familiar with it. Hence, you should open the Registry Editor, go to File, Expert, and save the backup to a safe location. If any wrong action is made on registry entries connected to critical system files, it could cause unforeseen problems. Therefore, you should perform the following steps.
Step 1: You should write Registry Editor in the Start menu search box. After that, it is possible to find the option “Registry Editor.” Then, tap on Run as administrator.
Step 2: After that, you should browse the editor and look for the DataCollection entry through this path:
Computer\HKEY_LOCAL_MACHINE\SOFTWARE\Policies\Microsoft\Windows\DataCollection
Step 3: Tap on the empty space on the right panel. Next, you should select New and DWORD (32-bit) Values. After that, you should set the name as AllowTelemetry.
Step 4: Tap two times on the newly created entry. After that, you should change the “Value data” to 0. Finally, tap on OK to save changes.
Method 3) Disable Connected User Experiences and Telemetry Service:
It is a background Windows service that can provide data automatically to Microsoft. In addition, the service can send diagnostic and usage details to the servers. Therefore, if you disable the service, it can help you to solve the high CPU or Disk usage problem by CompatTelRunner.exe.
- First, hold the Windows+R keys down to open Run.
- Then, write services.msc in the Run dialog box, and hit OK.
- After that, you should scroll through the services list. Next, you can find the Connected User Experiences and Telemetry service.
- Tap on Connected User Experiences and Telemetry and then on Properties.
- Hit the Stop button under the Service status section.
- While under Startup type, you should try opening the drop-down menu. Then, you should choose Disabled.
- Tap on Apply and OK simultaneously.
- Finally, shut down the Services window.
Set Diagnostic Data to Basic:
Step 1: Tap on the Start menu and select the Settings option.
Step 2: Head toward the pop-up Windows Settings and tap on Privacy. Next, tap on Diagnostics & Feedback.
Step 3: Under the “Diagnostic data” section, you should select the “Required diagnostic data.”
Step 4: You can find other sections like “Improve inking and typing” and “Tailored experiences” on a similar page. Hence, you should turn off the bar.
Delete CompatTelRunner.exe:
Step 1: Navigate to the path “C:\Windows\System32” in the Windows File Explorer. After that, find the CompatTelRunner.
Step 2: Your job is to tap on CompatTelRunner and select the option Properties. Next, you should move to the Security tab and hit the Advanced button. Then, you have to change the link and hit the Advanced button.
Step 3: Hit the Find Now button and find your account under the “Search results” column. After that, hit the OK button.
Step 4: You must return to the “Advanced Security Settings” window and hit the Apply button. Then, you should tap on OK while a message box appears.
Step 5: You should go back to the Properties again. Now, hit the Edit button to change anything on permission. Then, you should choose Administrators and check the option, Full Control, below the “Allow” option. Now, you need to make changes to save them.
Step 6: Tap on CompatTelRunner and delete it.
Scan and Repair Corrupt System Files:
Corrupted system files or errors might cause a problem on the hard drive. In this case, you should try running the SFC and chkdsk commands. These can help you to troubleshoot the issue.
Step 1: Go to the Windows searching box and write Command in the Windows searching box. After that, your job is to tap on Run as administrator after seeing Command Prompt in the search box.
Step 2: You should write SFC /scannow in Command Prompt. After that, hit the Enter key. Now, you should wait till the process is not ending.
Step 3: Write chkdsk /r and hit Enter key. Ensure that you need to write Y and hit Enter key while getting the message “Chkdsk cannot run because the volume is in use by another process. Would you like to schedule this volume to be checked the next time the system restarts?”
Step 4: Finally, you need to reboot the PC. Wait till the disk check process is not finishing.
Install Windows Updates:
Remember that you can solve multiple problems after installing the recent updates, like the high CPU and high disk problem. The process of updating Windows 10 is as follows:
Step 1: You should tap on the Start menu and select Settings. After that, tap on the Update & Security.
Step 2: You should hit the Check for updates button. Then, you need to check if there are updates.
Step 3: You need to download updates and install them. Then, you should reboot the PC if necessary.
Check and Repair Bad Sectors for Hard Drive:
If the PC becomes slow, the bad sector is one of the significant reasons. If you find the PC becoming slow, it is better to download a Free Edition tool and run it to check bad sectors. The tool can help you in data recovery, partition management, backup & restore, etc.
Step 1: You should first choose the Disk you are willing to check bad sectors. After that, move to the main menu and select Disk. Next, your job is to verify or try repairing Bad Sectors.
Step 2: Now, you should hit the Start Verify button to check whether any bad sectors exist on the Disk.
Look For Other Issues Causing Slow Windows Performance:
If none helps you to fix the Microsoft compatibility telemetry high CPU problem, check other issues; if these are the culprits of the issue, disable the windows 10 issue. But if you are experiencing system slowdowns and are willing to take an additional step toward peak computer performance, you should first learn how to speed up Windows 10.
A few users expressed complaints online about compattelrunner.exe with error 0x8024002e. If you are facing a Windows update error, you should know more about available 0x8024002e fixes. It is expected that you can manage to fix the Microsoft compatibility telemetry windows 10 high disk usage issue. Now, you can find the PC working smoothly now. However, you can share other methods if you know something.
The Bottom Line:
Our article lets you know the most effective fixes to Microsoft Compatibility Telemetry high CPU usage or high disk usage problem. Try these fixes on the PC. Besides, you should remember that you must back up Windows and private data daily. Therefore, you don’t need to worry about the appearance of any problem. Let us know if something is missing or if you have better fixes.
Frequently Asked Questions:
- Can you end the task of the Microsoft compatibility telemetry?
The task’s motive is to improve Windows features and user experience. Therefore, people can end it when required. For instance, slowing down your computer will cause this problem.
- Should you disable Windows telemetry?
No risk is present to the OS if you want to disable it. If you turn off the service, Microsoft can not collect data related to the performance of Windows. However, remember that it can cause high disk usage problems. Therefore, if you are willing to limit the shared data, go ahead and turn it off.
- Should you disable CompatTelRunner?
The procedure CompatTelRunner.exe, called Windows Compatibility Telemetry, is turned on by default. It is because Microsoft can diagnose the system and run compatibility checks when you enable the method. But it will not affect the proper running of the Windows OS, meaning you can disable CompatTelRunner if you want.


