If your Windows 10 is not running well, errors like blue screen of death (BSOD) can occur on the desktop. When the error appears, your Windows will reboot the system by default. If you’re a Windows 10 user, you can be familiar with the error. Based on a single thing, it is hard to pin. We have given here some things that you should try to fix the driver irql_less_or_not_equal issue.
What is Driver IRQL_LESS_OR_NOT_EQUAL Error?
The DRIVER IRQL_LESS_OR_NOT_EQUAL is a type of BSoD error that your system can encounter. Further, it applies to a vast range of issues. It indicates that the driver is facing difficulties communicating with the hardware. It is a blue screen issue that directly relates to the storahci.sys file.
Each windows OS version like Windows 7, 8, 8.1, or 10 contains the system file. As soon as the system files become corrupted, people will face the error message driver irql_less_or_not_equal. The error doesn’t depend on the type of Windows OS you use, as it can appear on all windows system versions.
Reasons for the Error Driver irql_less_or_not_equal Windows 10:
The error appears while the ‘storahci.sys’ file is affected by any internal or external errors. You should know that as these are system files, these become faulty after being damaged or corrupted.
Reason 1) Incompatible Hardware Device Configuration:
Are you facing the issue on your new computer or laptop after upgrading the hardware components in the PC or connecting an external device? If yes, then it can be a resource conflict between two devices ( internal or external) or more.
Reason 2) Corrupt System Files:
If you see the error message starting with “out of the blue,” and it doesn’t remain after you install, connect, replace, or upgrade any PC hardware or components, then ensure that a corrupted system file has caused the error. Therefore, you need this to boot your system. It can be caused due to virus attacks. Besides, other problems like power outages or disk write errors can occur for this attack.
Reason 3) Incompatible Device Drivers:
Installing a new or upgraded faulty device driver can be a reason due to which the error appears. Hence, the best way you can follow is to revert to an earlier driver version. Whether you cannot boot into Windows or reboots with the blue screen very fast, you are required to recover this with the help of EasyRE.
Reason 4) Faulty Hardware Items:
It can also be one of the reasons for which the error occurs. A poor module of RAM, a damaged motherboard, failing internal or external hardware or components are a few examples of faulty hardware items.
Reason 5) Wrong Software Installation:
A misconfigured Windows service or registry error can cause the issue. It can occur when you complete the installation of a Windows update or while the PC asks “applying updates.” You can experience the problem after any update is installed manually to a driver.
Reason 6) A Downgraded Windows Installation:
Whether you mistakenly install a previous Windows version on top of a newer one, it can cause the issue. It may happen that you have not replaced the system files accurately. If anything like this happens, then you should back up the files. After that, you are required to perform the steps of a clean installation. It ensures that there will not be any conflicts between different versions of Windows.
Driver irql less or not equal Error Variations:
The error may cause multiple issues on the PC. Here, we have given some of the error messages seen.
Driver irql less or not equal Windows 10 blue screen:
The error message is a BSOD or Blue Screen of Death error. As soon as you see the message appearing on display, it will crash the computer or laptop. If you are willing to solve the issue, you need to try a few solutions.
Driver irql less or not equal ql2300.sys, epfwwfp.sys, e1c62x64.sys, rdbss.sys, rdyboost.sys, rtkhdaud.sys, rtwlane.sys, tcpip.sys, tap0901.sys, tdx.sys, usbport.sys, usbhub.sys, igdkmd64.sys, netio.sys:
Usually, this type of error occurs with the file name. Just do some research to identify the problematic device or app and solve the issue. Many people encounter the error after installation to remove.
Driver irql less or not equal windows 10 mulloverclock:
Many users have encountered the error after installing their pc. Hence, you should remove the overclock settings.
Driver irql less or not equal on startup:
It can be seen when you start using the PC. As it is a BSOD error, the error can be seen in the restart loop.
Driver irql less or not equal McAfee, AVG, Avira, Kaspersky:
It may happen that a third-party app has caused the issue. According to multiple users, it has occurred due to their antivirus. Therefore, make sure that you remove this or disable it to fix the error.
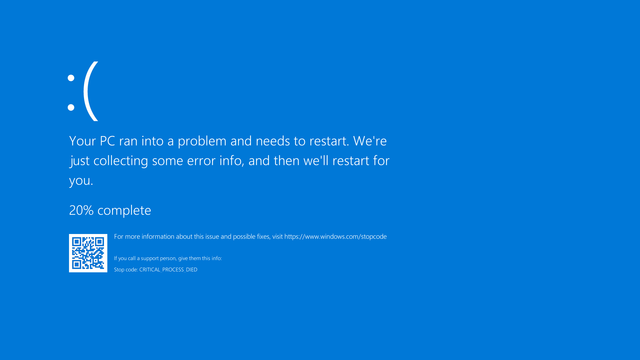
We have given here an example of the error on display. The first one is for Windows 11, whereas the second one is for Windows 7:
Your PC ran into a problem and needed to restart. We’re just
collecting some error info, and then we’ll restart for you.
25% complete
For more information about this and possible fixes, visit
http://windows.com/stopcode
If you call a support person, give them this info:
Stop code: IRQL_NOT_LESS_OR_EQUAL
The following message is for Windows 7.
IRQL_NOT_LESS_OR_EQUAL error screen
An error has been detected, and Windows has been shut down to prevent damage
to your computer.
IRQL_NOT_LESS_OR_EQUAL
If this is the first time you’ve seen this Stop error screen,
restart your computer. If this screen appears again, follow
these steps:
Check to make sure any new hardware or software is installed correctly.
If this is a fresh installation, ask your hardware or software manufacturer
for any Windows updates you might need.
If the issue continues, then disable or remove any newly installed hardware
or software. Besides, disable BIOS memory options such as caching or shadowing.
Further, if you need to use Safe Mode to remove or disable components, restart
your computer, press F8, select Advanced Startup Options, and
select Safe Mode.
Technical Information:
* STOP: 0x00000001 (0x00000001, 0x00000001, 0x00000000, 0x00000000)
Fix DRIVER IRQL_LESS_OR_NOT_EQUAL Error Applicable to the Following Systems:
The process can be applied to these operating systems.
- 1. Windows XP (all editions)
- 2. Windows Vista (all editions)
- 3. Windows 7 (all editions)
- 4. Windows 8 (all editions)
- 5. Windows 8.1 (all editions)
- 6. Windows 10 (all editions)
- 7. Windows 11 (all editions)
How to Fix DRIVER IRQL_LESS_OR_NOT_EQUAL Error on Windows:
Solution 1) Update All Drivers:
1.1 Disable Wireless Adapter:
- First, your job is to tap on the Windows Key + X for opening the Power User Menu. Then, you should choose the Device Manager option from the list.
- You have to find the wireless adapter and then tap on it. Then, you should select the Disable option from the menu.
You can fix the issue only by updating the wireless adapter driver. In this case, if you’re willing to download the recent adapter, then disable your adapter first. As soon as you disable the wireless adapter, you must attach the Ethernet cable to the PC. Finally, you should download the recent driver for the wireless adapter.
1.2 Download the Latest Driver:
- Tap on the wireless adapter first and select the Update Driver Software option.
- Now, you should choose, Search automatically for the updated driver software option. You should wait for a while till Windows 10 isn’t downloading the driver.
- It is an easy way to update drivers. However, it isn’t the best as Device Manager doesn’t allow you to download the recent drivers.
- If you are willing to download the recent drivers, it is recommended to go to the wireless adapter manufacturer’s website.
- As soon as you install the latest drivers, you need to return to the Device Manager. Then, you should enable the adapter.
1.3 Update the Drivers Automatically:
If the process is not working, or you don’t know the essential computer skills for this proposal, then we advise you to do this automatically with the help of a professional tool.
After performing some tests, you can say that it is the best-automatized solution.
Solution 2) Event Viewer:
- When you find that the above method cannot solve the issue, you have to detect the source of the problem. In this case, you can take the help of a default tool, ‘Event Viewer.’ It is available in the Windows Search bar/Cortana.
- The event viewer comes with a log of all critical errors, warnings, and messages with timestamps. Scroll every vital error to know which one is causing the issue. Whether the problem is recurring with the same device, ensure that you have detected the error.
You should hence remove the old faulty driver and then install these again. Navigate to the manufacturer’s website to download the latest driver first. After downloading, your job is to remove it by performing the steps.
- Head towards the Control Panel and open it then.
- After that, you should move to the Device Manager.
- Tap on the device causing the issue.
- Choose the ‘Uninstall’ option from the context menu.
- When you remove this entirely, you should install the driver downloaded by you. Then, reboot the PC.
Solution 3) Remove Overclocking Tool:
The function of the overclocking tools is to enhance the hardware’s performance beyond its limits. You need to remove the overclocking tools and then restore the hardware to factory defaults. After that, your task is to remove the software. Now, the issue should not remain.
Whether you are willing to overclock again, your job is to reinstall a clear copy of the software. Perform the step slowly not to push the hardware to its breaking point again. Due to having an overclocking tool, it may happen that your Windows 10 is not running correctly. You may need to select between overclocking the system or running Windows 10 smoothly.
Solution 4) Reinstall Audio/Network Drivers:
Remove the faulty drivers and reinstall them when you cannot fix the issue by updating the drivers. You can find the windows sometimes installing a generic version of a driver. It helps to finish the conflict with the hardware. If you are willing to do this, you should download the hardware’s exact driver first by going to the manufacturer’s website. Make sure that you have checked the correct model. To do so, you are required to refer to your original box. Whether there is no box, you should disconnect the device. Then, you should test this physically for a model number.
If you have installed a network device more than once, perform the steps.
- Your first task is to go to the Control Panel app and open it after that.
- Next, your job is to find the Device Manager option.
- Now, you need to tap on the Network Adapter.
- Then, go to the context menu and tap on the ‘Uninstall’ option.
- After that, your job is to install the downloaded driver. The issue should not exist now. You should update the particular driver next time. To do this, head towards the manufacturer’s website and get a new one. Don’t allow windows to download the driver for you. If the error is still available, use an external or a different network device. The device should be connected and removed manually.
Solution 5) Update/Change VPN software:
Technically, it is a network problem as VPN software redirects the traffic to a separate location across the globe. Outdated VPN software requests that your hardware does not know how to fulfill. Hence, you can eliminate the issues by updating the VPN software.
If you see the error still available, you should remove this software from the Control Panel. After that, move to the Programs and Features option. Then, you should tap on Uninstall. If it works, then change the VPN software. Make sure that you use software that supports your system.
Solution 6) Antivirus or Firewall Tools:
You can take the help of Third-party security tools as these offer decent protection for the system. Sometimes, security measures can interfere with the daily performance of your system. Hence, you should remove the protection software for fixing the issue. If you are willing, you can take the help of a different antivirus to keep your system secure. Whether you want to remove this type of software entirely, using one of the dedicated uninstallers is recommended. In most cases, the antivirus companies come with uninstaller tools available on the sites. You are required to use these for removing a specific antivirus program from the PC.
As soon as you remove the antivirus software, your job is to reinstall this. If you want, then install another antivirus software.
Solution 7) Reset Your Windows 10:
Resetting the windows will be useful when nothing helps you. It removes all the files and settings from Windows 10. Besides, the installed apps will also be deleted. Therefore, you are required to keep the backup of your essential files and then restore it. You should perform the steps to reset Windows 10.
- First, your job is to head towards the Start Menu and open it. Then, you are required to tap on the Power button.
- After that, your task is to tap on the Shift key and hold this. Navigate to the menu and then select Restart.
- If you cannot access your windows, then restart the computer during the boot sequence. It helps to access the Advanced Boot menu.
- After that, your task is to select Troubleshoot and choose the Reset this PC option. Next, your job is to tap on the Remove everything.
- It may ask you to insert the Windows 10 installation media. Make sure that you do this.
- Choose the Windows version, and then you should select only the drive containing your Windows. Next, you have to choose the option Just remove my files.
- A list of changes appears in front of you. You should tap on the Reset button as soon as you are ready to begin.
- You should go through the instructions available on display to finish the process.
- As soon as you complete the reset process, install all the apps. After that, your task is to move the files from backup.
If the earlier methods don’t work, you should reset your windows. You should never forget that performing the technique will eliminate all files from your system drive.
Solution 8) Check Your Hardware:
Test the hardware for physical defects. Your cooling system may not perform as it offers, your system can be overheated, etc. Open the system to disconnect, unscrew, remove, test the physical defects. You should clean every hardware part and reinstall them. Take the help of a professional if you don’t know about the system properly.
Solution 9) Remove Unnecessary Devices Connected:
You should apply a general fix to eliminate all the unnecessary hardware devices from the PC. Perform a test if your computer restarts appropriately. If this is the problem, the error may appear due to this.
In this case, you are required to remove all hardware devices that you don’t need, such as peripherals, USB devices, etc. Remove the devices also that are not needed for your PC to run.
Solution 10) Upgrade BIOS:
BIOS is a small-sized software that can fit in the motherboard’s memory chip. When the BIOS is not up-to-date, this software can create significant errors. Therefore, updating BIOS is crucial. Perform the steps if you are willing to upgrade BIOS.
- First, your task is to navigate the motherboard manufacturer’s official website.
- Then, you should download the recent BIOS version.
- If you don’t have enough technical knowledge, don’t try to update the BIOS. It is because this can cause fatal system crashes and errors. It is recommended to get the best BIOS update software so that your system will function properly.
Solution 11) Scan Your System for Viruses:
There are a few viruses capable of causing errors directly or indirectly. Hence, your job is to scan the computer or laptop to remove the virus. Perform the steps if you are willing to scan your system.
- First, your task is to navigate to the Start menu. Then, your job is to move to the Settings. After that, visit the update and security and Windows Defender sections, respectively.
- Hit the “Advanced scan” option below the “Virus and threat protection” section.
- Next, you should select the “Windows Defender offline scan” option.
- After that, hit the “Scan now” button.
- As soon as you complete the scanning process, check if the error is solved.
Solution 12) Repair Corrupted System Files:
The Windows system files may be damaged or corrupted. As a result, these cause blue screens of death errors. You should run the SFC scan to repair the corrupted Windows system files.
Perform the following steps to repair the corrupted system files.
- First, your job is to tap on the Windows + R. after that, your task is to write CMD in the Run box. Next, you should tap the Enter button.
- You must open the cmd and then run this as an admin.
- Next, you should type the command SFC/Scannow in your command prompt. Then, you should tap Enter.
- Now, wait for a while, about 15 minutes, until the scanning method is not finished.
- As soon as the procedure is ended, you must reboot the PC. Then, check if the issue is resolved.
Solution 13) Disable Memory Cache:
If you are willing to disable the memory cache of the OS, then go to the computer’s BIOS/UEFI menu.
Option 1:
If the computer boots first, tap on Enter, Esc, Del, or F2. It relies on the model of the PC that you use. You should do this to boot into your bios directly or the UEFI firmware setup subsystem. It also allows you to display a menu. It lets you tap on a key to boot into the BIOS or UEFI firmware setup.
Option 2: (Windows 8, 10, 11 only):
If you have Windows 8, Windows 10, or Windows 11 systems, then perform the steps to open the UEFI menu:
- First, you should start the Windows version that you use.
- Then, tap on a button and the C key for opening the Charm Bar.
- Tap on the Settings next.
- Then, you should move to the Change PC Settings.
- After that, your job is to choose the General option.
- Next, tap Advanced Startup.
- Hit Restart Now option.
- Move to the Troubleshoot option after that.
- Choose Advanced Options.
- Tap on the UEFI Firmware Settings.
- After that, your job is to choose Restart.
As soon as you enter into the BIOS/UEFI menu of the operating system, you need to perform the steps.
- Navigate to the Advanced Menu first because it relies on the BIOS/UEFI version. However, the menu may appear with a different name.
- After that, your job is to look for the Cache Memory option.
- Then, you should tap Enter.
- Choose the Disabled option after that.
- Next, tap on the F10 to Save & Exit the changes you have made.
- You should now reboot the PC.
Sometimes, you may not find the option available on the PC. If you don’t get this option available, move to the next solution. If you want, then use the EasyRE for repairing the issue.
Solution 14) Install Latest Updates:
Sometimes, you need to ensure that your windows have all the recent installed updates. It is because having all the latest updates available helps to fix the issue. You should ensure that you have enabled the Automatic Updates option.
Your job now is to perform the steps to check.
Open the Windows first.
If you are a user of Windows Vista, 7, you need to write the update in the search box to open the Windows Updates.
- Windows 8 users are capable of opening the Charm Bar. But to do this, they need to tap on the key and then the C keys. After that, you need to move to the Settings, and then you should visit the Change PC Settings section.
- Tap on the Update and Recovery option.
- Then, you should tap on the “Choose how updates get installed”
- Now, choose the Install updates automatically option.
- Next, you should check the box Give me recommended updates available under Recommended updates.
- Tap on the OK.
- You should launch the “Settings,” but you need to write “Settings” in the start menu to do this. Then, you need to launch the settings.
- After that, your job is to choose the “Windows Update” available in the sidebar in the “Settings” app. Then, hit the “Advanced Options.”
- Make sure that you have disabled the “Pause updates” option. Turn on the “Receive updates for other Microsoft products” option so that you can receive the device driver updates.
Your windows need to check if there are any updates available. If there will be any that you can install, it should let you know.
Solution 15) Use Recovery Tool with System Restore Options:
Whether you cannot solve the issue following the above steps or if you don’t find any updates available, use the Online Recovery Tool for Windows to repair the error.
- First, your job is to download one single copy of the Recovery Tool.
- Then, your task is to insert your USB drive into the computer. Next, you should perform the steps to make a bootable USB.
- You are required to insert your USB also into your PC if it needs repairing and booting from the USB.
- Open the dashboard, and then choose the Windows installation. After that, your task is to initiate an automatic repair.
You should mention the repair log if there were any blue screen fixes.
When the automated repair process has finished, you need to tap on the Back button to return to the main page. After that, your job is to choose the Windows installation again. Now, you should tap on the System Restore option to check the restore points if there are any.
Finally, your task is to restart the computer or laptop to test if the error exists.
Solution 16) Clean Boot:
If a current running procedure causes the issue, you need to reboot the Windows system by performing the clean boot procedure. The process enables you to fix the issue when any current service or process is the reason for the error.
We have given here the process of performing a clean boot.
- First, tap on Windows at the start menu.
- Then, you have to go to the Run and open it.
- If you are using Windows 8 and Windows 10/11 users, you have to tap on the key and R together to open the Run dialog.
- After that, you must write msconfig, and then tap Enter.
- Navigate to the General tab, and select the Selective Startup option. Then, your job is to unmark the Load, Startup items Check Box.
- Move to the Services tab.
- Navigate to the Hide all Microsoft services checkbox available at the bottom left corner of the window. Next, tap on the Disable all option and tap on the OK.
Quick Solution to Solve Error DRIVER IRQL_LESS_OR_NOT_EQUAL:
We hope that the steps mentioned above will fix the issue. If it is not, we have given here a way to solve the error.
You can run the PC Repair Tool. It is an advanced tool that helps identify and solve different PC errors. With the help of this, you can fix errors such as update error, registry error, DLL error, BSOD error, game error, etc. Along with fixing the error, it also helps increase the Windows PC performance by repairing the damaged system files.
Conclusion:
If necessary, use Windows 10 installation media to resolve the driver irql_less_or_not_equal issue. You need to remember that you should perform the reset process only when any software is causing the error. If hardware is the reason for the error, you should go with a different solution. Multiple methods are given in this article. We hope that any one of these will help you fix the error.
Frequently Asked Questions:
- What is Driver_IRQL_NOT_LESS_OR_EQUAL Blue Screen?
It is a BSOD error that is caused due to malware infection. The error can occur for the incorrect driver and memory address connections.
- What causes the error?
These are some causes due to which the error occurs.
- Damaged system files.
- Incompatible drivers.
- Overheated CPU.
- Corrupted registry.
- How do you fix it?
We have given here a few methods to fix it.
- Uninstall malware.
- Run Windows Memory Diagnostic tool.
- Update Driver.
- Reset this PC.


