Struggling with slow internet or dead zones at home? This expert guide reveals how to boost your Wi‑Fi signal strength using 14 proven, practical tips.
Your router might be powerful, but it is not magic. Learn how to boost your Wi‑Fi signal strength for faster, more reliable connectivity across your space.
Assess Your Wi-Fi Signal Strength First
Before you try to know, how to boost your Wi-Fi signal strength, it is critical to understand your current signal quality. By measuring signal strength, speed, and interference, you can pinpoint exactly where and why your network is underperforming. This data-driven approach ensures you do not waste time by guessing. This approach helps you apply the right fix where it matters most.
What Is Wi‑Fi Signal Strength?
Wi‑Fi signal strength refers to the power level your device receives from a wireless access point (router). It is typically measured in decibels milliwatts (dBm):
- -30 dBm: Excellent (Maximum signal, very close to router)
- -50 to -60 dBm: Good (Reliable and fast connection)
- -67 to -70 dBm: Fair (Okay for browsing and streaming)
- -80 dBm or lower: Weak (Unstable, often disconnects)
Ideal range for stable performance: −50 dBm to −65 dBm
Pro tip: dBm values are negative. Therefore, closer to 0 is better (−50 dBm is stronger than −75 dBm).
Tools to Measure Wi‑Fi Signal Strength
For Windows:
- NetSpot (Free & Pro): Site surveys, heatmaps, signal tracking
- https://www.netspotapp.com
- WiFi Analyzer (Microsoft Store): Visualizes channel congestion and signal bars
- https://apps.microsoft.com/store
For macOS:
- Option + Click the Wi‑Fi icon → See RSSI (signal), noise, channel
- iStumbler: Offers signal-to-noise ratio, dBm, channel info
- https://istumbler.net
For Android:
- WiFi Analyzer (by farproc): Real-time channel graphs and signal metrics
- Google Play Store
For iPhone/iPad (iOS limitations apply):
- Use Airport Utility (Apple’s app) → Enable Wi‑Fi Scanner in settings
- https://apps.apple.com/app/airport-utility
Create a Wi-Fi Heatmap (Optional but Powerful)
If you have a large home or office, a Wi-Fi heatmap visually shows where the signal strength is strong or weak.
Use tools like:
- NetSpot (Windows/macOS)
- Ekahau HeatMapper (Windows)
- Identify signal dead zones
- See how walls, floors, and furniture impact strength
- Plan where to place extenders or new routers
Common Causes of Poor Signal Strength
- Long distance from router (especially on 5GHz)
- Thick walls or floors (especially concrete or metal)
- Nearby interference (microwaves, Bluetooth devices)
- Overcrowded Wi‑Fi channels (especially in apartments)
- Obsolete hardware (old routers, low-gain antennas)
Benchmarks to Track Before & After Boosting
Track and compare before you make changes:
| Metric | Tool | Good Value |
| Signal Strength (dBm) | NetSpot / WiFi Analyzer | −30 to −65 dBm |
| Download Speed (Mbps) | Speedtest.net / Fast.com | 25 Mbps or higher |
| Signal-to-Noise Ratio | iStumbler / NetSpot | 25 dB or higher |
| Latency (Ping in ms) | Speedtest / cmd ping | Below 50 ms (ideal) |
Expert Insight
“Measuring Wi-Fi signal with professional tools like Heatmaps and SNR analysis lets you diagnose your network like an IT pro. It is the foundation of every high-performance Wi Fi fix.”
— Rajkumar RR, ProDigitalWeb.com
Key Takeaways
- Always measure before you move your router or change settings.
- Use apps or heatmapping software to identify dead zones and weak points.
- Document your results. Then only, you can compare signal strength before and after applying the optimizations in the next sections.
Choose the Ideal Router Location for Maximum Wi‑Fi Signal Coverage
Your Wi‑Fi router’s location plays a critical role in signal strength, speed, and coverage. Even a high-end router will underperform if placed in the wrong spot. Proper placement reduces dead zones and minimizes interference. In addition, proper placement ensures consistent performance across all devices.
Why Router Placement Matters
Wi‑Fi signals travel in all directions. Their strength degrades with distance and obstruction. Physical barriers like concrete walls, metal furniture, and water-filled objects (like aquariums) can weaken or deflect signals. Moreover, 5GHz signals are faster. However, they do not penetrate walls as effectively as 2.4GHz.
Poor placement often leads to:
- Dead zones in bedrooms, basements, or outdoor areas
- Low download/upload speeds
- Dropped connections and buffering
- Over-reliance on extenders or mesh units
General Guidelines for Ideal Router Placement
Place the Router:
- At the center of your home or office (for even coverage)
- At eye level or higher (signals propagate better downward and outward)
- In an open area, free from obstructions (avoid closets, cabinets, or behind TVs)
- Away from thick walls, mirrors, aquariums, or metal objects
Walls Matter: Know Your House Materials
| Material | Signal Loss (Low to High) | Notes |
| Drywall | Minimal | Common in modern homes |
| Wood | Light | Slight attenuation |
| Brick | Moderate | Decreases signal significantly |
| Concrete | Heavy | Greatly reduces range |
| Metal (ducts, studs) | Very High | Reflects and blocks signals entirely |
Pro Tip: Use a Wi-Fi Heatmap tool like NetSpot to test signal propagation in real time as you try different router positions.
Height & Orientation Matter
Elevate Your Router:
- Avoid placing it on the floor or under furniture
- Best position: 6–7 feet above the ground
Adjust Antennas:
- If you have external antennas:
- One vertical + one horizontal = best coverage
- If you have internal antennas:
- Place the router upright (as designed by the manufacturer)
Where Not to Place Your Router
- Inside cabinets or drawers
- Near microwaves, cordless phones, or Bluetooth speakers
- Behind large objects like mirrors, TVs, or bookshelves
- On window sills (signal escapes outdoors)
- Directly beside or under thick walls
- In basements (unless it is your primary living area)
Note: Even slight adjustments (moving it 2–3 feet away from a wall) can significantly improve performance.
Test Placement Effectiveness
After relocating your router:
- Re-run signal strength tests with tools like NetSpot, WiFi Analyzer, or Airport Utility.
- Walk around your space while observing dBm levels or signal bars.
- Document “before and after” values to measure real-world improvement.
Advanced Router Placement Strategies
For Large Homes:
- Central router + mesh satellites on opposite ends
- Avoid stacking mesh units vertically (ground floor vs. attic)
For Multi-Story Buildings:
- Use stairwell spaces to propagate vertically
- Consider ceiling-mounted access points for even floor coverage
For Apartments:
- Place the router near the hallway or in line-of-sight to the main work/living areas
- Choose a location away from shared walls to minimize channel interference with neighbors
Dual-Band Considerations
- 5GHz band: Ideal for high-speed, short-range (same room, streaming)
- 2.4GHz band: Ideal for long-range, wall-penetrating signal (far rooms, smart devices)
Many routers allow band steering. They are automatically connecting your device to the best band.
Expert Insight
“Router placement is not just about location—it is about line-of-sight, elevation, and environmental awareness. The best-performing networks start with physical layout optimization.”
— Rajkumar RR, ProDigitalWeb.com
Quick Checklist: Ideal Placement Rules
- Center of the home
- Open space, high off the ground
- Away from walls, mirrors, and electronics
- Visible—not hidden
- Proper antenna alignment
- No metal or water-filled objects nearby
Key Takeaways
- Router placement has a direct impact on signal strength, coverage, and internet speed.
- Keep the router elevated, unobstructed, and centrally located.
- Test signal strength before and after relocation to quantify improvements.
- Avoid signal-killing materials and appliances nearby.
Orient and Upgrade Your Antennas for Maximum Signal Direction and Range
Your Wi-Fi router’s antennas are the unsung heroes of signal propagation. Even a well-placed router can underperform if its antennas are poorly oriented or outdated. Proper antenna positioning and upgrades can make a dramatic difference in both range and throughput in multi-story or irregularly shaped homes.
How Wi-Fi Antennas Work
Wi-Fi antennas emit signals in a donut-shaped radiation pattern. This means:
- The strongest signal is perpendicular to the antenna’s direction
- There is less signal directly above or below the antenna
- Dual-band routers often have separate antennas for 2.4GHz and 5GHz, with different behaviors
Goal: Optimize signal coverage both horizontally and vertically across your home.
Correct Antenna Orientation: Vertical + Horizontal Combo
If your router has two antennas:
- Position one vertically (for horizontal coverage)
- Position one horizontally (for vertical coverage —upstairs/downstairs)
If your router has three antennas:
- Angle them at 45°, 90°, and -45° to create a spread beam pattern
- This maximizes coverage in multiple directions
Routers with internal antennas:
- Position the router upright or flat based on the manufacturer’s intended orientation
- Refer to the user manual or label—it matters!
Many users mistakenly point antennas straight up or leave them parallel to each other. This results in limited signal reach in vertical directions.
Understanding Antenna Types
| Antenna Type | Coverage Pattern | Best Use Case |
| Omni-directional | 360° horizontal spread | Homes/offices with open layouts |
| Directional (Yagi, Panel) | Focused beam in one direction | Point-to-point setups, long corridors |
| High-Gain | Extended range, less spread | Larger spaces, outdoor usage |
Most consumer routers come with low-gain omni-directional antennas (2–5 dBi). Upgrading to high-gain or directional antennas (8–12 dBi) can significantly extend signal reach.
Upgrading Router Antennas
If your router has detachable SMA or RP-SMA antenna connectors, you can upgrade to:
High-Gain Omni Antennas
- Boost the signal in all directions
- Ideal for central router placement
Directional Antennas (Panel/Yagi)
- Focus signal in one direction (long hallway or garage)
- Ideal for edge-of-home placement or outdoor APs
Ceiling-Mount or Wall-Mount Antennas
- Great for enterprise or large home mesh systems
Recommended Upgradable Antenna Brands:
- TP-Link TL-ANT2408CL (8dBi)
- Alfa Network ARS-N19 (9dBi)
- Bingfu High-Gain SMA Antennas (for dual-band routers)
- TP-Link TL-ANT2409A Yagi (directional)
When to Consider an Antenna Upgrade
- You have a weak signal in the far corners of the home
- You use your router for point-to-point Wi‑Fi (barn, garden, workshop)
- You have line-of-sight outdoor requirements (cameras)
- Your router supports antenna swapping (not all do!)
Note: Many modern mesh systems and ISP-supplied routers have internal or fixed antennas. Those routers cannot be upgraded. In that case, upgrading the whole router or adding a mesh node is the better route.
Test Before and After Adjustments
Use these steps to test your antenna tweaks:
- Measure signal strength (dBm) in problem areas before changing antenna positions.
- Adjust antenna angle/orientation incrementally.
- Retest using tools like NetSpot, WiFi Analyzer, or Airport Utility.
- Note download/upload changes and ping response improvements.
Advanced Tip: Add a Reflector (Cheap DIY Hack)
Using a parabolic aluminum foil shield or a purpose-built Wi-Fi reflector (like a Windsurfer template) behind an antenna can focus signal in one direction. That works similarly to a directional antenna.
Great for:
- Boosting the signal toward a specific room
- Reducing interference from the opposite side
DIY templates: freeantennasdotcom/projects
Expert Insight
“Optimizing antenna orientation and upgrading to high-gain antennas is one of the most overlooked ways to boost Wi-Fi performance. It is cheap, effective, and measurable.”
— Rajkumar RR, ProDigitalWeb.com
Key Takeaways
- Antenna direction directly affects signal spread in your home.
- Use mixed vertical/horizontal antenna angles for full 3D coverage.
- Upgrade antennas only if your router supports external ports.
- Use reflectors or directional antennas for point-to-point improvements.
- Always test performance before and after changes.
Build a DIY Cantenna for Directional Signal Boost
If you are facing signal dropouts in a specific direction, like a garage, garden, or a distant room, your omnidirectional router antenna may be spreading the signal too widely. Instead of buying expensive gear, you can build a DIY directional antenna (cantenna) using inexpensive materials.
A cantenna focuses Wi-Fi signal in one direction. Further, it boosts range and signal strength toward a specific location. It is perfect for targeting dead zones or extending your network outdoors.
What Is a Cantenna?
A cantenna (can + antenna) is a waveguide antenna made using a metal can (like a Pringles or coffee can) that enhances the gain of your router’s signal in a narrow beam like a flashlight versus a lantern.
It works on basic RF physics:
- Uses metal to reflect and concentrate the Wi‑Fi signal
- Acts as a directional antenna (typically for 2.4 GHz)
- Can increase range by 5–12 dBi. That depends on the build quality
Materials You Will Need
| Item | Purpose |
| Metal can (7.5–10 cm diameter) | Acts as the waveguide antenna body |
| N-type female connector (panel-mount) | Interface for coax cable |
| Coaxial pigtail cable (RP-SMA to N-type) | Connects the antenna to the router |
| Drill and Dremel tool | For creating holes in the can |
| Ruler and marker | For precision hole placement |
| Epoxy or metal screws | For mounting the connector |
Build Instructions (2.4 GHz Focused)
Step 1: Choose the Right Can
Ideal can diameter: 7.5–10 cm
Length: >12 cm
Must be unpainted on the inside and made of conductive metal (not cardboard-lined).
Step 2: Drill the Feed Hole
- Measure 4.9 cm (1.91 inches) from the bottom of the can
- Drill a hole just large enough for the N-type connector
Why 4.9 cm?
It matches 1/4 wavelength of 2.4 GHz, optimizing signal resonance.
Step 3: Mount the Connector
- Insert the N-type panel connector into the hole
- Secure with epoxy or bolts for stability
- Ensure the center pin is clear of the internal can wall
Step 4: Connect to Your Router
- Use an RP-SMA to N-type coaxial cable
- Screw the RP-SMA end into your router’s antenna port
- Keep the cable length short to minimize signal loss
Step 5: Aim the Cantenna
- Point it directly toward the dead zone
- Elevate to match the height of the target devices
- Fine-tune by checking signal strength with a Wi‑Fi analyzer app
Expected Results
| Setup Type | Approximate Gain |
| Stock router antenna | 2–3 dBi |
| DIY Pringles cantenna | 6–8 dBi |
| Large coffee can antenna | 9–12 dBi |
Up to 2X to 5X improvement in signal reach, depending on precision and environment.
Limitations & Safety Tips
- Directional only, it reduces the signal in other directions
- Works best with line-of-sight, avoid thick walls
- Keep away from moisture and heat
- Avoid placing it near microwaves or RF equipment
- Ideal for rural setups, outdoor workshops, or garages
Expert Insight
“The cantenna is proof that you do not always need expensive equipment to get a professional-grade signal boost. With simple RF theory and a steady hand, you can aim your Wi-Fi like a sniper.”
— Rajkumar RR, ProDigitalWeb.com
Summary
- A DIY cantenna is an excellent low-cost method to focus Wi-Fi in a single direction.
- Best suited for 2.4 GHz frequency (longer wavelength)
- With proper build and aiming, you can extend signal reach to 100–200 ft or more
- Perfect for targeted dead zones without buying extra extenders
Optimize Frequency Bands & Channels for Cleaner, Faster Wi-Fi
One of the most effective yet underused strategies to improve Wi-Fi performance is optimizing your frequency band and selecting the best channel. Understanding how wireless frequencies and channels operate, and how interference affects them, can help you dramatically reduce congestion and eliminate signal overlap. Optimizing can help you achieve better speeds.
Why Band and Channel Optimization Matters
Wi-Fi operates primarily on two frequency bands, namely 2.4GHz and 5GHz. However, the newer routers also support 6GHz (Wi-Fi 6E). Each band offers multiple channels. However, interference, overlapping, and poor configuration often lead to:
- Slow internet speeds
- Dropped connections
- Poor performance in crowded areas (apartments)
- Reduced signal range
Optimizing these settings helps reduce co-channel and adjacent-channel interference when surrounded by other networks.
Understanding Wi-Fi Frequency Bands
| Band | Range | Speed | Wall Penetration | Use Case |
| 2.4GHz | Long Range | Lower Speed | Excellent | Larger coverage, older devices |
| 5GHz | Medium Range | High Speed | Moderate | Streaming, gaming, and short-range |
| 6GHz | Short Range | Very High | Poor | Wi‑Fi 6E routers, least interference |
Note: Not all devices support 5GHz or 6GHz bands. Always check compatibility before switching.
What Are Wi-Fi Channels?
A channel is a specific sub-band within a frequency range. Think of channels like lanes on a highway; more congestion = slower speeds. On crowded frequencies (especially 2.4GHz), manually choosing the best channel can avoid interference from nearby routers.
2.4GHz: Only 3 Non-Overlapping Channels
- Channels 1, 6, and 11 are the only safe choices in most countries.
- Auto-channel selection often fails. Manual selection is better if neighbors are on the same channel.
5GHz: 24+ Non-Overlapping Channels
- More options, less congestion.
- Channels 36–48 and 149–165 are best for home use (UNII-1 and UNII-3 bands).
- Some channels (DFS—Dynamic Frequency Selection) may experience radar interference and device drops.
6GHz: Future-Proofing with Wi-Fi 6E
- Minimal interference and congestion.
- Limited device support (as of 2025).
- Useful for ultra-low latency applications (AR/VR, 8K streaming, large file transfers).
Tools to Scan and Choose the Best Channel
Windows
- Acrylic Wi-Fi Home: Shows signal strength, channel usage, and interference levels
- NetSpot: Heatmaps + real-time channel analysis
Android
- Wi-Fi Analyzer (farproc or VREM): Visual graphs of nearby networks per channel
- Network Signal Info: Signal strength + channel occupation
macOS
- Wireless Diagnostics Tool: Option + click Wi-Fi icon > “Open Wireless Diagnostics”
iOS
- Airport Utility (Enable Wi-Fi Scanner in Settings)
How to Change Wi-Fi Channel on Your Router
- Log in to your router (typically 192.168.0.1 or 192.168.1.1)
- Go to Wireless Settings > Advanced Settings
- Locate Channel or Channel Width
- Manually set:
- Channel 1, 6, or 11 for 2.4GHz
- A clean 5GHz channel (44, 149)
- Save and reboot the router
Tip: Set “Channel Width” to 20MHz for 2.4GHz (to reduce overlap). And set channel width to 40/80MHz for 5GHz, depending on congestion.
Bonus: Enable Band Steering (If Supported)
Modern routers support band steering. They automatically move compatible devices to 5GHz or 6GHz for better performance.
- Ensures legacy devices stay on 2.4GHz
- Keeps high-speed devices on faster bands
- Often enabled under “Smart Connect” or “Band Steering” in the admin panel
When to Re-Scan and Switch Channels
- After moving your router or changing the placement
- During peak hours (evening traffic)
- If you notice drops or buffering in a specific room
- After firmware updates or ISP changes
Wi-Fi interference is dynamic in urban environments. Run periodic scans every few months.
Expert Insight
“Most users overlook channel optimization, yet it is one of the easiest ways to eliminate bottlenecks and interference, especially in apartments or high-density areas.”
— Rajkumar RR, ProDigitalWeb.com
Key Takeaways
- 2.4GHz = more range, less speed; 5GHz = more speed, less range.
- Always use channel 1, 6, or 11 on 2.4GHz to avoid overlap.
- Use tools to scan and manually select the cleanest channel.
- Enable band steering to push devices to faster frequencies.
- Reassess channels regularly to stay ahead of interference.
Update Router Firmware Regularly to Fix Bugs & Boost Performance
Firmware is the operating system of your router. A router is like your phone or computer. It requires regular updates to stay optimized, secure, and compatible with new technologies. Yet many users overlook this simple step. By avoiding updates, they are unknowingly compromising both Wi-Fi performance and cybersecurity.
Updating router firmware can:
- Improve Wi-Fi stability and speed
- Fix critical bugs that cause drops or poor range
- Patch security vulnerabilities (KRACK, VPNFilter)
- Add new features (WPA3 support, QoS improvements)
What Is Router Firmware?
Firmware is the low-level software pre-installed by your router’s manufacturer that controls:
- Signal processing and radio behavior
- Channel selection logic
- Security protocols (WPA2, WPA3, firewall)
- Band steering, mesh coordination (on newer routers)
- Web interface and admin tools
Unlike regular software, firmware updates often directly impact Wi-Fi hardware performance.
What Happens If You Do Not Update It?
- Persistent signal drops or poor connection quality
- Vulnerabilities to hackers or malware (DNS hijacking)
- Incompatibility with newer devices or standards (like Wi-Fi 6/6E)
- Inability to use newer QoS, guest network, or parental control features
How to Check for Firmware Updates (Step-by-Step)
Step 1: Access Your Router’s Admin Panel
- Enter the router IP into your browser:
- Common IPs: 192.168.0.1, 192.168.1.1, 192.168.1.254
- Log in using your admin username and password
- Default credentials are often on a label under the router
Step 2: Locate the Firmware Update Section
Usually found under:
- Advanced Settings > Administration
- System Tools > Firmware Upgrade
- Maintenance > Update
Step 3: Update the Firmware
- Some routers support automatic updates (toggle it on if available)
- Others require manual:
- Visit the manufacturer’s website (TP-Link, ASUS, Netgear, etc.)
- Download the correct firmware version for your model
- Upload the .bin or .img file in the admin panel
- Reboot the router after flashing
Warning: Never interrupt a firmware update. Power loss during this process can brick your router.
Routers with Auto Firmware Update Support
| Brand | Auto Update Support | Notes |
| ASUS | Yes | AiMesh + Adaptive QoS supported |
| Netgear | Yes (Nighthawk app) | Supports security and performance enhancements |
| TP-Link | (for newer models) | Archer & Deco lines support auto updates |
| Linksys | Yes | Velop & Smart Wi-Fi routers |
| Google Nest | Always-on updates | Silent OTA updates (no manual action needed) |
How Often Should You Check?
Even if your router does not auto-update, you should:
- Manually check every 2–3 months
- Immediately check after a major performance drop
- Always update if your router has not been touched in over a year
Pro Tip: Sign up for firmware alerts on your router brand’s website to stay notified of important releases.
Firmware Updates = Wi‑Fi Security Boost
Firmware updates often include:
- WPA3 security protocol support
- DNS over HTTPS (DoH) or DNSSEC
- Improved firewall and DoS protection
- Patching of zero-day vulnerabilities
- Enhanced VPN passthrough and port management
Updating your firmware is not just about speed; it is about protecting your data.
Expert Insight
“Updating firmware is like tuning your engine; it does not just fix bugs, it unlocks the full performance your hardware was designed to deliver.”
— Rajkumar RR, ProDigitalWeb.com
Key Takeaways
- Firmware updates are essential for Wi-Fi speed, security, and stability.
- Always keep your router’s firmware up to date, even if your internet seems ‘fine.’
- Auto-update capable routers are worth investing in for peace of mind.
- Manual updates are simple but require regular check-ins and safe flashing procedures.
Lock Down Your Network – Strong Security Protocols to Protect Your Wi-Fi
Securing your Wi-Fi network is not just about keeping neighbors from using your bandwidth. It is all about protecting your data, devices, and digital identity. Weak security settings can lead to:
- Slower internet from unauthorized users
- Hijacked DNS or man-in-the-middle attacks
- Malware injection via insecure IoT devices
- Legal liabilities from others abusing your connection
In this section, you will learn how to harden your router’s defenses to keep your signal strong and secure.
Why Security Affects Wi-Fi Performance
When intruders gain access to your Wi-Fi:
- They consume bandwidth, slowing legitimate traffic
- They can inject malicious traffic, triggering router slowdowns
- They might open backdoors to devices on your network
- Your router may be blacklisted if used for spam or illegal activity
Locking down your network directly improves speed, reliability, and safety.
Best Practices to Secure Your Wi-Fi Network
-
Use WPA3 or WPA2-AES Encryption Only
Your router likely offers multiple options for wireless encryption:
| Protocol | Security Level | Status |
| WPA3 | Best | Most secure (2020+) |
| WPA2-AES | Good | Still secure if WPA3 is unsupported |
| WPA2-TKIP | Weak | Outdated, vulnerable |
| WEP | Unsafe | Easily hackable (deprecated) |
How to check/change:
- Log in to your router’s admin panel
- Navigate to Wireless Settings > Security
- Select WPA3-Personal (or WPA2-AES if unavailable)
Note: Some older devices may not support WPA3. Use mixed WPA2/WPA3 mode if available.
-
Set a Strong Wi-Fi Password (Pre-Shared Key)
A secure Wi-Fi password should:
- Be at least 12 characters
- Use a mix of uppercase, lowercase, numbers, and symbols
- Avoid names, birthdays, or dictionary words
Example: P@rk7!zzR4d1o2025
Never use default passwords like admin, 12345678, or qwerty.
-
Change Default Router Login Credentials
The admin panel of your router often uses:
- Username: admin
- Password: admin or blank
This is the first thing attackers check.
Change it to something strong under:
- Administration > Management Settings
-
Disable WPS (Wi‑Fi Protected Setup)
WPS allows quick pairing via button or PIN. However, it is notoriously vulnerable to brute-force attacks.
Disable it completely unless you absolutely need it (and only briefly).
-
Enable Network Firewall & DoS Protection
Most routers include:
- Stateful Packet Inspection (SPI)
- DoS (Denial of Service) attack protection
These settings filter malicious traffic. Further, these settings prevent overloads or remote exploitation.
Found under Advanced Settings > Security > Firewall
-
Use a Separate Guest Network
Keep visitors or IoT devices segregated from your main devices (PCs, work files, NAS drives).
Benefits:
- Prevents malware from spreading
- Let’s you limit the bandwidth for guest traffic
- Avoids accidental access to shared drives or smart controls
Set a different password and SSID (HomeGuest_5GHz)
-
Disable Remote Management (Unless Needed)
Remote Web Access (WAN access to router settings) is a huge attack vector.
Disable this under Remote Management / WAN Access Settings
Use a VPN or encrypted connection (HTTPS/SSL) if remote access is required.
-
Enable Automatic Firmware Updates
Many modern routers can auto-update security patches. If supported:
- Enable auto-update
- Or set a calendar reminder to manually check monthly
See Section 5 for full firmware update steps.
-
Monitor Connected Devices Frequently
Check for unknown devices:
- Use the router’s device list or the connected clients tab
- Some routers allow blocking by MAC address
Tools: ASUS AiProtection, TP-Link HomeShield, or apps like Fing
-
Use DNS Filtering & Parental Controls
Set DNS to services that block malicious sites:
- Cloudflare DNS: 1.1.1.1
- Quad9 DNS: 9.9.9.9 (blocks known malicious domains)
- OpenDNS: Filtering + parental control options
Expert Insight
“A secure network is not just about strong passwords—it is about reducing surface area. Lock down admin access, isolate devices, and audit everything regularly.”
— Rajkumar RR, ProDigitalWeb.com
Key Takeaways
- Use WPA3 or WPA2-AES encryption—never WEP or WPA-TKIP.
- Disable WPS, remote access, and change default credentials.
- Isolate IoT and guest devices with VLANs or guest networks.
- Monitor connected devices and use firewall/DNS protection.
- A secure network = faster, safer, more stable Wi‑Fi.
Use Mesh, Extenders, or Multiple Access Points to Expand Coverage
Even with optimal router placement and antenna orientation, there are physical and architectural limitations in large homes, multi-story buildings, or office spaces. That is where deploying Wi‑Fi extenders, mesh systems, or multiple access points (APs) becomes essential for eliminating dead zones and maintaining seamless connectivity.
Why a Single Router Is Not Always Enough
Wi-Fi signals degrade over distance and through obstacles like:
- Concrete/brick walls
- Thick floors between stories
- Mirrors, aquariums, or metal appliances
- Long corridors and stairwells
A multi-node setup (mesh or extenders) allows you to blanket your space with a consistent, reliable signal.
Solution Comparison: Mesh vs. Extenders vs. Access Points
| Feature | Wi‑Fi Extender | Mesh Wi‑Fi System | Access Point (Wired) |
| Setup Complexity | Low | Medium | High |
| Backhaul Type | Wireless | Wireless/Wired | Wired (Ethernet) |
| Roaming (Seamless Switching) | Often requires manual | Seamless handoff | With the controller/AP setup |
| Performance Impact | 50% speed loss | Minimal (if backhaul) | Full speed |
| Ideal For | Small homes with dead spots | Large homes, multi-floor | Offices or structured cabling |
| Cost | $–$$ | $$–$$$ | $$–$$$ |
-
Wi-Fi Range Extenders (Repeaters)
These are plug-in devices that rebroadcast your existing router’s signal.
Pros:
- Easy to install
- Affordable (under ₹2,500 / $30)
Cons:
- Halves your bandwidth if using the same band (no dedicated backhaul)
- May require a separate SSID (Home_EXT)
- Roaming between the router and the extender is not seamless
Best for:
- Spot-fixing 1–2 weak zones
- Budget-conscious setups
Examples:
- TP-Link RE315
- Netgear EX3700
-
Mesh Wi‑Fi Systems
Mesh systems use multiple nodes (satellites) that work together under one SSID to provide seamless, unified coverage.
Pros:
- Automatic roaming and self-healing
- Intelligent band steering and channel management
- Scalable: Add more nodes as needed
- Mobile apps for setup, monitoring, and parental control
Cons:
- More expensive
- Some models still use wireless backhaul (which can reduce speed)
Best for:
- Multi-story homes
- Coverage over 2,000+ sq ft
- Users who want plug-and-play scalability
Recommended Systems:
- TP-Link Deco X20/X55 (Wi‑Fi 6)
- Google Nest Wi‑Fi
- ASUS ZenWiFi XT8 (Tri-band with backhaul)
- Netgear Orbi RBK50+
Look for tri-band mesh with dedicated backhaul to avoid bottlenecks.
-
Wired Access Points (APs)
A wired AP is a secondary router or AP connected via Ethernet to your main router. This provides full-speed connectivity without wireless signal loss.
Pros:
- Full bandwidth (no wireless relaying)
- Works well in dense or signal-hostile environments
- Professional-grade stability
Cons:
- Requires running Ethernet cable (CAT6 preferred)
- More complex to configure (may need static IPs or VLANs)
- Not cost-effective for casual users
Best for:
- Homes with existing Ethernet wiring
- Home offices, studios, or multi-floor buildings
- Power users, gamers, or remote workers
Devices to Consider:
- Ubiquiti UniFi APs
- TP-Link EAP245
- MikroTik hAP ac³
Bonus Tip: Use Powerline Adapters for Hard-to-Reach Areas
If running Ethernet is not feasible, then powerline adapters use your home’s electrical wiring to transmit data.
Example:
- TP-Link AV1000
- Netgear Powerline 2000
They won’t match Ethernet speeds but are more stable than wireless extenders in certain layouts.
Placement Tips for All Setups
- Place extenders or mesh nodes midway between your main router and the weak zone.
- Avoid placing nodes in the same room; they will amplify already-weak signals.
- For mesh, tri-band units with a dedicated backhaul band = best performance
Expert Insight
“Mesh systems are not only signal boosters, they are intelligent, self-managing networks designed for modern connectivity needs. But wired APs still reign supreme for speed and stability.”
— Rajkumar RR, ProDigitalWeb.com
Key Takeaways
- For minor weak spots, use Wi‑Fi extenders. However, expect some performance trade-offs.
- For seamless, whole-home coverage, mesh systems offer smart roaming and scalability.
- For top-tier stability and speed, wired access points are the gold standard.
- Always consider backhaul type, roaming performance, and device compatibility when choosing.
Deploy Powerline Adapters or Wired Backhaul for Reliable High-Speed Connectivity
Wireless signals cannot reach due to thick walls, interference, or long distances. However, nothing beats the reliability of a wired connection. That is where powerline adapters and wired Ethernet backhaul come in. Both methods bypass the limitations of Wi-Fi propagation by delivering data over physical infrastructure. It is ensuring consistent speed and stability.
Why Go Wired?
Even the best mesh systems can suffer from:
- Signal degradation over distance
- Bandwidth sharing with wireless backhaul
- Interference from neighboring Wi-Fi networks or devices
Wired backhaul ensures:
- Zero signal loss or interference
- Full bandwidth per node or device
- Stable latency for gaming, streaming, and remote work
Option 1: Use Powerline Adapters (Quick & Easy Alternative to Ethernet)
How It Works:
Powerline adapters transmit network data over your home’s existing electrical wiring. You need to plug one near your router and another near the device or area you want to connect.
Typical setup:
- Adapter 1: Connected to router via Ethernet
- Adapter 2: Connected to smart TV / PC / access point
Pros:
- No need to run long Ethernet cables
- Quick setup—plug & play
- Ideal for connecting desktops, smart TVs, or APs in far rooms
Cons:
- Performance depends on electrical wiring quality
- Older homes may yield lower speeds
- Can be affected by large appliances on the same circuit
- Less ideal for real-time activities like competitive gaming
Best Practices for Powerline Adapters:
- Plug directly into wall outlets (not through power strips or surge protectors)
- Use adapters on the same electrical phase
- Choose Gigabit-rated models with AES encryption
Top models (2025):
- TP-Link AV1300/AV2000 (Gigabit + pass-through)
- Netgear PLP2000
- Devolo Magic 2 (High-speed + mesh-compatible)
Option 2: Use Wired Ethernet Backhaul (Gold Standard for Speed & Stability)
What is Backhaul?
In mesh systems or multi-AP setups, backhaul refers to how each node connects to the main router. A wired backhaul uses Ethernet to link nodes. It provides a dedicated, high-speed connection.
Pros:
- Full-speed performance at each node
- No Wi‑Fi spectrum used for internal communication
- Latency as low as direct router connections
- Ideal for streaming, 4K/8K media, and online gaming
Cons:
- Requires Ethernet cabling (CAT5e or CAT6 preferred)
- Installation may be complex in finished homes
- May need network switches for multiple wired endpoints
Best Practices for Wired Backhaul:
Use Quality Ethernet Cables:
- CAT5e: Good for gigabit speeds up to 100m
- CAT6: Better shielding, supports up to 10Gbps over short runs
- CAT6A/CAT7: Ideal for future-proofing
Connect to a Switch If Needed:
- If your router does not have enough Ethernet ports, then use a Gigabit switch
- Managed switches allow for VLANs and QoS
Use Wired Backhaul in Mesh Systems:
- TP-Link Deco, ASUS AiMesh, Netgear Orbi support Ethernet backhaul
- Reduces load on wireless spectrum → frees up Wi‑Fi for connected devices
Example Setup:
Router (LAN) ─────── Mesh Node 1 (via Ethernet)
└────── Mesh Node 2 (via Ethernet)
Bonus: Combine Powerline + Ethernet
In some cases, you can use a powerline adapter to extend Ethernet. And then:
- Connect a secondary router or mesh node to that adapter
- Create a hybrid backhaul setup
It is ideal for areas with no Ethernet wiring. However, they are helpful where a stable connection is needed.
Performance Comparison Table
| Backhaul Type | Speed (Theoretical) | Real-World Stability | Best Use Case |
| Wireless (5GHz) | 400–800 Mbps | Variable | Open layout, short range |
| Powerline (AV2000) | 200–600 Mbps | Moderate | Retrofit setups, no Ethernet |
| Ethernet (CAT6) | 1,000–10,000 Mbps | Rock-Solid | Performance-critical zones |
Expert Insight
“Wired backhaul is not just a performance upgrade; it is a foundational decision. If you want bulletproof Wi-Fi, then invest in cabling or hybrid setups. It pays off for years.”
— Rajkumar RR, ProDigitalWeb.com
Key Takeaways
- Powerline adapters are quick fixes for hard-to-wire rooms. However, they depend on the quality of electrical wiring.
- Ethernet backhaul is the gold standard for speed, consistency, and low latency.
- Combine methods when needed: hybrid setups offer excellent flexibility.
- Invest in CAT6 cables or use gigabit powerline kits for future-proofing.
Reduce Interference from Nearby Devices to Maximize Wi‑Fi Stability
Even with the fastest routers and best placement, your Wi-Fi signal can still suffer from instability, slow speeds, or frequent dropouts. Why? The culprit is often electromagnetic interference (EMI) caused by nearby electronic devices or environmental materials.
Wi-Fi interference is not only about other networks. It includes microwaves, Bluetooth devices, cordless phones, baby monitors, and even smart appliances. Understanding and mitigating this interference is crucial to unlocking your router’s full performance potential.
What Is Wi-Fi Interference?
Wi-Fi interference occurs when your router’s signal is disrupted by other wireless signals or EMI sources operating in the same frequency band (primarily 2.4GHz and sometimes 5GHz).
There are two main types of interference:
| Type | Description | Examples |
| Co-channel interference (CCI) | Multiple routers/devices using the same channel | Neighbor’s Wi-Fi on Channel 6 |
| Adjacent-channel interference (ACI) | Overlapping signals from nearby channels | Wi-Fi on Channels 5, 6, 7 overlapping |
Common Devices That Cause Wi-Fi Interference
| Device/Appliance | Interferes With | Reason |
| Microwaves | 2.4GHz | Emits EM radiation in the 2.4GHz band |
| Bluetooth devices | 2.4GHz | Frequency hopping across the same band |
| Cordless phones (older) | 2.4GHz | Constant signal output |
| Baby monitors | 2.4GHz | Analog models interfere with Wi-Fi signals |
| Smart TVs / Set-top boxes | Both | Emit EMI when poorly shielded |
| Wireless security cameras | 2.4GHz | Compete for limited bandwidth |
| Wireless keyboards/mice | 2.4GHz | Close proximity leads to signal overlap |
| Power supplies and chargers | All bands | Emit broad EMI cheap adapters |
| Other Wi-Fi routers | All bands | Overlapping channels in high-density areas |
Technical Explanation: Why 2.4GHz Suffers More
The 2.4GHz band is widely used due to better range and wall penetration. However, it is also:
- Limited to only 3 non-overlapping channels (1, 6, 11)
- Heavily congested in apartments, urban homes, and offices
- Shared with many legacy and IoT devices
In contrast, 5GHz (and 6GHz, if supported) offers:
- More non-overlapping channels
- Less congestion
- Shorter range (which can be an advantage in dense environments)
How to Reduce Interference and Maximize Signal Quality
- Switch to the 5GHz or 6GHz Band
- Modern dual-band or tri-band routers let you manually split bands or use band steering.
- Devices like laptops, phones, and smart TVs should prioritize 5GHz for cleaner throughput.
Tip: Rename SSIDs to identify bands (Home_2.4G and Home_5G) during setup.
- Change Wi–Fi Channel Manually
- Use tools like Wi-Fi Analyzer (Android) or NetSpot (Windows/macOS) to scan for congested channels.
- Manually assign your router to channels 1, 6, or 11 on 2.4GHz or a clean 5GHz channel (36, 40, 44, 48, etc.)
Auto channel selection often picks congested channels. Therefore, manual tuning is better.
- Move Interfering Devices Away from the Router
- Keep microwaves, cordless phones, and baby monitors at least 5–6 feet away.
- Avoid placing your router near metal objects, mirrors, or large appliances.
- Bluetooth hubs and gaming controllers should also be distanced from the router.
- Use Shielded Power Adapters and Cables
Cheap or unshielded adapters emit high EMI. Always use:
- Certified adapters from trusted brands
- Shielded Ethernet cables (CAT6 or better) to reduce crosstalk
- Schedule Heavy Network Devices at Off-Peak Times
If smart TVs, cameras, or IoT hubs constantly consume bandwidth:
- Use router QoS (Quality of Service) to prioritize real-time traffic
- Schedule firmware updates and cloud syncs during night hours
- Use DFS Channels on 5GHz (With Caution)
DFS (Dynamic Frequency Selection) channels (52–144) are less used by consumer devices.
Benefits:
- Less congestion
- Cleaner signal
Risks:
- Interference from radar/weather services may force a channel shift
- Not all client devices support DFS
Use DFS if your router and clients support it. However, monitor for connection drops.
- Physically Isolate Your Network (Multi-Router or VLAN)
Advanced users can reduce interference and congestion by:
- Splitting devices across two routers (main + IoT)
- Using separate SSIDs for high- and low-priority devices
- Creating VLANs to segment device traffic
Tools to Detect and Diagnose Interference
| Tool | Platform | Features |
| NetSpot | Windows/macOS | Wi-Fi heatmap, signal strength, channel usage |
| Wi-Fi Analyzer (VREM) | Android | Channel congestion visualization |
| AirPort Utility | iOS | Wi‑Fi scan for Apple users |
| Acrylic Wi-Fi Home | Windows | Advanced signal diagnostics |
| Wireshark | All | Packet-level inspection for advanced users |
Expert Insight
“Wi-Fi is not just about speed, it’s about signal quality. Identifying interference sources and eliminating them is like removing static from a radio. Only then does performance shine.”
— Rajkumar RR, ProDigitalWeb.com
Key Takeaways
- 2.4GHz is highly susceptible to interference from household devices.
- Switching to 5GHz/6GHz and manually tuning channels improves signal clarity.
- Move your router and wireless devices away from EMI sources.
- Use shielded cables, QoS, and VLANs to reduce cross-device impact.
- Diagnostic tools are essential for tracking and troubleshooting interference zones.
Upgrade to a Modern Wi-Fi Standard (Wi-Fi 6, 6E, and Wi-Fi 7)
Still using a router from five years ago? It might be holding you back. Upgrading to the latest Wi-Fi generation, like Wi-Fi 6, Wi-Fi 6E, or the new Wi-Fi 7, can unlock huge gains in speed, capacity, security, and latency.
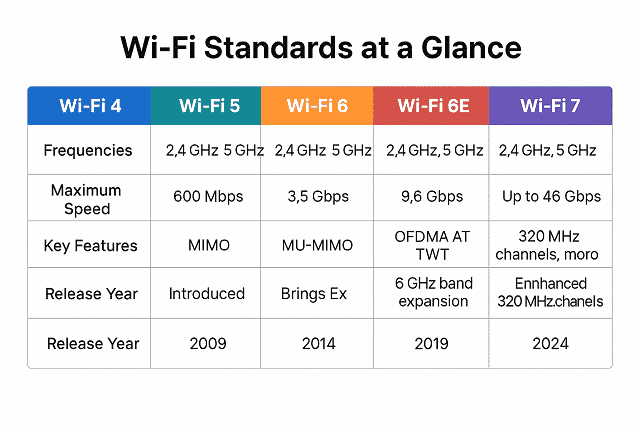
With more devices competing for bandwidth than ever, smartphones, laptops, IoT devices, smart TVs, game consoles, and legacy routers (Wi-Fi 4 and Wi-Fi 5) simply can not keep up. The result? Congestion, lag, and signal drops.
Understanding the Wi-Fi Generations
| Standard | Technical Name | Max Speed (Theoretical) | Frequency Bands | Year Introduced |
| Wi-Fi 4 | 802.11n | ~600 Mbps | 2.4GHz + 5GHz | 2009 |
| Wi-Fi 5 | 802.11ac | ~3.5 Gbps (Wave 2) | 5GHz | 2014 |
| Wi-Fi 6 | 802.11ax | ~9.6 Gbps | 2.4GHz + 5GHz | 2019 |
| Wi-Fi 6E | 802.11ax (6GHz) | ~9.6 Gbps | 6GHz (New Band) | 2021 |
| Wi-Fi 7 | 802.11be | 46 Gbps+ | 2.4GHz + 5GHz + 6GHz | 2024–2025 |
Benefits of Upgrading to Wi‑Fi 6/6E/7
- Higher Speeds
- Wi-Fi 6 supports up to 9.6 Gbps (more than double Wi-Fi 5)
- Wi-Fi 7 is 5× faster than Wi-Fi 6 on paper
- Improved Performance in Crowded Networks
- Uses OFDMA (Orthogonal Frequency-Division Multiple Access) to divide channels into subcarriers. Therefore, each device gets a dedicated lane
- Handles dozens of simultaneous device connections efficiently
- Lower Latency
- Ideal for gaming, 4K/8K streaming, VR/AR, and remote work
- Target Wake Time (TWT) reduces congestion and improves battery life on devices
- Better Coverage
- Wi-Fi 6 uses BSS coloring to reduce interference from neighboring networks
- Wi-Fi 6E & 7 introduce 6GHz. It is a clean, wide band free from legacy congestion
- Enhanced Security
- All new standards support WPA3. It is much stronger than WPA2
- Improved encryption and protections for open networks
Why Wi-Fi 6E & Wi-Fi 7 Are Game-Changers
Wi-Fi 6E:
- Unlocks the 6GHz band (not used by older Wi-Fi devices)
- 7 additional 160MHz channels (ultra-wide)
- Eliminates co-channel and adjacent-channel interference
- Ideal for dense smart homes and future-proofing
Wi-Fi 7 (2024+):
- Introduces Multi-Link Operation (MLO)—simultaneous multi-band connections
- 320MHz-wide channels = double the data capacity
- 4K QAM modulation = 20–30% throughput gain
- Perfect for real-time 8K video, AR/VR, and multi-gigabit internet
Note: Device and ISP support for Wi-Fi 7 is rolling out in 2025.
How to Upgrade to the Latest Wi-Fi Standard
- Replace Your Router
Look for routers labeled:
- “Wi-Fi 6” or “AX” (AX3000, AX6000)
- “Wi-Fi 6E” or “Tri-band 6GHz”
- “Wi-Fi 7” or “BE” (BE900)
Top Models (2025):
- Wi-Fi 6: ASUS RT-AX86U, TP-Link Archer AX55
- Wi-Fi 6E: ASUS ROG Rapture GT-AXE16000, Netgear Nighthawk RAXE500
- Wi-Fi 7: TP-Link BE900, ASUS RT-BE96U (early adopters)
- Upgrade Devices
Make sure your:
- Phones (Galaxy S21+, iPhone 15+)
- Laptops (Wi-Fi 6E cards or Intel BE200 for Wi-Fi 7)
- Smart TVs, consoles, and smart hubs support the new standards
Older devices can still connect to newer routers. However, they won’t get the speed/latency benefits unless they are compatible.
Backward Compatibility
All modern Wi-Fi routers are backward compatible:
- A Wi-Fi 6 router supports Wi-Fi 5, 4, and even 802.11a/b/g devices
- You can upgrade your router first and gradually replace devices
Bonus: Future-Proofing Tips
- Choose routers with multi-gig WAN/LAN ports (2.5G or 10G) to support upcoming internet plans.
- Invest in mesh systems that support Ethernet backhaul and firmware upgradability.
- Ensure your new router has band steering, WPA3, and DFS support
Expert Insight
“Wi-Fi 6E and Wi-Fi 7 are not only meant for faster downloads, they are about handling tomorrow’s smart homes, real-time media, and immersive apps without breaking a sweat.”
— Rajkumar RR, ProDigitalWeb.com
Key Takeaways
- Wi-Fi 6 is the current sweet spot—fast, efficient, and affordable
- Wi-Fi 6E adds a clean, interference-free 6GHz band. It is ideal for future devices
- Wi-Fi 7 delivers next-gen speeds, ultra-low latency, and unmatched capacity
- Upgrading your router is one of the easiest ways to future-proof your entire digital ecosystem
Use Quality-of-Service (QoS) to Prioritize Critical Traffic
Wi‑Fi bandwidth is a shared resource. When multiple devices compete for limited bandwidth, video calls, 4K streaming, or online gaming can lead to latency, jitter, and buffering. Those can cripple your experience.
That is where Quality of Service (QoS) comes in. QoS lets you assign network priority to specific apps, devices, or services so that critical traffic gets the bandwidth it needs, even during peak usage.
What Is QoS?
Quality of Service is a traffic management feature built into many modern routers. It allows you to:
- Prioritize latency-sensitive traffic (video conferencing, gaming)
- Deprioritize background tasks (software updates, cloud backups)
- Allocate bandwidth to key devices (work laptop, gaming console)
Types of QoS and How They Work
| QoS Type | Description | Use Case |
| Device-Based QoS | Prioritize traffic to/from specific MAC/IP addresses | Give priority to a work laptop or console |
| Application-Based QoS | Classify traffic by service or port (VoIP, Netflix, Zoom) | Ensure smooth video calls or streaming |
| Dynamic/Adaptive QoS | Automatically detects and prioritizes in real time | Great for mixed-use households |
| Port-Based QoS (Advanced) | Used in enterprise setups (VLANs, switches) | Ideal for pros with managed networks |
Benefits of QoS
- Reduced lag in multiplayer games
- Fewer call drops and frozen screens in Zoom/Teams
- Smooth streaming on Netflix, YouTube, and Disney+
- Stable uploads/downloads even during heavy usage
- Better experience for remote workers and digital classrooms
How to Set Up QoS on Your Router
Step 1: Log in to Your Router Admin Panel
- Common IPs: 192.168.0.1, 192.168.1.1
- Use the admin credentials (usually printed on the router)
Step 2: Locate QoS Settings
- Typically under:
- Advanced > QoS or Traffic Management > QoS Settings
Step 3: Enable QoS and Choose Your Method
- Some routers offer:
- Basic/Standard QoS
- Smart QoS or Adaptive QoS (ASUS, Netgear)
- Manual rules (upload/download limits, port priorities)
Step 4: Set Priorities
- Add your work laptop, gaming console, or smart TV
- Assign high, medium, or low priority
- Some routers allow drag-and-drop or device naming
Optional: Enable Bandwidth Tester to let the router auto-detect your connection speed (important for accurate QoS allocation)
Router Brands with Strong QoS Support
| Brand | Feature Name | Highlights |
| ASUS | Adaptive QoS | Activity-based (gaming, streaming, work) |
| Netgear | Dynamic QoS | Prioritizes real-time apps automatically |
| TP-Link | Standard QoS/HomeCare | Easy device-based rules |
| Ubiquiti | Traffic Shaping | Granular rules via UniFi Controller |
| Linksys | Device Prioritization | Simple drag-and-drop QoS UI |
Real-World Examples
Online Class vs Netflix
Your child’s Zoom class stutters when someone streams 4K YouTube in the living room.
QoS can:
- Assign high priority to Zoom and Google Meet
- Assign medium priority to video streaming
- Assign low priority to file downloads and smart home traffic
Gaming vs Backup
You are gaming on PS5 while your PC starts syncing 50GB to the cloud.
Without QoS: lag spikes.
With QoS:
- PS5 = High priority
- Cloud apps = Low priority
Expert Insight
“QoS is the digital traffic cop of your home network. When configured right, it ensures the data that matters gets the green light—every time.”
— Rajkumar RR, ProDigitalWeb.com
Key Takeaways
- QoS helps you prioritize essential traffic. It helps you to avoid lag, buffering, and latency.
- Most modern routers offer device-based and app-based QoS settings.
- Set QoS rules for gaming, conferencing, streaming, and work. QoS rules improve the overall experience.
- Some routers support auto-QoS that adapts in real-time.
- Combine QoS with modern standards (Wi‑Fi 6/7) and smart placement for ultimate performance.
Use Wi‑Fi Analytics Tools to Monitor Performance
Optimizing your Wi‑Fi network is not a one-and-done task. Even after upgrades and configurations, performance can fluctuate due to:
- Signal interference
- Network congestion
- Firmware bugs
- Misconfigured channels or device overload
To keep your wireless network running at peak performance, you need real-time monitoring and analytics. Fortunately, There are powerful free and professional tools available. Both of them are free and professional tools. Those tools can analyze signal strength, coverage, interference, channel usage, and connected devices.
Why Monitor Your Wi-Fi?
- Identify dead zones and weak signal areas
- Detect channel overlap and interference from neighbors
- Analyze bandwidth usage per device
- Track ping spikes, latency, and jitter
- Detect unauthorized connections
- Fine-tune the placement of routers, mesh nodes, and APs
Best Wi-Fi Analytics Tools for Home and Pro Users
-
NetSpot (Windows/macOS)
A leading tool for visual heatmaps and in-depth analysis
Key Features:
- Wi-Fi signal heatmap across your floor plan
- Channel interference analysis
- Live signal-to-noise ratio (SNR) metrics
- Supports 2.4GHz, 5GHz, and 6GHz (Wi‑Fi 6E)
Use Case: Optimize router/node placement and detect channel saturation
-
Wi-Fi Analyzer by VREM (Android)
Popular and free tool for quick on-the-go network checks
Key Features:
- Shows SSID signal strength in real time
- Visual graph of channel usage
- Signal quality alerts
- Channel recommendation engine
Use Case: Manual channel tuning and basic diagnostics
-
AirPort Utility + Wi‑Fi Scanner (iOS)
Hidden gem for iPhone users with detailed signal metrics
Key Features:
- Scan for SSIDs and measure RSSI (signal strength)
- Shows BSSID, noise levels, and channel usage
- Apple-optimized, simple UI
Use Case: Quick signal audits on iPhone/iPad
-
Acrylic Wi-Fi Home/Pro (Windows)
Professional-grade diagnostics for advanced users
Key Features:
- View SSID, BSSID, signal quality, and security protocols
- Detect beacon intervals, hidden networks
- Identify network intrusions and signal drops
- Logs signal fluctuation over time
Use Case: Enterprise-level analysis at home or in office networks
-
UniFi Network Controller (for Ubiquiti users)
Advanced dashboard for users with Ubiquiti APs or mesh systems
Key Features:
- Real-time throughput, latency, and client stats
- VLAN and traffic segmentation
- Alerts for AP overload or interference
- Smart auto-channel configuration
Use Case: Scalable network monitoring with granular control
Metrics You Should Monitor
| Metric | What It Tells You | Ideal Range |
| RSSI (Signal Strength) | Strength of signal from AP to client | -30 to -67 dBm (good), lower is better |
| SNR (Signal-to-Noise) | Signal clarity vs background noise | 25 dB+ (good), 40 dB+ (excellent) |
| Channel Utilization | Bandwidth usage on a frequency | Below 50% for smooth performance |
| Jitter | Variance in packet delay (bad for VoIP) | <30ms preferred |
| Ping/Latency | Response time between the device and the server | <50ms (ideal for gaming/streaming) |
| Client Load | Number of devices connected to a band/AP | 15 or fewer per band recommended |
How to Use These Tools Effectively
Step-by-Step for Home Optimization
- Walk around with the analyzer app or laptop
- Identify low-signal or no-coverage zones
- Review channel overlap
- Switch channels based on visual usage charts
- Check device load per band
- Use the router dashboard or controller software
- Scan for unauthorized users
- Block them via a MAC filter or change the WPA3 password
- Reposition routers/APs accordingly
- Adjust based on the heatmap or drop zones
- Retest after adjustments
- Repeat scans to validate improvements
Bonus: Monitor for Security Breaches
- Set up alerts for new device connections
- Watch for unusual bandwidth spikes (malware?)
- Use analytics tools to track unknown MAC addresses
Combine this with WPA3 security and guest networks (as discussed in Section 6) for full protection.
Expert Insight
“You cannot optimize what you do not measure. Wi-Fi analytics turns guesswork into data-driven decisions—essential for getting every last Mbps out of your setup.”
— Rajkumar RR, ProDigitalWeb.com
Key Takeaways
- Use tools like NetSpot, WiFi Analyzer, or Acrylic Wi-Fi to evaluate network health.
- Look for interference, poor SNR, weak signals, and device congestion
- Adjust placement, channel, and QoS based on hard data
- Regular Wi‑Fi health checks keep your network fast, secure, and reliable
Troubleshoot Common Signal Issues with Diagnostic Logs
Even with modern routers, mesh systems, and analytics tools, Wi‑Fi issues can still crop up. The issues may be such as random drops, high ping, slow downloads, or inconsistent speeds in specific rooms.
This is where diagnostic logs and built-in system tools become invaluable. They provide raw insights into the router’s performance, system errors, and connectivity problems. Those are helping you move from symptoms to root causes.
Why Use Diagnostic Logs?
Heatmaps and signal graphs show where issues occur. Diagnostic logs tell you why. With access to:
- System boot logs
- DHCP errors
- Authentication failures
- Channel switch history
- AP handoffs (in mesh networks)
- Signal strength per client device
Using that data, you can uncover hidden problems that visual tools may miss.
Common Wi‑Fi Issues You Can Troubleshoot via Logs
| Issue | Possible Causes | Diagnostic Clue |
| Frequent Disconnects | DHCP lease errors, interference | DHCP fail logs, RSSI drops, AP handoff |
| High Latency / Ping Spikes | Overloaded AP, excessive retransmissions | ICMP logs, retry/failure rates |
| Dead Zones | Signal attenuation, poor placement | Low RSSI per MAC in client log |
| Slow Speeds in One Room | Weak backhaul, band steering issue | Channel load logs, backhaul error logs |
| Devices can’t connect | Wrong security settings, MAC filtering | WPA3 handshake fail, blacklist events |
| Roaming Not Working | Mesh node handoff or sticky clients | Roaming event logs, node status |
Where to Find and How to Read Diagnostic Logs
-
Router Web Interface (Admin Panel)
Most routers have logs under:
Advanced > System Tools > System Log
or
Status > Logs > Wireless Logs
Look for tabs like:
- Wireless Log
- DHCP Log
- Security Log
- Event Log
- Client Info or Statistics
Pro tip: Download logs regularly if your router auto-clears them after reboot.
Key Fields in Logs to Understand
| Log Entry / Term | What It Means |
| RSSI = -82 dBm | Low signal strength from the client |
| AP roaming event | Device switched to another node/band |
| DHCP NAK or Lease Expired | IP not assigned → disconnection |
| WPA2 handshake timeout | Security key mismatch or interference |
| Beacon Loss | The router momentarily disappeared (drop zone) |
| TX retries = high | Packet loss or poor link quality |
| STA disassoc or deauth | Device disconnected—can be manual or an error |
| Backhaul down | Mesh inter-node link issue |
-
Command-Line Tools (For Advanced Users)
For Windows/macOS/Linux:
- ping → Latency testing
- tracert / traceroute → Path analysis
- netsh wlan show interfaces (Windows) → RSSI, signal rate
- iwconfig / iwlist (Linux) → Wi‑Fi signal info
- nslookup or dig → DNS response issues
-
3rd-Party Firmware Logs (Advanced Routers)
If you are using firmware like OpenWRT, DD-WRT, or Asuswrt-Merlin then logs go deeper:
- syslog: Full event logging
- dmesg: Kernel-level error messages
- hostapd.log: AP client activity and errors,
- dnsmasq.log: DHCP and DNS cache behavior
SSH access is required for log inspection on these systems.
-
Vendor-Specific Diagnostic Tools
| Brand | Diagnostic Tool or Feature | What It Offers |
| ASUS | System Log + Wireless Log | Channel switches, roaming, and interference |
| TP-Link | Advanced Logs + Client List | Real-time RSSI and client activity |
| Netgear | Nighthawk App → Wi‑Fi Analytics | Ping, channel quality, device priority |
| Ubiquiti | UniFi Controller Logs | Alerts, AP down, handoffs, rogue SSIDs |
Tips for Effective Troubleshooting
- Correlate symptoms with time-stamped logs
- If Zoom drops at 3:15 PM, look for events around that time
- Check client device logs too
- Phones, laptops, and smart TVs often show error messages or network stats
- Use logs to verify changes
- Did changing the channel or relocating the AP help? Logs will show fewer retries, lower latency, or better signal quality.
- Export logs when contacting support
- Most ISPs or router manufacturers will ask for system logs when handling support tickets.
Expert Insight
“Tools tell you what is happening. Logs tell you why. Reading router logs is the difference between guessing and diagnosing. That is how you solve the toughest Wi-Fi problems.”
— Rajkumar RR, ProDigitalWeb.com
Key Takeaways
- Diagnostic logs help you uncover the real causes of speed drops, disconnections, and instability.
- Learn to interpret RSSI, DHCP, WPA errors, and AP handoff events
- Use tools like ping, netsh, and vendor apps for fast analysis
- Regular log reviews can prevent outages and optimize network health
- Export logs for ISP/router support if needed
Final Thoughts + Maintenance Checklist
Boosting your Wi-Fi signal strength is not a one-time fix. It is a strategic combination of hardware upgrades, smart placement, spectrum management, and continuous monitoring.
If you live in a compact apartment or a multi-story smart home, these optimization strategies, when implemented correctly, can dramatically improve coverage, speed, and reliability. The focus is to understand your environment, leverage modern standards (Wi‑Fi 6/6E/7). In addition, you stay proactive with diagnostics and maintenance.
Recap: What You Have Learned
Let’s quickly revisit the core strategies covered in this guide:
- Choose the Ideal Router Location – Central, elevated, unobstructed placement.
- Upgrade Your Router Hardware – Wi‑Fi 6/6E/7 routers unlock next-gen performance.
- Adjust Antennas & Orientation – Proper angle improves vertical and horizontal coverage.
- Optimize Frequency Bands & Channels – Separate 2.4GHz/5GHz devices, avoid interference.
- Limit Bandwidth-Hogging Applications – Use QoS to prioritize traffic.
- Use Strong Security Protocols – WPA3, guest networks, and MAC filtering.
- Extend with Mesh or APs – Scalable coverage across large homes.
- Use Powerline or Ethernet Backhaul – Ensure strong inter-node performance.
- Reduce Device Interference – Avoid microwaves, Bluetooth, and overlapping signals.
- Upgrade to Modern Wi‑Fi Standards – Leverage higher speed and efficiency.
- Enable QoS for Critical Traffic – Ensure work and gaming stay lag-free.
- Monitor with Analytics Tools – Use heatmaps, scanners, and signal monitors.
- Analyze Logs to Solve Problems – Deep dive into disconnects and signal issues.
Your Wi‑Fi Maintenance Checklist (Monthly/Quarterly)
| Task | Frequency | Tools or Notes |
| Reboot your router | Weekly or bi-weekly | Clears memory, improves performance |
| Check for firmware updates | Monthly | Via router web UI or mobile app |
| Scan for channel interference | Monthly | NetSpot, WiFi Analyzer, UniFi Controller |
| Review device bandwidth usage | Monthly | Router dashboard or QoS tools |
| Audit connected devices | Monthly | Remove unknown devices, update passwords |
| Test coverage in key rooms | Quarterly | Heatmap tool or signal strength app |
| Inspect diagnostic logs | Quarterly | Look for DHCP errors, handshake failures |
| Clean the router physically | Quarterly | Dust build-up can reduce airflow & heat dissipation |
| Evaluate router/AP placement | Bi-annually | Especially after renovations or moves |
| Review Wi-Fi needs | Annually | New devices? Time to upgrade router? |
Expert Closing Insight
“A stable and fast Wi Fi network is no longer optional—it is the backbone of everything from work and learning to entertainment and smart automation. The good news? You do not need to be a network engineer to master it. You just stay informed, monitor regularly, and upgrade strategically.”
— Rajkumar RR, ProDigitalWeb.com
Call to Action
Have you tried some of these Wi-Fi optimization strategies?
Are you using Wi-Fi 6E or still holding on to that trusty old N-router?
Drop your setup in the comments below, let us compare real-world results and tips!
And do not forget to share this guide with a friend or family member who is still stuck with buffering videos and signal dropouts.